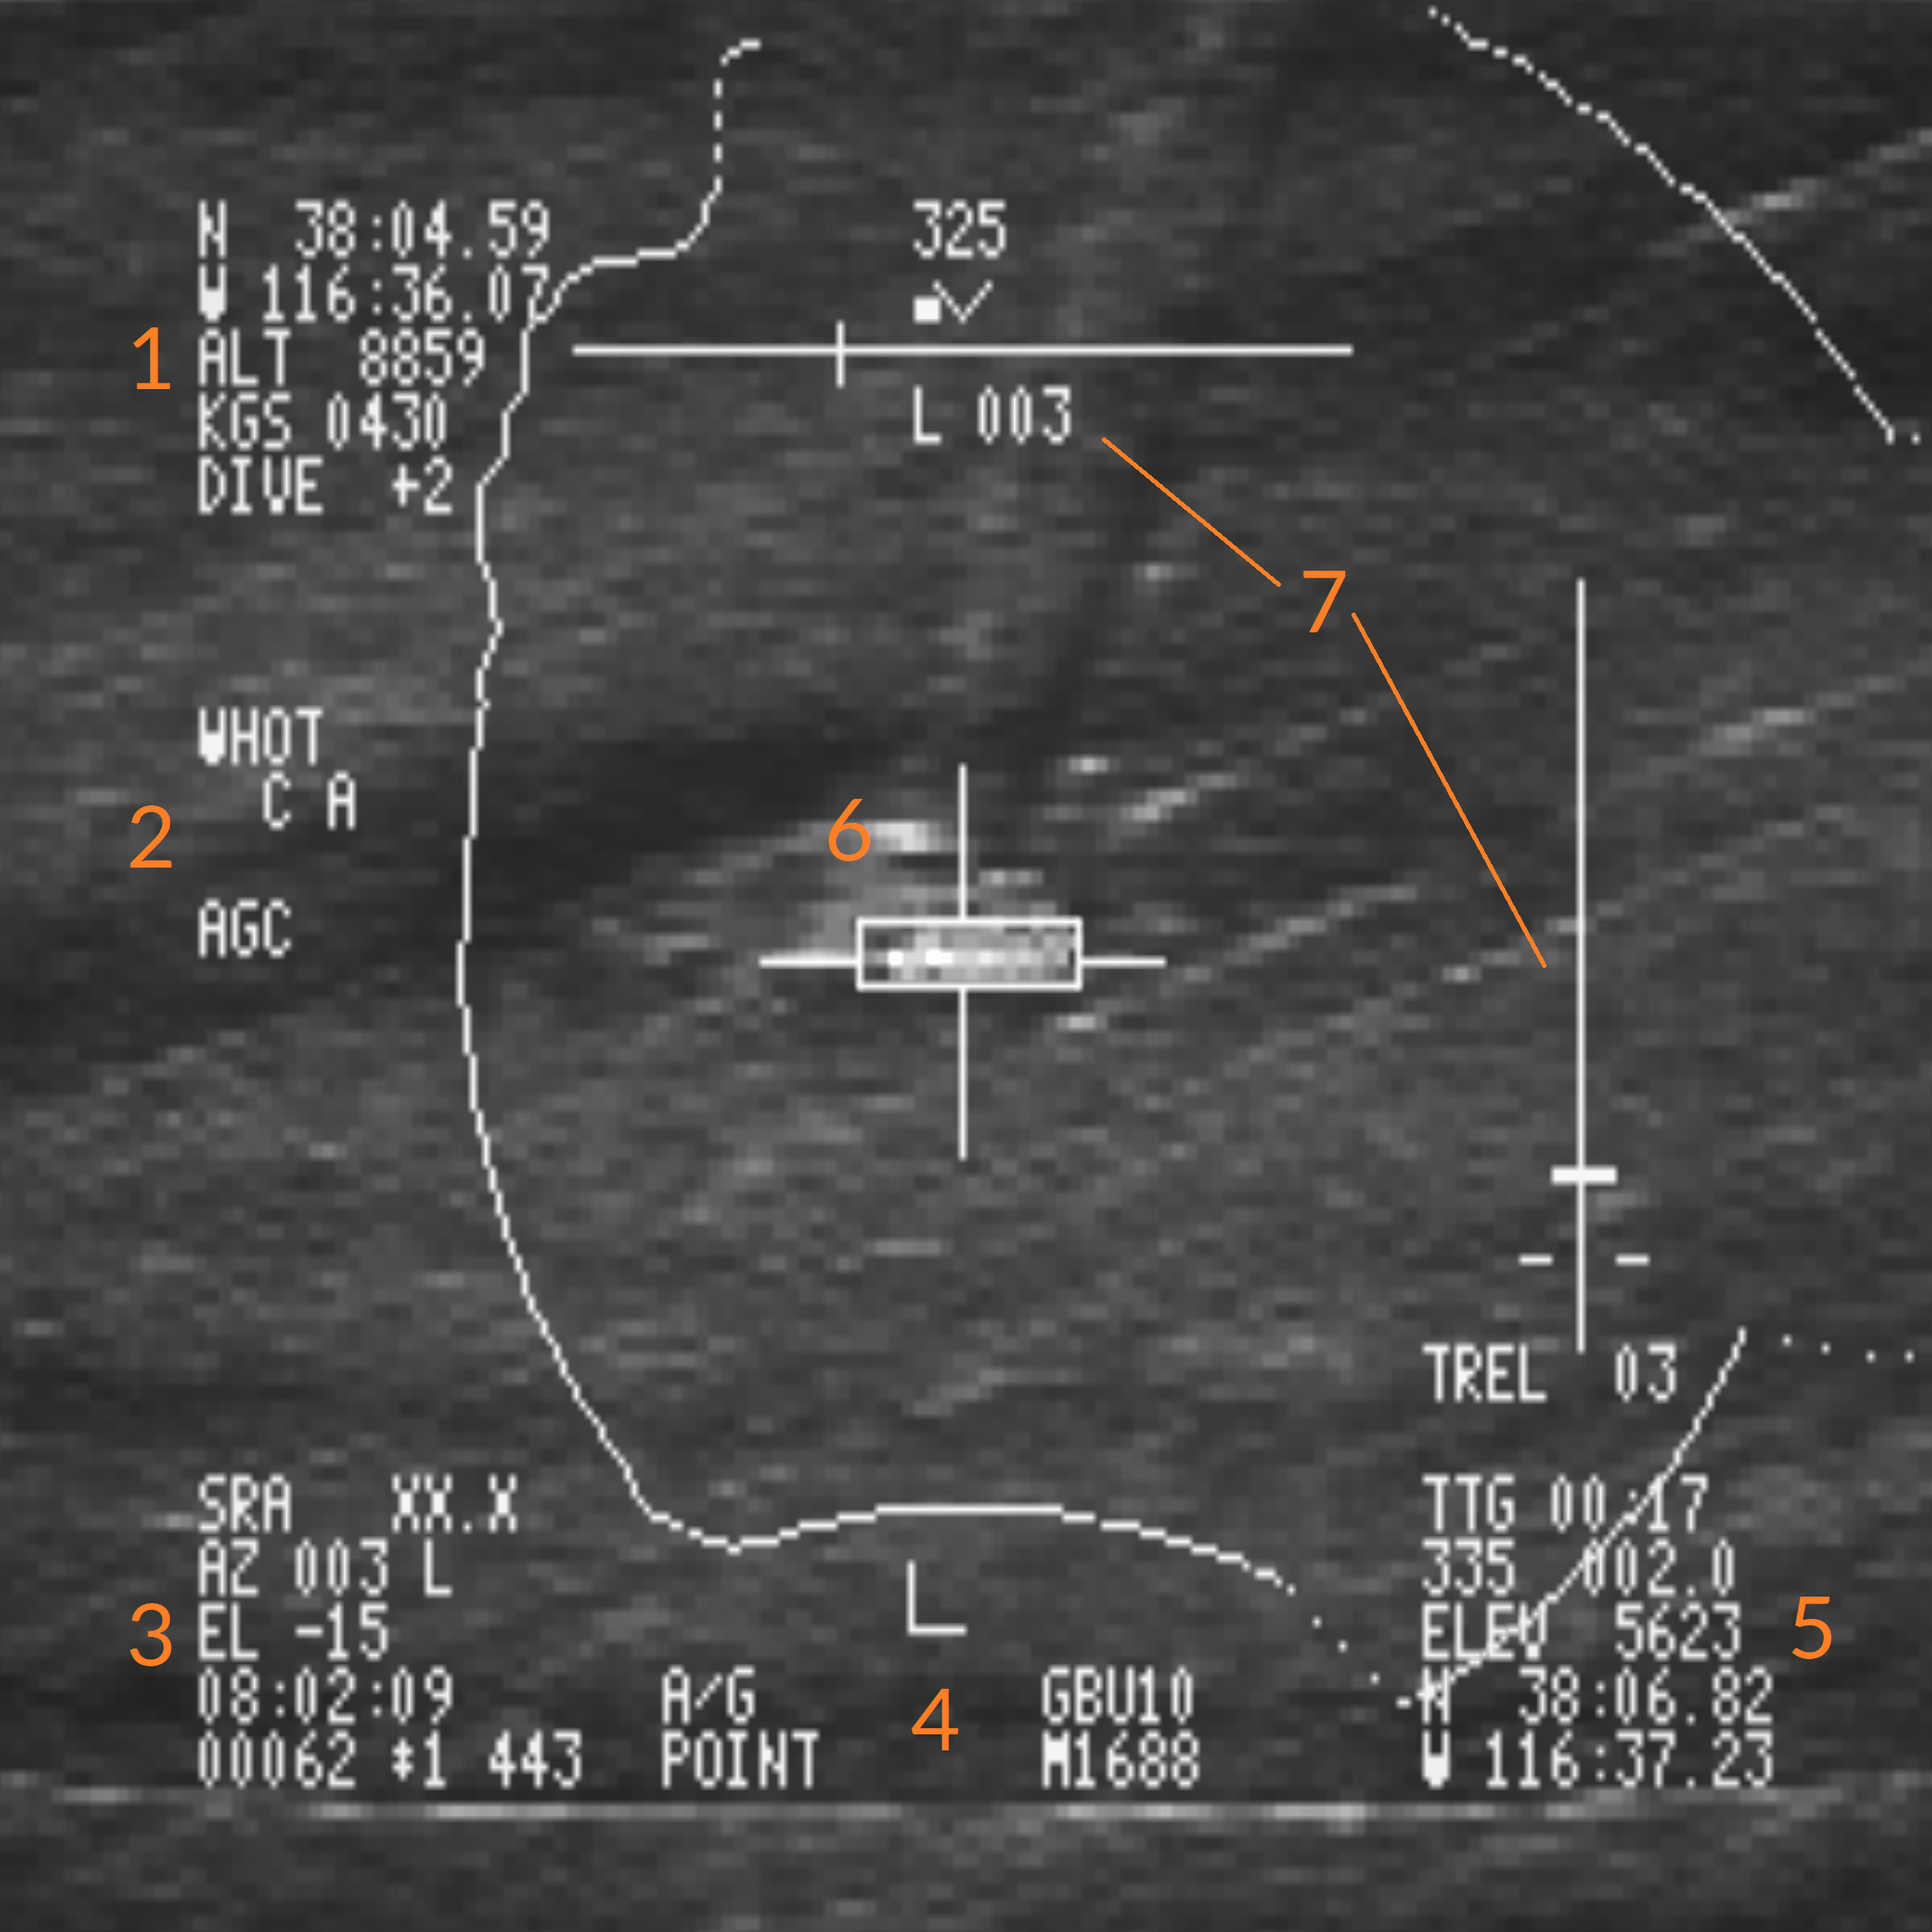
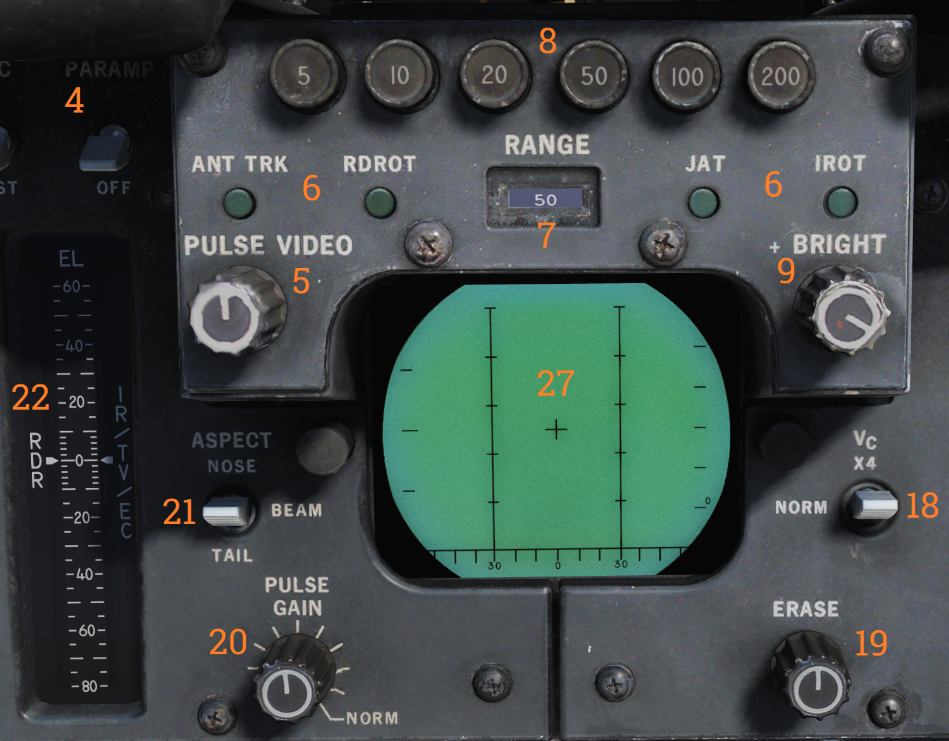
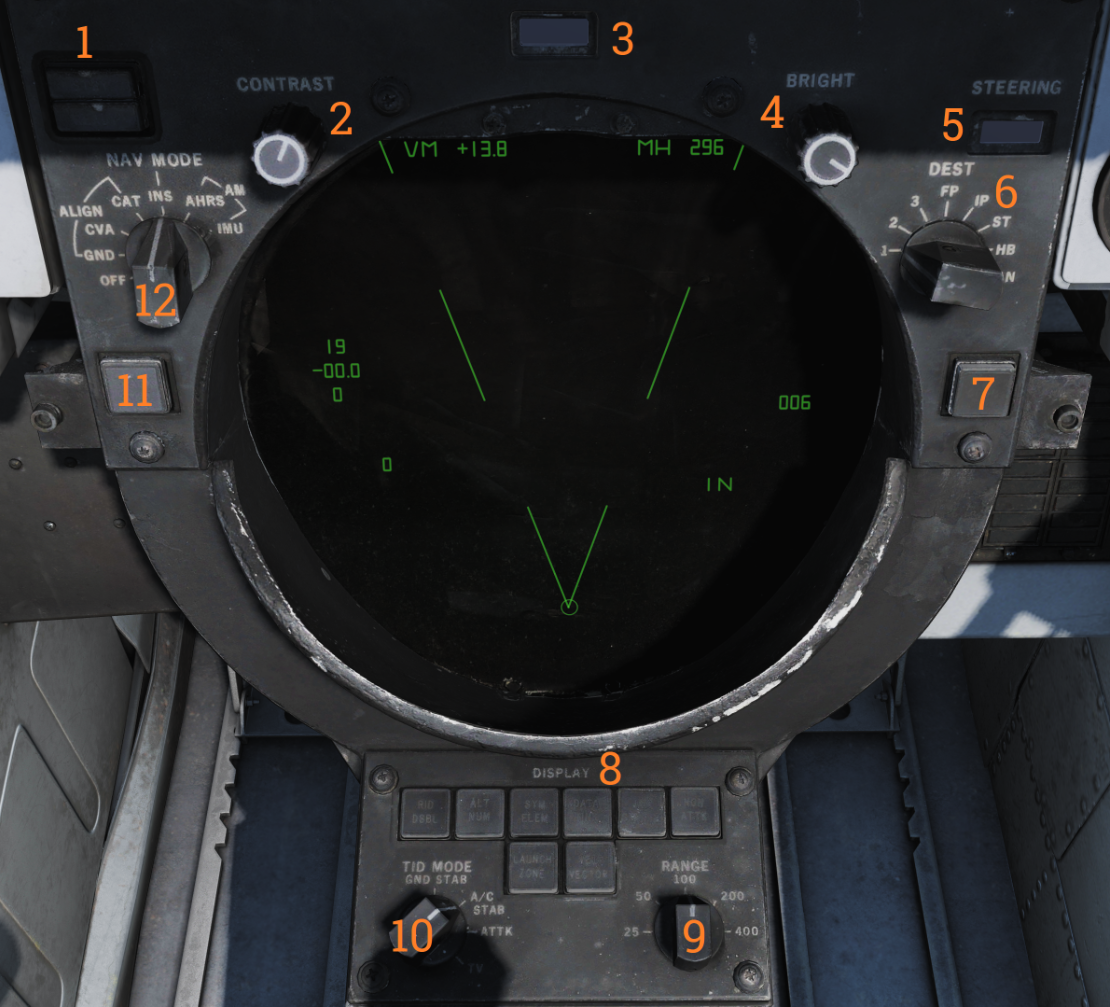
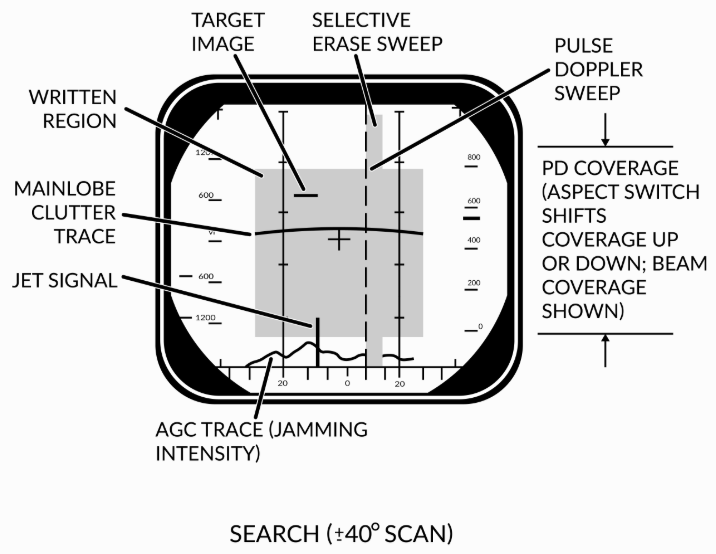
Difference between revisions of "F-14A/B"
(→Pulse-Doppler STT Mode) |
(→AIM-7 Sparrow) |
||
| (89 intermediate revisions by 4 users not shown) | |||
| Line 15: | Line 15: | ||
}} | }} | ||
| − | '' | + | <div class="alert alert-info" role="alert"> |
| + | '''NOTE:''' This guide is currently being reworked. A lot of infromation might still be inaccurate. Please direct feedback and ideas to Del3te-O#0678 or #wiki-discussions on Discord. | ||
| + | |||
| + | This page is focused on the DCS World F-14A/B Tomcat module, which is still in Early Access. Some information may be missing. | ||
| + | </div> | ||
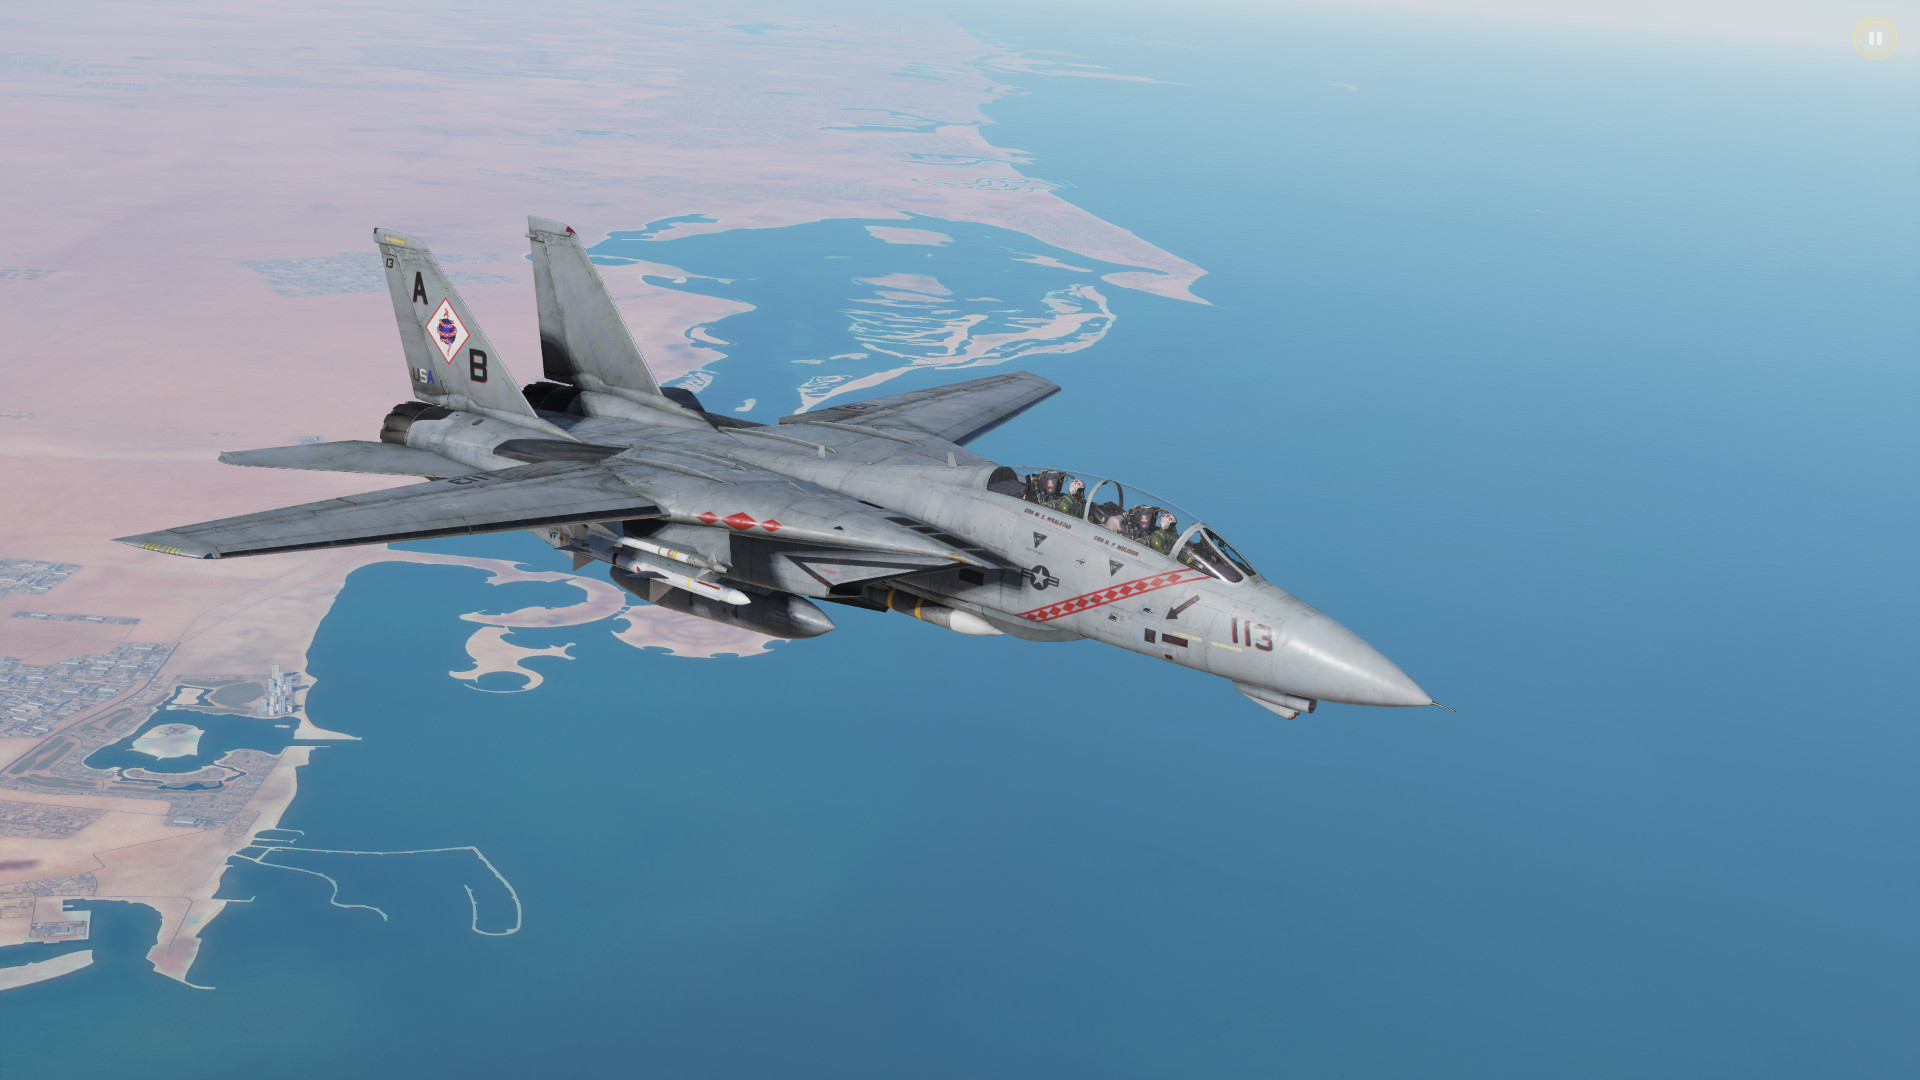
The Grumman '''F-14A/B''' Tomcat is a two-seat, twin-engine supersonic variable wing-sweep fighter aircraft. The F-14 was the first US fighter jet with twin tails and was the largest & heaviest US fighter to ever fly from an aircraft carrier. The reason that the F-14 was so incredibly large and heavy was that it carried the large AWG-9 radar and accompanying AIM-54 Phoenix (air-to-air) missiles: this very capable combination allowed the F-14 to make shots of up to 200 nautical miles at the bad guys. Also, being big means you can carry a lot of fuel! | The Grumman '''F-14A/B''' Tomcat is a two-seat, twin-engine supersonic variable wing-sweep fighter aircraft. The F-14 was the first US fighter jet with twin tails and was the largest & heaviest US fighter to ever fly from an aircraft carrier. The reason that the F-14 was so incredibly large and heavy was that it carried the large AWG-9 radar and accompanying AIM-54 Phoenix (air-to-air) missiles: this very capable combination allowed the F-14 to make shots of up to 200 nautical miles at the bad guys. Also, being big means you can carry a lot of fuel! | ||
| Line 21: | Line 25: | ||
Of course, the practical range of the AWG-9 is rather more limited, especially if you are shooting at more maneuverable fighter-sized targets, but even at these closer ranges, the AIM-54 Phoenix is still a capable missile that should not be underestimated. The F-14 is also capable of carrying an array of air-to-ground weapons, such as dumb bombs in both high and low drag forms, air-to-ground Zuni rockets and even laser-guided bombs, which can be self-designated using the LANTIRN targeting pod on the F-14. | Of course, the practical range of the AWG-9 is rather more limited, especially if you are shooting at more maneuverable fighter-sized targets, but even at these closer ranges, the AIM-54 Phoenix is still a capable missile that should not be underestimated. The F-14 is also capable of carrying an array of air-to-ground weapons, such as dumb bombs in both high and low drag forms, air-to-ground Zuni rockets and even laser-guided bombs, which can be self-designated using the LANTIRN targeting pod on the F-14. | ||
| − | Most people will recognize and adore the F-14 because of its stardom presence in that one weird volleyball movie from the '80s. Its on-screen presence in movies will make the F-14 to appear docile and easy to fly, but due to lack of a fly-by-wire the F-14 can be a real handful: it being a pilot's aircraft however makes it fun to fly and learn. The analogous nature of the F-14 (comparable to the F-5E II Tigershark) will give you a good knowledge of the airplane over time but requires a bit of a different mindset that the computerized flight of the F/A-18C and the F-15. | + | Most people will recognize and adore the F-14 because of [https://en.wikipedia.org/wiki/Top_Gun its stardom presence in that one weird volleyball movie from the '80s ]. Its on-screen presence in movies will make the F-14 to appear docile and easy to fly, but due to lack of a fly-by-wire the F-14 can be a real handful: it being a pilot's aircraft however makes it fun to fly and learn. The analogous nature of the F-14 (comparable to the F-5E II Tigershark) will give you a good knowledge of the airplane over time but requires a bit of a different mindset that the computerized flight of the F/A-18C and the F-15. |
__TOC__ | __TOC__ | ||
| Line 28: | Line 32: | ||
---- | ---- | ||
==Implemented== | ==Implemented== | ||
| − | Partially or fully implemented weapons of the | + | Partially or fully implemented weapons of the F-14 A/B Tomcat: |
* M61 Vulcan Six-Barreled Gatling Gun | * M61 Vulcan Six-Barreled Gatling Gun | ||
| − | * AIM- | + | * AIM-7 F/M Sparrow |
| − | * CAP/AIM- | + | * CAP-9M |
| − | * AIM-54A | + | * AIM-9 L/M Sidewinder |
| − | * AIM-54C | + | * AIM-54A Mk.47 |
| + | * AIM-54A Mk.60 | ||
| + | * AIM-54C Mk.47 | ||
* Mk-81, 82, 83, and 84 | * Mk-81, 82, 83, and 84 | ||
* GBU-10, 12, 16, and 24 | * GBU-10, 12, 16, and 24 | ||
| Line 57: | Line 63: | ||
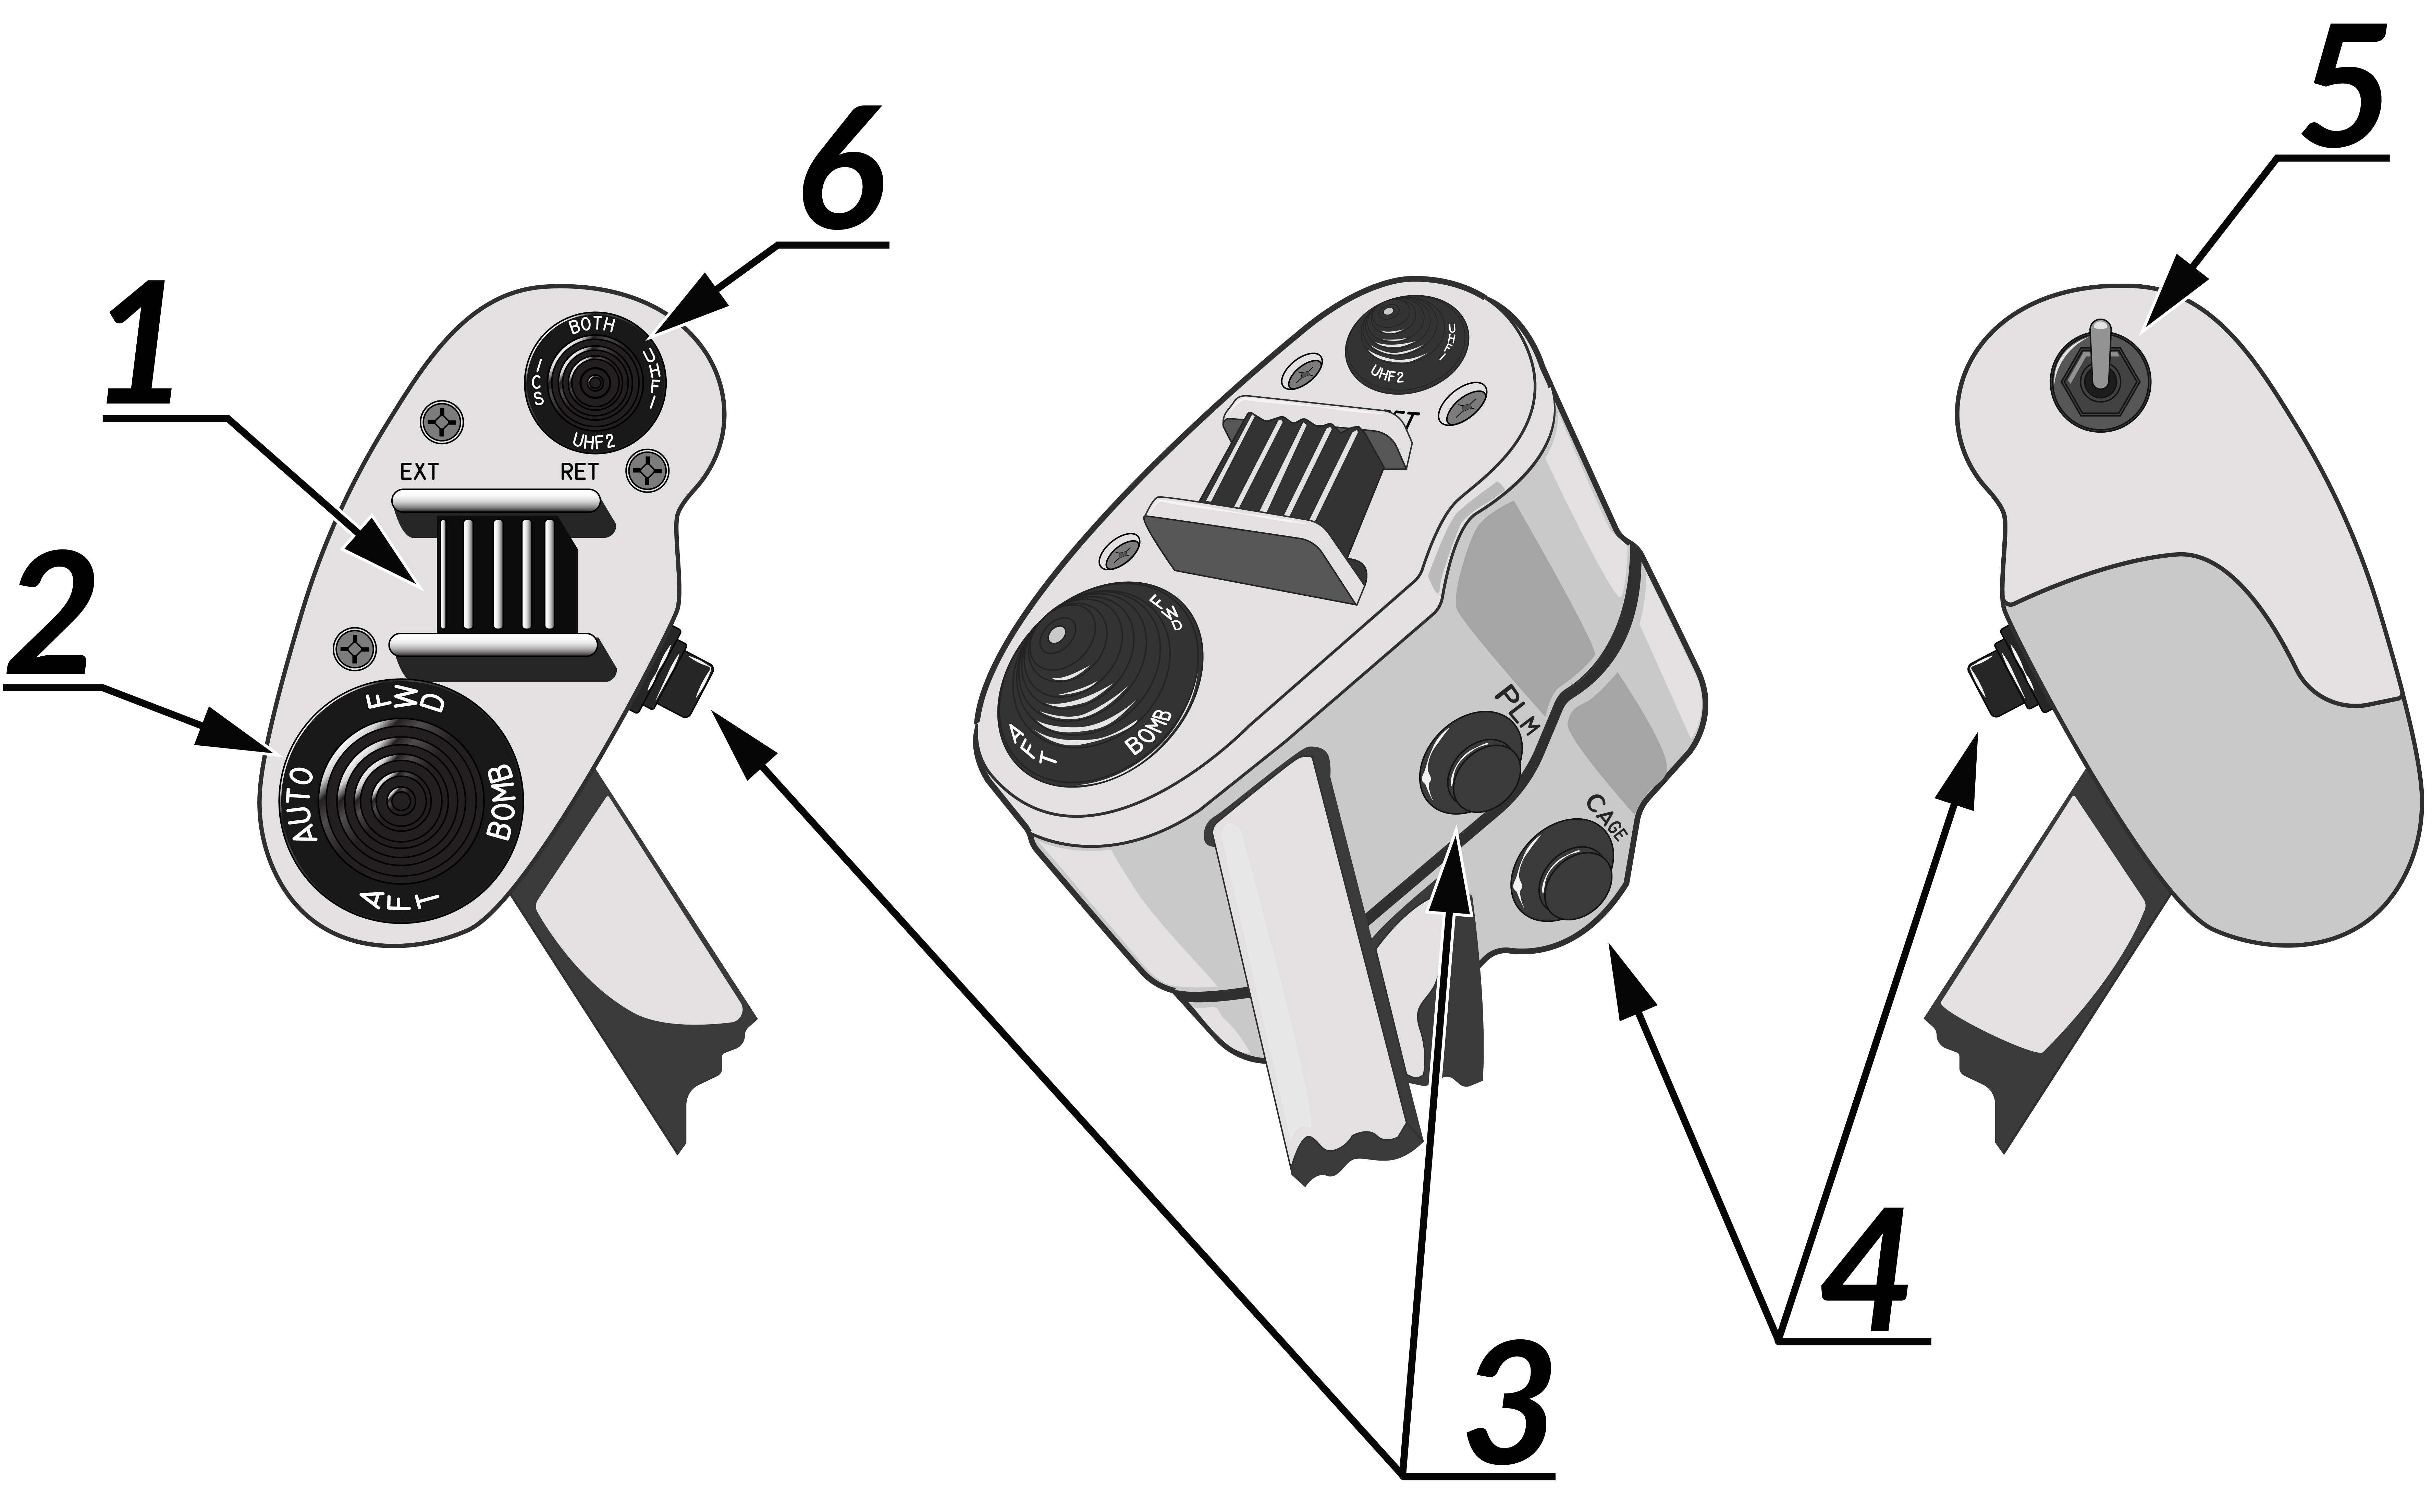
The throttle has the following controls: | The throttle has the following controls: | ||
# '''Speed Brake Switch:''' 2-position switch. "EXT" is a momentary and needed input position that extends the speed brake outward depending on the aircraft speed. | # '''Speed Brake Switch:''' 2-position switch. "EXT" is a momentary and needed input position that extends the speed brake outward depending on the aircraft speed. | ||
| − | # '''Wing Sweep Switch:''' 4-way hat switch. "AUTO" sets the wing to sweep automatically determined by | + | # '''Wing Sweep Switch:''' 4-way hat switch. "AUTO" sets the wing to sweep automatically determined by the onboard Central Air Data Computer (CADC), "BOMB" sets the wing to sweep in an angled highly angled position for maximum stability of the aircraft to allow for precise release of unguided weapons. The aft and forward positions manually adjust the commanded wingsweep as seen on the wingsweep indicator, but will not allow for oversweep or unsafe sweep angles as determined by the CADC. |
# '''PLM Button:''' multifunction button. When the steering command is in A2A mode, this acts as a pilot lock-on tool for the AWG-9 radar. But when used for landing and/or in the LDG steering command mode, this allows for disengagement of the ACLS. | # '''PLM Button:''' multifunction button. When the steering command is in A2A mode, this acts as a pilot lock-on tool for the AWG-9 radar. But when used for landing and/or in the LDG steering command mode, this allows for disengagement of the ACLS. | ||
| − | # '''CAGE/SEAM Button:''' multifunction button. When the steering command is in A2A mode, this allows for CAGE/SEAM lock-on of the AIM-9 Sidewinder. But when used for landing and/or in the LDG steering command mode, this allows for disengagement of the | + | # '''CAGE/SEAM Button:''' multifunction button. When the steering command is in A2A mode, this allows for CAGE/SEAM lock-on of the AIM-9 Sidewinder. But when used for landing and/or in the LDG steering command mode, this allows for disengagement of the ATC. |
# '''Exterior Light Switch:''' 2-position switch. Used to toggle the exterior lights of the aircraft. | # '''Exterior Light Switch:''' 2-position switch. Used to toggle the exterior lights of the aircraft. | ||
# '''ICS PTT Switch:''' 2-position switch. Acts as a push-to-talk system for the ICS system inside of the aircraft used between the Pilot and RIO. (or JESTER AI) | # '''ICS PTT Switch:''' 2-position switch. Acts as a push-to-talk system for the ICS system inside of the aircraft used between the Pilot and RIO. (or JESTER AI) | ||
| Line 68: | Line 74: | ||
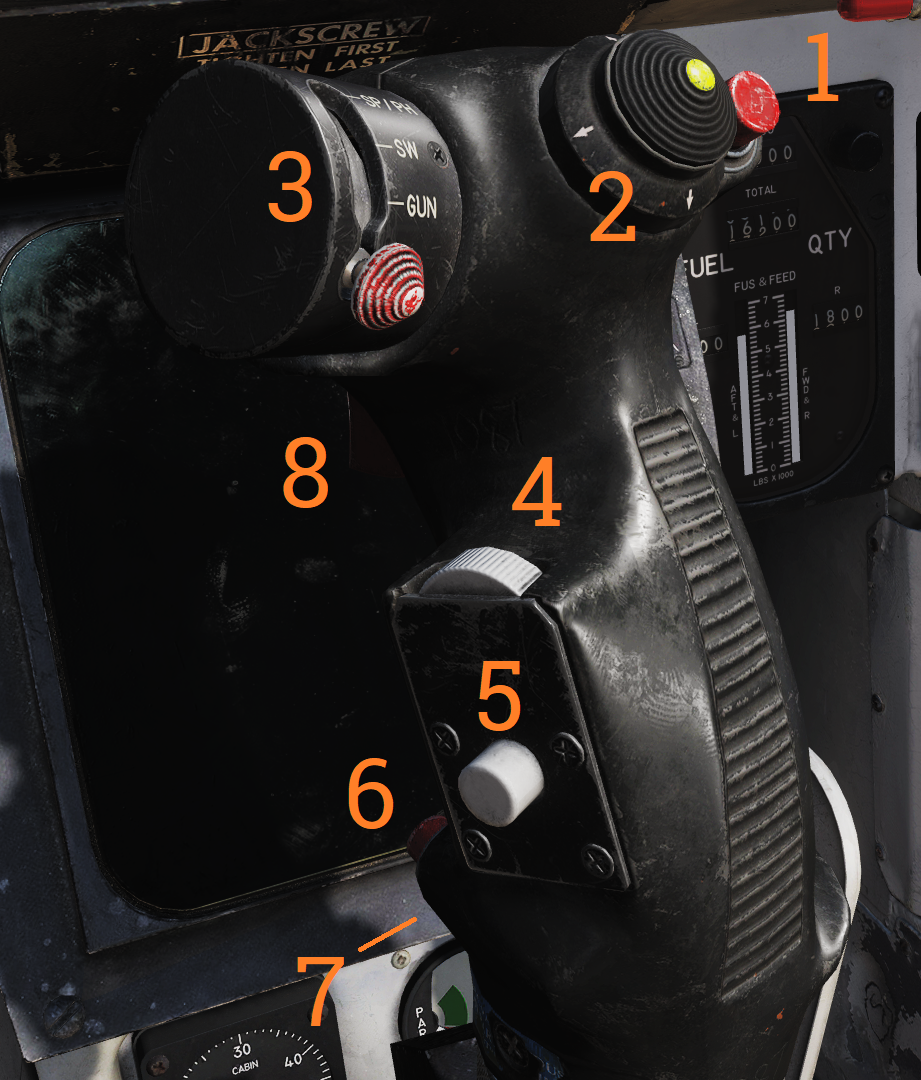
The control stick has the following controls: | The control stick has the following controls: | ||
| − | # '''Bomb Release Button:''' single-purpose button. When pressed in A2G steering command mode, all pylons selected with bombs will release respective of the ripple settings, type, and interval. | + | # '''Bomb Release Button:''' single-purpose button for free fall weapons (bombs). When pressed in A2G steering command mode, all pylons selected with bombs will release respective of the ripple settings, type, and interval. |
# '''Trim Hat:''' 4-way hat switch. Upward movement moves the aircraft downward, and downward movement moves the aircraft upward. Both left and right movements follow to their directions according to their name. | # '''Trim Hat:''' 4-way hat switch. Upward movement moves the aircraft downward, and downward movement moves the aircraft upward. Both left and right movements follow to their directions according to their name. | ||
# '''Weapon Select Hat:''' 4-way hat switch. Bottom selection is OFF, and a ridge requires a momentary push action to move in/out of to GUN. Following all to the top are SW, then SP/PH which requires a momentary push action to switch between. | # '''Weapon Select Hat:''' 4-way hat switch. Bottom selection is OFF, and a ridge requires a momentary push action to move in/out of to GUN. Following all to the top are SW, then SP/PH which requires a momentary push action to switch between. | ||
| − | # '''DLC & Maneuver Flap Command Wheel:''' scrollable dial. Moving it with the | + | # '''DLC & Maneuver Flap Command Wheel:''' scrollable dial. Moving it with the Flaps fully deployed and DLC engaged, acts as a variable control for spoiler extension. With the flaps retracted, the scrollwheel commands the extension of the manuevering flaps as a binary input. |
| − | # '''DLC Engage/Disengage & CMS Dispense Button:''' multifunction button. When pressed with the | + | # '''DLC Engage/Disengage & CMS Dispense Button:''' multifunction button. When pressed with the flaps fully deployed, this controls the engagement and disengagement of the DLC system. But with the flaps fully retracted, allows the pilot to dispense a countermeasure pulse as selected by the RIO. |
| − | # '''Autopilot Reference & NWS Button:''' multifunction button. When the aircraft is up in the air, this controls specific autopilot settings. But when the aircraft is on the ground, | + | # '''Autopilot Reference & NWS Button:''' multifunction button. When the aircraft is up in the air, this controls specific autopilot settings. But when the aircraft is on the ground, controls the activation of the nosewheel steering system. |
# '''Autopilot Emergency Disengage Paddle:''' multifunction button. Disengages all autopilot modes and DLC and releases all autopilot switches and roll and pitch SAS switches to OFF position. | # '''Autopilot Emergency Disengage Paddle:''' multifunction button. Disengages all autopilot modes and DLC and releases all autopilot switches and roll and pitch SAS switches to OFF position. | ||
| − | # '''Weapon Firing Trigger:''' two-stage trigger switch. The first detent enables CTVS and gun camera. Second detent releases selected | + | # '''Weapon Firing Trigger:''' two-stage trigger switch for forward firing weapons (rockets, missiles, guns). The first detent enables CTVS and gun camera. Second detent releases selected forward firing weapons. |
=Flight Controls & Landing Gear= | =Flight Controls & Landing Gear= | ||
| Line 102: | Line 108: | ||
===Speed Brake=== | ===Speed Brake=== | ||
| − | The speed brake is | + | The speed brake is 2 flaps located on the end of the aircraft designed to provide drag to decelerate faster. It is activated via the speed brake switch on the throttle. The two positions are: |
* '''EXT:''' When the switch is moved aft, this extends the speed brake of the aircraft out depending on the airspeed. | * '''EXT:''' When the switch is moved aft, this extends the speed brake of the aircraft out depending on the airspeed. | ||
* '''RET:''' When the switch is moved forward, this retracts the speed brake. | * '''RET:''' When the switch is moved forward, this retracts the speed brake. | ||
| Line 110: | Line 116: | ||
===Wing Sweep=== | ===Wing Sweep=== | ||
| − | The | + | [[File:Wingsweep.jpg|thumb|500px]] |
| + | The F-14 features a variable wings sweep design to allow for high speed flight. The wings can be swept from 20° to 68° with an additional oversweep setting available for parking on a carrier deck. During flight, the wing sweep is controlled by the CADC automatically or by the pilot within limits set by the CADC or with the fully manual emergency wing sweep. | ||
| + | |||
| + | The the wing sweeps current status is displayed on the wing sweep indicator on the right side of the ACM panel below the HUD. The current angle of the system is displayed by a white tape (7). The wingsweep commanded by the CADC is displayed by a white triangle on the angle tape (1). This is equivalent to the safe limit of forward movement and the pilot cannot exceed the sweep amount indicated by the triangle by regular means. The pilot commanded sweep is indicated by a white box moving along the wingsweep tape (2). | ||
| + | |||
| + | The current mode of the system is shown by flags on the right side of the instrument. The OVER (3) flag indicates that the wings are in the oversweep/parking position and are not safe for flight. The EMER (4) flag indicates that the emergency wing sweep has been selected by pulling the handle out and the CADC has no authority over the wing position anymore, as pulling the handle disconnets the electrical motor from the handle. Should the pilot choose to move the wings aft of the automatically selected angle, the system will show the MAN (5) flag and the CADC will not alter the angle unless the safety limit is equivalent to the current angle. This flag will also engage when BOMB mode is selected. The AUTO flag (6) shows when the CADC has full control over the wing sweep and is automatically moving the wings for optimal aerodynamic performance. | ||
| + | |||
| + | The BOMB mode, unlike the manual mode, alters the CADCs limits, to result in better flight stability at the cost of reduced lift. The CADC triangle will move to around 60° once bomb mode is selected and consequently move the wing angle along with it. | ||
| + | |||
| + | |||
| + | Once landed, the wings can be stowed, by removing the wing sweep handle cover, pulling/popping the handle out and moving it as far aft as possible. Then the pilot has to push it back in and move it the last few degress aft. Afterwards its advised to hold the handle in this position for a few seconds before popping it out again, resulting in the final oversweep position. | ||
| + | |||
| + | To unstow the wings again you simply move the handle back forwards to the 68° position before putting it back in and connecting it to the eletical motor again. Then, the CADC needs to be reset by hitting the CADC MASTER RESET infront of the handle. | ||
==Landing Gear== | ==Landing Gear== | ||
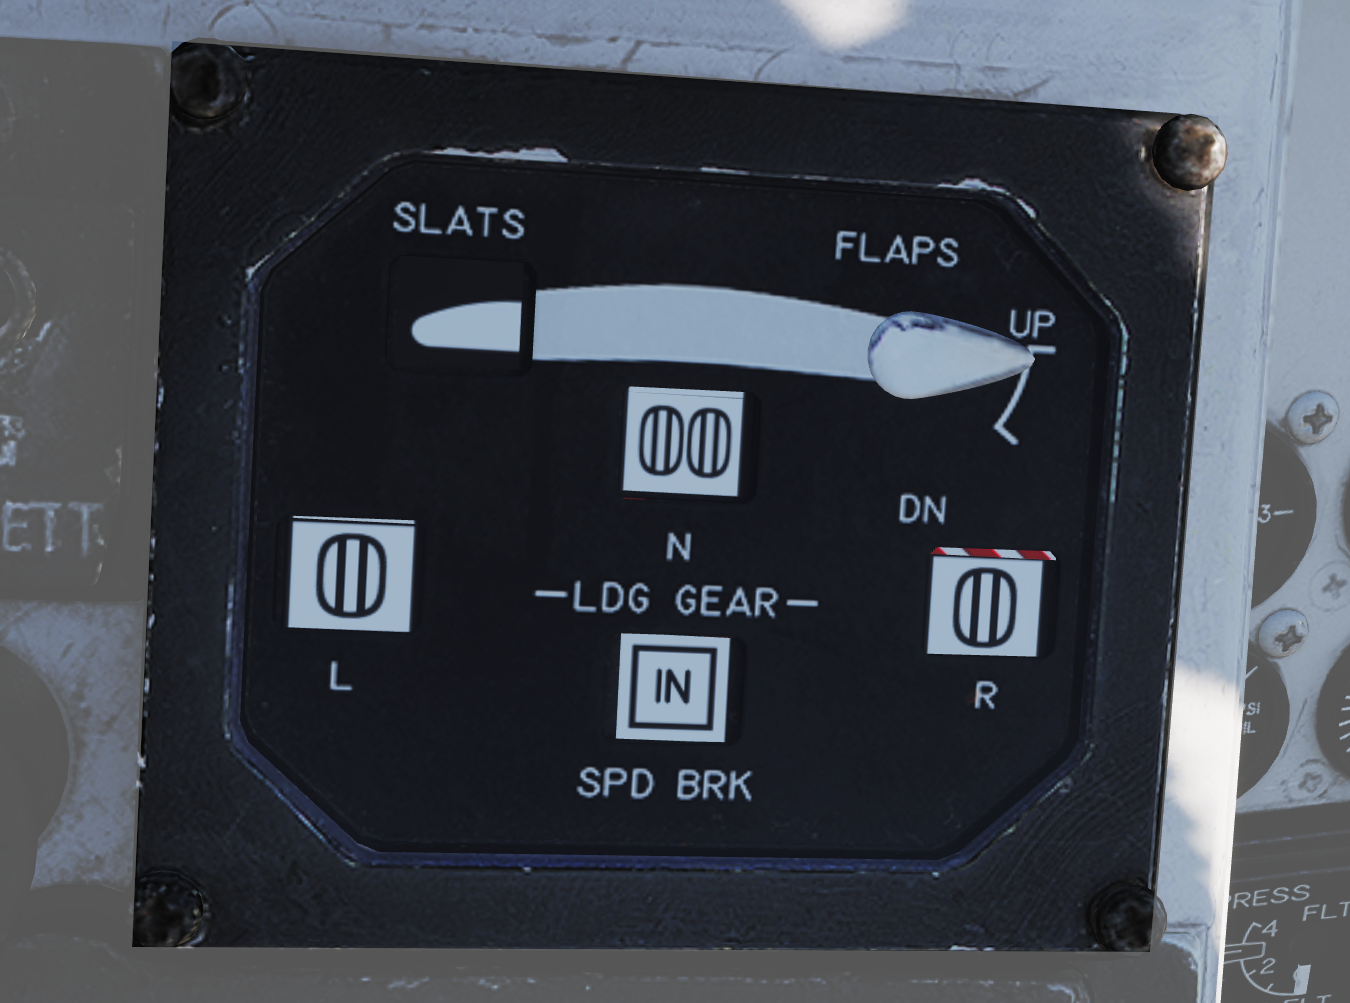
| − | The F-14 Tomcat has 3 retractable landing gears: the nose gear, the left gear, and the right gear. The gear is moved via the gear lever on the left side of the cockpit. In the up position, the gear will retract. In the down position, the gear will extend. | + | The F-14 Tomcat has 3 retractable landing gears: the nose gear, the left gear, and the right gear. The gear is moved via the gear lever on the left side of the cockpit. In the up position, the gear will retract. In the down position, the gear will extend as well as move the hydraulic isloation switch from the "flight" into the "TO/LDG" position. Additionally, the landing gear has an emergency extension, that is activated by roatating the head of the landing gear handle. This process is irreversible by the pilot, as the gear is extended by firing pressure cartridges that will lock the gear in place. This will also disable nose wheel steering permanently. |
| + | In DCS World, the only way to fix this state, is to take a new aircraft. | ||
===Nosewheel Steering=== | ===Nosewheel Steering=== | ||
| − | The nose gear features nosewheel steering (NWS) controlled by the rudder pedals. | + | The nose gear features nosewheel steering (NWS) controlled by the rudder pedals. NWS can be engaged and disengaged by the NWS button on the stick. The status of the NWS system is indicated on the left side of the windshield frame with the "NWS engaged" light illuminating upon NWS engagement. The F-14s nose wheel is prone to skidding, if the pilot oversteers while taxiing fast. The nose wheel will also not be able to recenter if the aircraft is not moving, therefore, if hooking up to a catapult, the pilot should attempt to center the nose before stopping the plane. |
===Launch Bar=== | ===Launch Bar=== | ||
| − | On the front nosegear is a launch bar that attaches the airplane to a catapult | + | [[File:nosestrut.jpg|thumb|500px]] |
| + | On the front nosegear is a launch bar that attaches the airplane to a catapult for launches from an aircraft carrier. Its deployment is pilot-controlled, but it is connected to the catapult by the ground crew, via the "Catapult Hook Up" keybind on Stennis and the Forrestall or by the ground crew directly on the ships included in the "DCS World: Supercarrier". | ||
| + | |||
| + | The launch bar is operated by hydraulically extending and retracting the nose strut of the F-14. The act of retracting the nose strut is referred to as "kneeling" as the aircrafts front will come down by around 3 degrees. This is commanded with the "nose strut switch" in the kneel (2) position. As the aircraft comes down, the launch bar will automatically extend and once the process is completed, the switch will return to the "off" (3) position. Should the pilot wish to take the aircraft out of its kneeling state, he can move the nose strut switch to the "EXTD" (1) position. | ||
| − | + | A manual override for the launch bar is present in form of the "Launch Abort" switch, hidden below and to the left of the parking brake handle and under a red cover. The switch is spring loaded to the "NORM" postition and held there when the cover is down. The "ABORT" position retracts the launch bar, without extending the nose strut. However, this switch will NOT actually abort the launch on any carriers and also will not disconnect the aircraft from the catapult. | |
=Autopilot and Autothrottle= | =Autopilot and Autothrottle= | ||
---- | ---- | ||
| − | The F-14 Tomcat has the ability to automate certain | + | The F-14 Tomcat has the ability to automate certain ascpects of flight via its Automatic Flight Control System (AFCS) and Automatic Throttle Control (ATC). The AFCS, or simply the autopilot, control the flight surfaces and the ATC controls the throttles. |
==AFCS== | ==AFCS== | ||
[[File:afcs.png|thumb|500px]] | [[File:afcs.png|thumb|500px]] | ||
| − | The | + | The AFCS can be controlled on a panel on the left console of the front seat. The front switch row controls the flight stability component of the AFCS with the "Yaw", "Roll" and "Pitch" channels. Engaging these for normal flight outside of combat situations is highly recommended as they make it significantly easier to remain coordinated and avoid overstressing the wings. Although, unlike in Fly-By-Wire aircraft, they DO NOT provide care free handling. Therefore, its remains entirely within the realms of possibilty to perform rapid unscheduled disassembly during a high speed pullout, or to, plainly said, tear of the wings. |
| − | |||
| − | |||
| − | |||
| − | |||
| − | |||
| − | |||
| − | |||
| − | + | For hands off flying, the F-14 also has several fully automatic autopilot modes, which are engaged with their assorted switches on the panel below the flight stability system. | |
| − | + | ||
| + | Firstly, the “Engage” switch, toggles the autopilot on and off along with its Attitude Hold system. Once this switch is flipped, the plane will work to hold the current flight level. Its not recommended to fight the autopilot with pitch inputs, once this is engaged. | ||
| + | |||
| + | To the left of the “Engage” switch, you can find the “HDG/GT” switch, which engages the Heading hold and the Ground Track mode. Heading hold, as the name suggests hold the planes current heading once engaged. Ground track on the other hand, maintains the planes current direction of travel, while compensating for the plane drifting left or right due to wind. Both of these only activate if the engage switch is set to the “Engage” position. | ||
| + | |||
| + | The “ALT” switch is in control of the Altitude hold autopilot mode. Once this switch and the engage switch is engaged, a warning labelled “A/P REF” will light up on the left side of the VDI. To now hand the control over to the autopilot, the pilot needs to fly the plane at a vertical velocity within 200 feet per minute to 0 and press the “Autopilot reference/NWS” switch. If done correctly, the plane will attempt to zeroize the planes vertical velocity and keep it there, even if roll commands are applied. Therefore, it can not only be used to cruise, but also can hold the plane in an orbit. Unlike some other autopilots however, the F-14 will not attempt to fly at a set altitude once the system is engaged. It will therefore not fly at the exact altitude that it was engaged at, but usually withing a close margin around it. At high speed flight where the VVI is unreliable, the plane might also start shaking as the autopilot cannot keep up. This might be a DCS issue and not be present in the real aircraft. | ||
| + | |||
| + | Lastly, there is the “VEC/PCD/ACL” switch. This switch controls the remote controlled flight modes, such as the “Datalink Bombing mode”, which is not implemented in DCS at the time of writing and the ACL or “Automatic Carrier Landing” mode on the other hand is fully functional and will receive its own section on this wiki in the future. In the meantime, you can find Redkites video on it [https://www.youtube.com/watch?v=k5femxA_lisChuck's here]. | ||
| + | |||
| + | ==Autothrottle== | ||
| + | The Autothrottle in the F-14 unlike in its younger cousin, the F/A-18 cannot be used to hold a specific speed. Instead, its used exclusively for landing. It is controlled via the throttle mode switch on the left of the throttle quadrant.To engage the autothrottle, the pilot needs to have the flaps fully deployed and the landing gear down, ideally, the DLC should also be engaged and the speedbrake deployed. Then, move the throttle mode switch into the "AUTO" position and let go of the throttle. Once engaged, the authrottle will automatically adjust the engine RPM to bring the plane to "Onspeed AoA" as indicated on the left canopy frame, the HUD or the AOA tape. The pilot should now only fly the plane with stick pitch, roll and DLC inputs until touchdown. The system can be disengaged by moving the throttle manually and thus overriding it, putting the switch back into the "boost" position or by applying weight to the wheels. | ||
=Digital Systems Overview= | =Digital Systems Overview= | ||
| Line 538: | Line 563: | ||
====Pulse-Doppler STT Mode==== | ====Pulse-Doppler STT Mode==== | ||
| − | [[File:f14 pdstt.png|thumb|350px | + | [[File:f14 pdstt.png|thumb|350px]] |
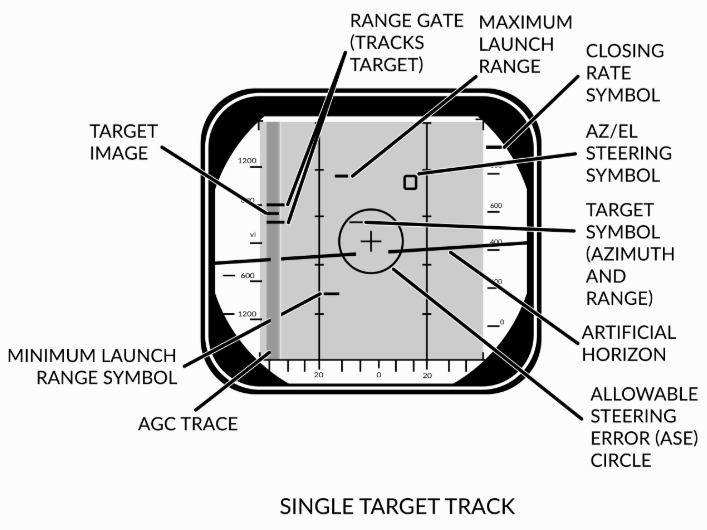
The pulse-doppler STT works and looks much like the pulse STT mode. It does, however, have the same advantages and disadvantages compared to pulse STT as the other pulse-doppler modes compared to the pulse modes. This means that while much better at tracking a target close to the ground it is however vulnerable to notching. | The pulse-doppler STT works and looks much like the pulse STT mode. It does, however, have the same advantages and disadvantages compared to pulse STT as the other pulse-doppler modes compared to the pulse modes. This means that while much better at tracking a target close to the ground it is however vulnerable to notching. | ||
| Line 559: | Line 584: | ||
====Pulse Search Mode==== | ====Pulse Search Mode==== | ||
| − | [[File:f14 pulse.png|thumb| | + | [[File:f14 pulse.png|thumb|350px]] |
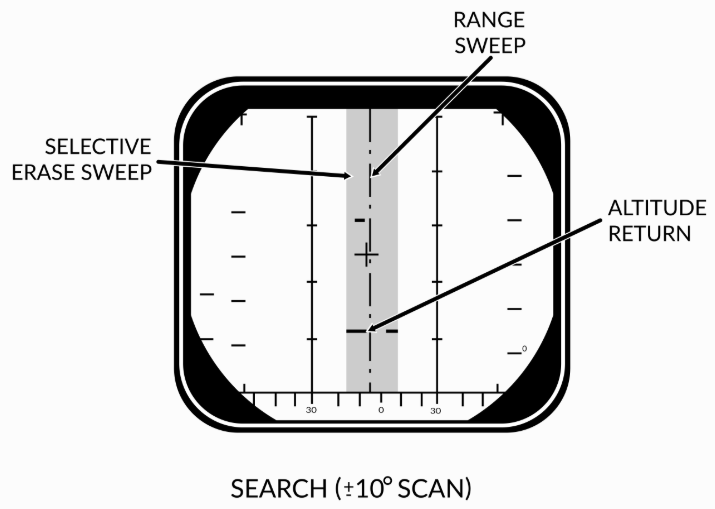
Pulse search is used to search for and find airborne targets at range. It is possible to use this radar mode as a basic ground mapper as well which can be useful for navigation and navigational fixes and can also be used in a pinch to detect larger surface targets like ships. Keep in mind though that the radar is not built with this as its main function and that a real air-to-ground radar will outperform it handily. | Pulse search is used to search for and find airborne targets at range. It is possible to use this radar mode as a basic ground mapper as well which can be useful for navigation and navigational fixes and can also be used in a pinch to detect larger surface targets like ships. Keep in mind though that the radar is not built with this as its main function and that a real air-to-ground radar will outperform it handily. | ||
| Line 565: | Line 590: | ||
====Pulse STT Mode==== | ====Pulse STT Mode==== | ||
| − | [[File:f14 pstt.png|thumb| | + | [[File:f14 pstt.png|thumb|350px]] |
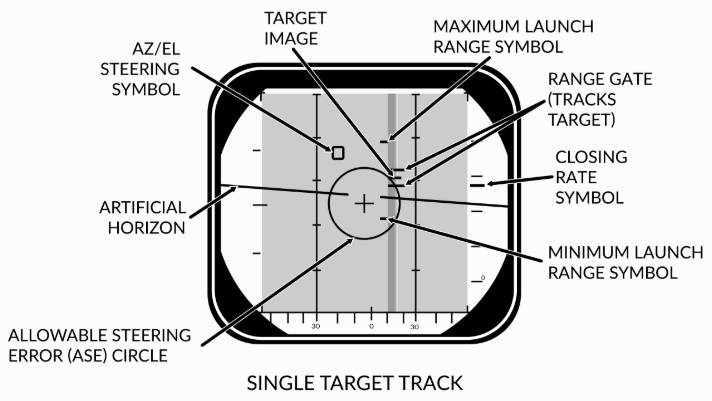
Pulse STT is used to track a single target, like pulse search mode it is not susceptible to notching but it is to ground clutter. The fact that the STT modes use gates to track the target, in this case, range gates, means that it is less susceptible to ground clutter but a target close enough to the ground that the ground return enters the range gates would be likely to shake the lock. | Pulse STT is used to track a single target, like pulse search mode it is not susceptible to notching but it is to ground clutter. The fact that the STT modes use gates to track the target, in this case, range gates, means that it is less susceptible to ground clutter but a target close enough to the ground that the ground return enters the range gates would be likely to shake the lock. | ||
| Line 582: | Line 607: | ||
When enabled IFF received IFF returns are then overlaid on the normal AN/AWG-9 radar returns on the DDD. A friendly target will be indicated with two bars, one above and one below the normal radar return. As the AN/APX-76 is a separate radar, secondary mode, radar apart from the AWG-9 the IFF can sometimes also detect targets not detected by the AWG-9. In this case the IFF return will not have a radar echo inside it. In the search mode this is overlaid over each target replying and in STT over the STT target. Additionally, if the STT target is hooked on the TID the DDD will switch from normal range display to a ±10 NM display to enable display of multiple returns in case of closely grouped targets. | When enabled IFF received IFF returns are then overlaid on the normal AN/AWG-9 radar returns on the DDD. A friendly target will be indicated with two bars, one above and one below the normal radar return. As the AN/APX-76 is a separate radar, secondary mode, radar apart from the AWG-9 the IFF can sometimes also detect targets not detected by the AWG-9. In this case the IFF return will not have a radar echo inside it. In the search mode this is overlaid over each target replying and in STT over the STT target. Additionally, if the STT target is hooked on the TID the DDD will switch from normal range display to a ±10 NM display to enable display of multiple returns in case of closely grouped targets. | ||
| − | == | + | ==TID Symbology== |
| − | + | Similarly to the F-18, the F-14 uses a series of shapes with assorted lines to display the identity and direction of travel of a track. Unlike the F-18 however, the Tomcat does not have the ability to display colours apart from green and white on the TID. Therefore, symbology takes a high priority and you must learn how to read it as a pilot and how to set it as a RIO. The full list of TID symbols can be found in heatblurs * [https://www.heatblur.se/F-14Manual/general.html#tid-data-readouts full manual on the F-14] | |
| − | + | ||
| + | *WIP | ||
| + | |||
| + | =Air-to-Air Weapons= | ||
| + | ---- | ||
| + | This area will cover over all the different air-to-air weapons brought with the F-14B Tomcat. | ||
| − | + | ==Air-to-Air Gun== | |
| − | + | [[File:f14 gun aa.png|thumb|500px]] | |
| − | + | ''Using Real-Time mode.'' | |
| − | |||
| − | |||
| + | The F-14 Tomcat is outfitted with the M61A1 Vulcan 6-barreled Gatling cannon, being able to hold up a maximum of 675 rounds internally. | ||
| − | + | =Gun Fire Rate= | |
| − | + | The F-14's pneumatically driven M61 cannon is able to fire at 2 rates of fire which are selectable in flight by the pilot on the ACM panel below the HUD. The GUN RATE pushbutton voth served as an indicator and as a toggle for the two possible fire rates with the currently enabled one being illuminated with a red backlight. | |
| − | |||
| − | |||
| − | |||
| − | |||
| + | *'''Low''' | ||
| + | The low fire rates put ammo preservation firet and decreases the fire rate to 4000 RPM. This can be useful for destroying slow moving aircraft such as bombers or ground targets. | ||
| − | + | *'''High''' | |
| + | High fire rate lets the cannon fire at its maximum rate of 6000RPM and is usually used in close quarters fights with enemy fighter aircraft. | ||
| − | + | ===Gun Modes=== | |
| + | The cannon for Air-to-Air mode is able to be placed into 2 following positions: | ||
| − | + | * '''Manual:''' this mode is able to be selected by depressing the CAGE/SEAM button, which will then only display the pipper and ammo count. | |
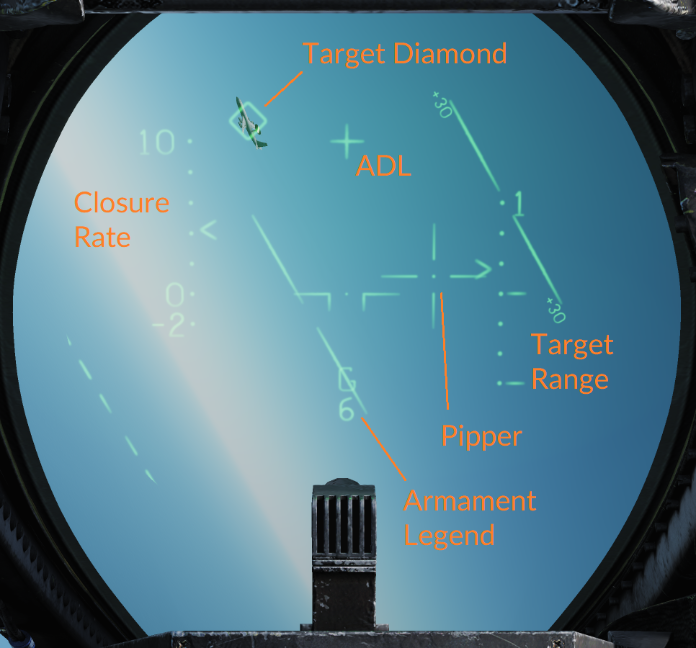
| + | * '''Real-Time:''' this mode is the regular, default mode. Along with a radar lock, the pipper will calculate to be accurate when directed to the diamond contact box. This will also give a closure rate towards the contact and the range relative to the aircraft. | ||
| − | =Air-to-Air Weapons= | + | ===Symbology=== |
| + | |||
| + | The symbology for the cannon is displayed on the HUD with the weapon master selector in the GUN position, and display in A/A. By default, the gun rounds indicator will be displayed as 0 for rounds per 100. Located next to the display panel to the right is the gun ammo counter. Additionally, the gunsight elevation is also able to be adjusted underneath the steer commands on the display panel. | ||
| + | |||
| + | ==Air-to-Air Missiles== | ||
| + | ===Missile Preparation=== | ||
| + | Missile preparation in the F-14B Tomcat is started by moving the master arm switch on the ACM panel underneath the HUD to ON. This is then followed by pressing the MSL PREP and SW COOL buttons to be ON, depending on the armament type. Radar guided missiles give the ready indication with white flags appearing the the station indicator windows on the ACM panel, or when the "HOT TRIG" light illuminates with either a Sparrow or Phoenix selected. The AIM-9s indiacted their ready to use state, by an audible tone that, when a monotonous tone can be heard through the pilots headphones. | ||
| + | |||
| + | ===AIM-54 Phoenix=== | ||
| + | The AIM-54 is a long-range, semi-active and active radar missile for Air-to-Air use. The F-14 was the only aircraft to carry it in service. The missile itself is designed to be used against large bomber formations attacking US aircraft carriers, but is also very capable against smaller enemy aircraft, such as fighters. The AIM-54 comes with a proximity fuse and missile gate suite for non-direct contact explosions and radar tracking methods. | ||
| + | |||
| + | Upon the launch of the missile, active input from the AN/AWG-9 radar is used to guide itself towards the contact. If commanded by the AN/AWG-9 in TWS or prior to launch, the missile will go "pitbull" or active and use its own on-board radar to guide itself to its target this can either be the last stretch of the flight in TWS, or throughout the whole flight in the "short range" modes. | ||
| + | |||
| + | A table of when the Phoenix will use its active seeker can be found below. | ||
| + | {|class="wikitable mw-collapsible mw-collapsed" | ||
| + | !Condition | ||
| + | !Missile seeker mode | ||
| + | |- | ||
| + | |"PH ACT" selected by RIO | ||
| + | |Phoenix goes active of the rail and if able to, towards the STT target locked during launch. | ||
| + | |- | ||
| + | |AWG-9 in "TWS" | ||
| + | |Phoenix will fly towards the assigned target and go active on command by the AWG-9.(Fallible. No guarantee that Phoenix will receive command) | ||
| + | |- | ||
| + | |AWG-9 in "P-STT" on launch | ||
| + | |Phoenix will go active towards last known location | ||
| + | |- | ||
| + | |AWG-9 in "PD-STT" | ||
| + | |Phoenix launches in SARH mode and will not go active. | ||
| + | |- | ||
| + | |Target within 10nm, closing. AWG-9 in "PD-STT" | ||
| + | |Phoenix will go active towards last known location immdediately. | ||
| + | |- | ||
| + | |Target within 6nm, cold. AWG-9 in "PD-STT" | ||
| + | |See above | ||
| + | |- | ||
| + | |Phoenix launched with "ACM cover" up | ||
| + | |Phoenix will go active, either towards a locked target or as a maddog along the ADL. | ||
| + | |- | ||
| + | |Phoenix launched with Boresight selected | ||
| + | |See above | ||
| + | | | ||
| + | |} | ||
| + | |||
| + | |||
| + | The time until impact will be calculated during the whole flight of the missile and will be displayed on the right side of the contact in the measure of seconds. The maximum displayed amount is 150 seconds TTI (Time To Impact). | ||
| + | |||
| + | ====Missile Variants==== | ||
| + | Like most missiles, the AIM-54 was continously developed throughout its service life and received many modifications and upgrades. In DCS, the AIM-54 "family" is represented by 3 variants. Here, listed in chronological order. | ||
| + | * '''AIM-54A Mk.47''' The oldest version of the Phoenix. It is equipped with the original analogue guidance section and an older rocket motor with a shorter burn time compared to the Mk.60. | ||
| + | * '''AIM-54A Mk.60:''' A modified version of the Phoenix with a longer burning Mk.60 rocket motor that provides ~30 seconds of burntime, vastly increasing the potential range of the missile. It still uses the analogue seeker and guidance system. Not smokeless, but provides an effective range in excess of 35nm miles against fighters and can strike larger targets more than 100nm away from the Tomcat. | ||
| + | * '''AIM-54C Mk.47:''' The C variant of the Phoenix is a self cooling modernized version, equipped with a digital guidance section and a smokeless rocket motor with slightly shorter burn time than the Mk.60. In the near future, its DCS implementation will also receive an on board INS system, allowing it to go active, even when no signal is received from the AN/AWG-9. | ||
| + | |||
| + | ====Launch Modes==== | ||
| + | The main seeker in the AIM-54 is able to be fired through 3 launch modes in according: | ||
| + | |||
| + | # '''Semi-active Radar Homing (SARH):''' In the first stage of the AIM-54 engagement, the missile is guided semi-actively by the AN/AWG-9 radar using both guidance commands transmitted via the radar and radar energy reflected off the target. Then when the missile is within range of its seeker’s ARH mode the AN/AWG-9 commands the missile to switch to ARH. In pulse doppler STT the AIM-54 uses SARH all the way to the target receiving guidance commands at a greater rate than in TWS and also continuous spotlighting of the target because of the STT mode being used. This increases the effective range of the AIM-54 seeker slightly. | ||
| + | # '''Active Radar Homing (ARH):''' This tells the WCS to immediately command the AIM-54 to go active in the first guidance command after launch. If launched at a target within 6 NM if in the targets rear hemisphere or 10 NM miles if in its forward hemisphere the WCS will also automatically command this mode instead of a SARH mode. If the target is not detected actively by the seeker it will still fall back to SARH until the seeker can acquire on its own like in the two SARH modes. | ||
| + | # '''ACM Active:''' The missile is commanded active before launch making this the only mode where the missile is truly fire and forget. The AIM-54 missile receives the active message before launching from the WCS in addition to a command prepositioning the seeker-head to have it look at the current WCS track if available. | ||
| + | |||
| + | |||
| + | Additionally, the AIM-54 has an unofficial method of launching the missile: | ||
| + | |||
| + | * '''Mad-dogging:''' A method that uses the aircraft relative to their contact altitude and airspeed and firing the AIM-54 in the direction, which will force it to become semi-active within the pitbull range. | ||
| + | |||
| + | ====HUD Symbology==== | ||
| + | [[File:f14 aim54 hud.png|thumb|400px]] | ||
| + | The pilot will receive standard symbology of the AIM-54 missile selected when the display is in A/A mode. Similar to the GUNS format, displayed on the HUD will be the weapon type denoted in 2 letters, and the number of missiles. Additionally, any more advanced symbology will occur by lock, which is required at first to fire the missile without "mad-dogging." | ||
| + | |||
| + | ====VDI Symbology==== | ||
| + | [[File:f14 aim54 vdi.png|thumb|400px]] | ||
| + | The pilot will also receive additional symbology on the VDI whenever a radar lock occurs with the AIM-54 selected. | ||
| + | |||
| + | WIP. | ||
| + | |||
| + | ===AIM-7 Sparrow=== | ||
| + | The AIM-7 Sparrow is a semi-active-radar homing medium range air to air missile. As such, it requires guidance all the way to impact. The F 14 is equipped with 4 variants of the sparrow. The F, M, MH, and P. | ||
| + | |||
| + | Upwards of the MH, these missiles are capable of lofting to increase their range, while the F has a worse motor and seeker compared to the M. All of these missiles can be guided by PD-; and P-STT radar locks and if necessary by the AWG-9s flood mode. Unlike the Phoenix, the Sparrow only provides medium range capabilities, but is quite lethal at ranges up to 15nm while being less clunky to operate than the Phoenix. | ||
| + | |||
| + | ===AIM-9 Sidewinder=== | ||
| + | The AIM-9 Sidewinder is an IR-guided missile that self tracks based off of thermal energy (heat) of an aircraft. This missile should be used for close quarters range, where agility and speed are a high priority. The benefit of this missile is how quickly it can turn onto a contact. However, a con to this can be "sun-aiming," where the missile follows a contact that flies directly to the sun and immediately flanks out of the sensor sight of the Sidewinder. | ||
| + | |||
| + | The maximum range on this missile is ~10 nmi., but recommended range is within ~5 nmi. under optimal conditions. | ||
| + | |||
| + | =Air-to-Ground Weapons= | ||
---- | ---- | ||
| − | + | The F-14B Tomcat comes with a variety of air-to-ground weapons after the upgrade to the Bombcat. | |
| + | |||
| + | ==Air-to-Ground Gun== | ||
| + | The symbology of the Air-to-Ground Gun is similar to of the Air-to-Air mode. The weapon will instead keep a diamond inside with the cross until passing the horizon threshold. All happens with the Gun selected and the HUD steering command in A/G mode. | ||
| + | |||
| + | ==Air-to-Ground Bombs== | ||
| + | The F-14 Tomcat is able to carry numerous types of munitions that act as bombs, whether dumb or laser-guided. | ||
| + | |||
| + | ===Mk81/82/83/84 GPB=== | ||
| + | The "Mk 80" series of general purpose bombs is the main general purpose bomb use by Western militaries. After being used mainly for fighter operations, slowly, due to necessity the F-14 started using bombs more frequently. Among these the Mk 80 series. | ||
| + | |||
| + | As general purpose bombs, these are unguided, simple, "dumb" bombs that are simply dropped from the aircraft in a free fall style and detonate on impact or with a small delay. | ||
| + | |||
| + | The DCS F-14 has 4 of these bombs available. The Mk.81 is the smallest of the series with 250 pounds. The Mk82 is double the weight, being a 500 pound class bomb. The Mk 83 doubles the load again to reach 1000 pounds per bomb, while the largest is the Mk84 with 2000 pounds of weight behind it. The RIO selects which bomb type is on the stores he selected with a rotating wheel on the armament panel on the left of his cockpit. This provides the computer with the necessary information to compute the impact point in all computer bombing modes, and fulfills the same function for the LANTIRN. The RIO then simply needs to select the stations on which the desired weapons hang, the ripple interval and the ripple quantity, to allow the pilot to employ the weapons. | ||
| + | |||
| + | To deploy these weapons, the crew of the F-14 has two main computer aiming options. Firstly, it can use "Computer Pilot", a CCIP equivalent which uses radar rangefinding to deliver bombs on target with an aiming cross displayed on the HUD. The Pilot simply puts the target under the crosshair and depresses "stores release" to employ the selected weapon at that location. This mode is the default and can be accessed if the pilot simply puts the PDCP selector to "A/G". The RIO can, change the modes manually, should the crew so desire. The "Bombing mode selector knob" is used to either make sure that computer pilot is selected, or to swap to the alternative modes. Secondly, the Tomcat has a mode similar to "CCRP" know as "Computer target". If this mode is selected while the A/G mode is active, the pilots symbology will change to add a diamond to the bomb fall line which the pilot can move up and down by using the VSL HI and VSL LO switch on the sidewall. Then, once the diamond is over the target, he can press the rocker in to the PLM/Target designate position to fix the diamond in place. The AN/AWG-9s radar is then, similar to certain AJS-37 bombing modes slaved to the target point for rangefinding. After designating the target, the pilot simply needs to fly his flight path vector on the hud onto the bomb fall line and hold the stores release. | ||
| + | |||
| + | The Mk.82 specifically also comes in two high drag variants. One with a drogue and the "snakeeye". These bombs, are designed to be dropped while in low, level flight. | ||
| − | + | Additionally, the Tomcat also posses the option to release in "manual" mode as selected by the RIO. This will remove any altitude, or release time restrains from the computer and allow you to drop the selected bombs at any time without any aiming aide. In DCS this is mainly used for Laser Guided bombs, for which aiming is provided by the LANTIRN. | |
| − | |||
| − | === | + | ===GBU-12/14/16 LGB=== |
WIP. | WIP. | ||
| − | === | + | ===BDU-33 Training Bomb=== |
| − | + | The BDU-33 is a training bomb that emits smoke upon impact on a hard surface. This is generally used in training for Air-to-Ground in the Tomcat, and among other aircraft. | |
| − | == | + | ===ADM-141 TALD=== |
| − | + | The ADM-141 Towed Air Launch Defense (TALD) missile is a decoy weapon that is employed for doing Suppression of Enemy Air Defenses. (SEAD) The TALD missile represents one of the only true SEAD weapons used in DCS World that is not DEAD-related. The objective of the TALD is to be dropped to confuse SAM sites that use radar guidance so other aircraft are able to destroy them, hence being "suppressed." | |
| − | + | The TALD is only able to be successfully launched when the RWR is receiving a radar lock warning or missile warning in the F-14 Tomcat. Only the F-14B Tomcat is able to use this weapon. | |
| − | |||
| − | == | + | ==Air-to-Ground Rockets== |
| − | + | The F-14 Tomcat carries 4 4-count Zuni rockets, which are precision, unguided rockets that are able to be fired in an Air-to-Ground configuration. | |
=Resources= | =Resources= | ||
---- | ---- | ||
| + | ==Contributors== | ||
| + | * Jak: An early contributor who wrote information on what the aircraft was and helping serve filler content. | ||
| + | * Nullspec: Contributor towards the F/A-18C Hornet on implemented/non-implemented for the formatting. | ||
| + | |||
==Manuals & Documents== | ==Manuals & Documents== | ||
* [https://info.publicintelligence.net/F14AAP-1B.pdf F-14B NATOPS Pocket Checklist] | * [https://info.publicintelligence.net/F14AAP-1B.pdf F-14B NATOPS Pocket Checklist] | ||
* [http://www.heatblur.se/F-14Manual/ Heatblur F-14 Manual] | * [http://www.heatblur.se/F-14Manual/ Heatblur F-14 Manual] | ||
| + | * [https://www.mudspike.com/chucks-guides-dcs-f-14b-tomcat/ Chuck's F-14 Guide] | ||
==Heatblur's Videos== | ==Heatblur's Videos== | ||
| Line 658: | Line 793: | ||
* [https://www.youtube.com/watch?v=4groy-_Bxfk Quick Tips - AIM-54 Phoenix] | * [https://www.youtube.com/watch?v=4groy-_Bxfk Quick Tips - AIM-54 Phoenix] | ||
* [https://www.youtube.com/watch?v=Is3AtOX-abw Quick Tips - Bombing] | * [https://www.youtube.com/watch?v=Is3AtOX-abw Quick Tips - Bombing] | ||
| + | |||
| + | ==RedKite's Tutorial Videos== | ||
| + | (More in-depth on particular systems, referenced throughout the guide.) | ||
| + | |||
| + | * [https://www.youtube.com/watch?v=R9-8UCj66Ds Pilot/RIO - LANTIRN & LGB Bombs] | ||
| + | * [https://www.youtube.com/watch?v=k5femxA_lis Pilot/RIO - ICLS & ACLS] | ||
| + | * [https://www.youtube.com/watch?v=YqQz9YrEi6A Pilot/RIO - INS Fix] | ||
Latest revision as of 19:39, 18 June 2023
NOTE: This guide is currently being reworked. A lot of infromation might still be inaccurate. Please direct feedback and ideas to Del3te-O#0678 or #wiki-discussions on Discord.
This page is focused on the DCS World F-14A/B Tomcat module, which is still in Early Access. Some information may be missing.
The Grumman F-14A/B Tomcat is a two-seat, twin-engine supersonic variable wing-sweep fighter aircraft. The F-14 was the first US fighter jet with twin tails and was the largest & heaviest US fighter to ever fly from an aircraft carrier. The reason that the F-14 was so incredibly large and heavy was that it carried the large AWG-9 radar and accompanying AIM-54 Phoenix (air-to-air) missiles: this very capable combination allowed the F-14 to make shots of up to 200 nautical miles at the bad guys. Also, being big means you can carry a lot of fuel!
Of course, the practical range of the AWG-9 is rather more limited, especially if you are shooting at more maneuverable fighter-sized targets, but even at these closer ranges, the AIM-54 Phoenix is still a capable missile that should not be underestimated. The F-14 is also capable of carrying an array of air-to-ground weapons, such as dumb bombs in both high and low drag forms, air-to-ground Zuni rockets and even laser-guided bombs, which can be self-designated using the LANTIRN targeting pod on the F-14.
Most people will recognize and adore the F-14 because of its stardom presence in that one weird volleyball movie from the '80s . Its on-screen presence in movies will make the F-14 to appear docile and easy to fly, but due to lack of a fly-by-wire the F-14 can be a real handful: it being a pilot's aircraft however makes it fun to fly and learn. The analogous nature of the F-14 (comparable to the F-5E II Tigershark) will give you a good knowledge of the airplane over time but requires a bit of a different mindset that the computerized flight of the F/A-18C and the F-15.
Contents
- 1 Weapons List
- 2 Hands On Throttle And Stick (HOTAS)
- 3 Flight Controls & Landing Gear
- 4 Autopilot and Autothrottle
- 5 Digital Systems Overview
- 6 Navigation
- 7 Defensive Systems
- 8 Television Camera Set
- 9 LANTIRN Targeting Pod
- 10 TARPS Pod
- 11 Air-to-Air Radar
- 12 Air-to-Air Weapons
- 13 Gun Fire Rate
- 14 Air-to-Ground Weapons
- 15 Resources
Weapons List
Implemented
Partially or fully implemented weapons of the F-14 A/B Tomcat:
- M61 Vulcan Six-Barreled Gatling Gun
- AIM-7 F/M Sparrow
- CAP-9M
- AIM-9 L/M Sidewinder
- AIM-54A Mk.47
- AIM-54A Mk.60
- AIM-54C Mk.47
- Mk-81, 82, 83, and 84
- GBU-10, 12, 16, and 24
- MK-20 Rockeye
- Zuni Rockets
- BDU-33 Practice Bombs
- ADM-141 TALD
- LUU-2 Parachute Flare
- Smokewinder
- LANTIRN Pod
- FPU-1 Fuel Tank
Planned
Weapons not yet implemented into the Tomcat:
- TARPS Pod
Hands On Throttle And Stick (HOTAS)
Throttle
The throttle of the F-14 Tomcat consists of 2 quadrants, both for the left and right engines. There is an afterburner detent along with a cutoff detent for maximum throttle and shutdown of the engine for each quadrant.
The throttle has the following controls:
- Speed Brake Switch: 2-position switch. "EXT" is a momentary and needed input position that extends the speed brake outward depending on the aircraft speed.
- Wing Sweep Switch: 4-way hat switch. "AUTO" sets the wing to sweep automatically determined by the onboard Central Air Data Computer (CADC), "BOMB" sets the wing to sweep in an angled highly angled position for maximum stability of the aircraft to allow for precise release of unguided weapons. The aft and forward positions manually adjust the commanded wingsweep as seen on the wingsweep indicator, but will not allow for oversweep or unsafe sweep angles as determined by the CADC.
- PLM Button: multifunction button. When the steering command is in A2A mode, this acts as a pilot lock-on tool for the AWG-9 radar. But when used for landing and/or in the LDG steering command mode, this allows for disengagement of the ACLS.
- CAGE/SEAM Button: multifunction button. When the steering command is in A2A mode, this allows for CAGE/SEAM lock-on of the AIM-9 Sidewinder. But when used for landing and/or in the LDG steering command mode, this allows for disengagement of the ATC.
- Exterior Light Switch: 2-position switch. Used to toggle the exterior lights of the aircraft.
- ICS PTT Switch: 2-position switch. Acts as a push-to-talk system for the ICS system inside of the aircraft used between the Pilot and RIO. (or JESTER AI)
Control Stick
The control stick is located in the center of the cockpit, mounted onto the floor. Left and right movements of the control stick direct hydraulic movement to the spoilers and horizontal stabilizers of the aircraft. Forward and backward movement result to respectively the same but to the horizontal stabilizers.
The control stick has the following controls:
- Bomb Release Button: single-purpose button for free fall weapons (bombs). When pressed in A2G steering command mode, all pylons selected with bombs will release respective of the ripple settings, type, and interval.
- Trim Hat: 4-way hat switch. Upward movement moves the aircraft downward, and downward movement moves the aircraft upward. Both left and right movements follow to their directions according to their name.
- Weapon Select Hat: 4-way hat switch. Bottom selection is OFF, and a ridge requires a momentary push action to move in/out of to GUN. Following all to the top are SW, then SP/PH which requires a momentary push action to switch between.
- DLC & Maneuver Flap Command Wheel: scrollable dial. Moving it with the Flaps fully deployed and DLC engaged, acts as a variable control for spoiler extension. With the flaps retracted, the scrollwheel commands the extension of the manuevering flaps as a binary input.
- DLC Engage/Disengage & CMS Dispense Button: multifunction button. When pressed with the flaps fully deployed, this controls the engagement and disengagement of the DLC system. But with the flaps fully retracted, allows the pilot to dispense a countermeasure pulse as selected by the RIO.
- Autopilot Reference & NWS Button: multifunction button. When the aircraft is up in the air, this controls specific autopilot settings. But when the aircraft is on the ground, controls the activation of the nosewheel steering system.
- Autopilot Emergency Disengage Paddle: multifunction button. Disengages all autopilot modes and DLC and releases all autopilot switches and roll and pitch SAS switches to OFF position.
- Weapon Firing Trigger: two-stage trigger switch for forward firing weapons (rockets, missiles, guns). The first detent enables CTVS and gun camera. Second detent releases selected forward firing weapons.
Flight Controls & Landing Gear
Flight Controls
The F-14B has a large hydraulic system which covers for all of the control surfaces of the aircraft. Without the hydraulic system, or taking damage the controls are in risk of improperly working. The F-14 Tomcat was the last of its generation to have no integration of an FBW or FCS system, which was introduced with the F-15 Eagle.
The F-14's primary flight controls are:
- Left Spoilers (LES): A set of spoilers that lie within the left wing of the aircraft that help with aileron movement and control that react opposite of the intended direction.
- Right Spoilers (RES): A set of spoilers that lie within the right wing of the aircraft that help with aileron movement and control that react opposite of the intended direction.
- Tailerons (TAIL): Two horizontal stabilizers located on the rear end of the aircraft that control both pitch and aileron movement.
- Leading Edge Flaps (LEF): Normal slats located on the leading (front) edge of the wings to add lift.
- Trailing Edge Flaps (TEF): Normal flaps located on the trailing (back) edge of the wings to add lift.
The control stick controls the stabilators, ailerons, and rudder and the rudder pedals control the rudder.
Flaps System
The aircraft's flap system provides more lift (and as a byproduct, drag). The flaps lever has two positions:
- NONE: This applies no flap whatsoever to the wings of the aircraft.
- FULL: This applies full movement of flaps to the wings of the aircraft.
The flaps lever allows for variable movement, which gives the pilot the ability to control the amount of flap they wish for.
Speed Brake
The speed brake is 2 flaps located on the end of the aircraft designed to provide drag to decelerate faster. It is activated via the speed brake switch on the throttle. The two positions are:
- EXT: When the switch is moved aft, this extends the speed brake of the aircraft out depending on the airspeed.
- RET: When the switch is moved forward, this retracts the speed brake.
Trim
The tailerons are capable of being trimmed to make roll and pitch corrections. This is accomplished with the trim hat on the controls stick. When the autopilot system is engaged, the onboard computer will attempt to make active trim movements in order to keep the aircraft within the specified attitude when set, along of the setting parameters. As speed is either gained or lost, the trim will actively move the stick as well along of the tailerons to adapt.
Wing Sweep
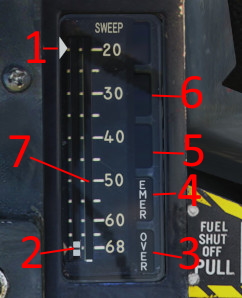
The F-14 features a variable wings sweep design to allow for high speed flight. The wings can be swept from 20° to 68° with an additional oversweep setting available for parking on a carrier deck. During flight, the wing sweep is controlled by the CADC automatically or by the pilot within limits set by the CADC or with the fully manual emergency wing sweep.
The the wing sweeps current status is displayed on the wing sweep indicator on the right side of the ACM panel below the HUD. The current angle of the system is displayed by a white tape (7). The wingsweep commanded by the CADC is displayed by a white triangle on the angle tape (1). This is equivalent to the safe limit of forward movement and the pilot cannot exceed the sweep amount indicated by the triangle by regular means. The pilot commanded sweep is indicated by a white box moving along the wingsweep tape (2).
The current mode of the system is shown by flags on the right side of the instrument. The OVER (3) flag indicates that the wings are in the oversweep/parking position and are not safe for flight. The EMER (4) flag indicates that the emergency wing sweep has been selected by pulling the handle out and the CADC has no authority over the wing position anymore, as pulling the handle disconnets the electrical motor from the handle. Should the pilot choose to move the wings aft of the automatically selected angle, the system will show the MAN (5) flag and the CADC will not alter the angle unless the safety limit is equivalent to the current angle. This flag will also engage when BOMB mode is selected. The AUTO flag (6) shows when the CADC has full control over the wing sweep and is automatically moving the wings for optimal aerodynamic performance.
The BOMB mode, unlike the manual mode, alters the CADCs limits, to result in better flight stability at the cost of reduced lift. The CADC triangle will move to around 60° once bomb mode is selected and consequently move the wing angle along with it.
Once landed, the wings can be stowed, by removing the wing sweep handle cover, pulling/popping the handle out and moving it as far aft as possible. Then the pilot has to push it back in and move it the last few degress aft. Afterwards its advised to hold the handle in this position for a few seconds before popping it out again, resulting in the final oversweep position.
To unstow the wings again you simply move the handle back forwards to the 68° position before putting it back in and connecting it to the eletical motor again. Then, the CADC needs to be reset by hitting the CADC MASTER RESET infront of the handle.
Landing Gear
The F-14 Tomcat has 3 retractable landing gears: the nose gear, the left gear, and the right gear. The gear is moved via the gear lever on the left side of the cockpit. In the up position, the gear will retract. In the down position, the gear will extend as well as move the hydraulic isloation switch from the "flight" into the "TO/LDG" position. Additionally, the landing gear has an emergency extension, that is activated by roatating the head of the landing gear handle. This process is irreversible by the pilot, as the gear is extended by firing pressure cartridges that will lock the gear in place. This will also disable nose wheel steering permanently.
In DCS World, the only way to fix this state, is to take a new aircraft.
Nosewheel Steering
The nose gear features nosewheel steering (NWS) controlled by the rudder pedals. NWS can be engaged and disengaged by the NWS button on the stick. The status of the NWS system is indicated on the left side of the windshield frame with the "NWS engaged" light illuminating upon NWS engagement. The F-14s nose wheel is prone to skidding, if the pilot oversteers while taxiing fast. The nose wheel will also not be able to recenter if the aircraft is not moving, therefore, if hooking up to a catapult, the pilot should attempt to center the nose before stopping the plane.
Launch Bar
On the front nosegear is a launch bar that attaches the airplane to a catapult for launches from an aircraft carrier. Its deployment is pilot-controlled, but it is connected to the catapult by the ground crew, via the "Catapult Hook Up" keybind on Stennis and the Forrestall or by the ground crew directly on the ships included in the "DCS World: Supercarrier".
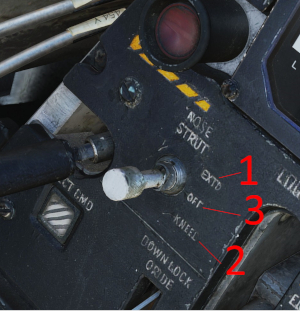
The launch bar is operated by hydraulically extending and retracting the nose strut of the F-14. The act of retracting the nose strut is referred to as "kneeling" as the aircrafts front will come down by around 3 degrees. This is commanded with the "nose strut switch" in the kneel (2) position. As the aircraft comes down, the launch bar will automatically extend and once the process is completed, the switch will return to the "off" (3) position. Should the pilot wish to take the aircraft out of its kneeling state, he can move the nose strut switch to the "EXTD" (1) position.
A manual override for the launch bar is present in form of the "Launch Abort" switch, hidden below and to the left of the parking brake handle and under a red cover. The switch is spring loaded to the "NORM" postition and held there when the cover is down. The "ABORT" position retracts the launch bar, without extending the nose strut. However, this switch will NOT actually abort the launch on any carriers and also will not disconnect the aircraft from the catapult.
Autopilot and Autothrottle
The F-14 Tomcat has the ability to automate certain ascpects of flight via its Automatic Flight Control System (AFCS) and Automatic Throttle Control (ATC). The AFCS, or simply the autopilot, control the flight surfaces and the ATC controls the throttles.
AFCS
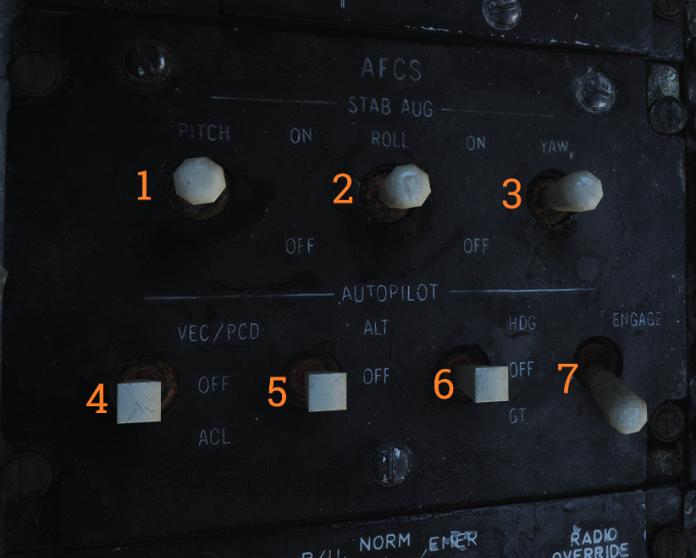
The AFCS can be controlled on a panel on the left console of the front seat. The front switch row controls the flight stability component of the AFCS with the "Yaw", "Roll" and "Pitch" channels. Engaging these for normal flight outside of combat situations is highly recommended as they make it significantly easier to remain coordinated and avoid overstressing the wings. Although, unlike in Fly-By-Wire aircraft, they DO NOT provide care free handling. Therefore, its remains entirely within the realms of possibilty to perform rapid unscheduled disassembly during a high speed pullout, or to, plainly said, tear of the wings.
For hands off flying, the F-14 also has several fully automatic autopilot modes, which are engaged with their assorted switches on the panel below the flight stability system.
Firstly, the “Engage” switch, toggles the autopilot on and off along with its Attitude Hold system. Once this switch is flipped, the plane will work to hold the current flight level. Its not recommended to fight the autopilot with pitch inputs, once this is engaged.
To the left of the “Engage” switch, you can find the “HDG/GT” switch, which engages the Heading hold and the Ground Track mode. Heading hold, as the name suggests hold the planes current heading once engaged. Ground track on the other hand, maintains the planes current direction of travel, while compensating for the plane drifting left or right due to wind. Both of these only activate if the engage switch is set to the “Engage” position.
The “ALT” switch is in control of the Altitude hold autopilot mode. Once this switch and the engage switch is engaged, a warning labelled “A/P REF” will light up on the left side of the VDI. To now hand the control over to the autopilot, the pilot needs to fly the plane at a vertical velocity within 200 feet per minute to 0 and press the “Autopilot reference/NWS” switch. If done correctly, the plane will attempt to zeroize the planes vertical velocity and keep it there, even if roll commands are applied. Therefore, it can not only be used to cruise, but also can hold the plane in an orbit. Unlike some other autopilots however, the F-14 will not attempt to fly at a set altitude once the system is engaged. It will therefore not fly at the exact altitude that it was engaged at, but usually withing a close margin around it. At high speed flight where the VVI is unreliable, the plane might also start shaking as the autopilot cannot keep up. This might be a DCS issue and not be present in the real aircraft.
Lastly, there is the “VEC/PCD/ACL” switch. This switch controls the remote controlled flight modes, such as the “Datalink Bombing mode”, which is not implemented in DCS at the time of writing and the ACL or “Automatic Carrier Landing” mode on the other hand is fully functional and will receive its own section on this wiki in the future. In the meantime, you can find Redkites video on it here.
Autothrottle
The Autothrottle in the F-14 unlike in its younger cousin, the F/A-18 cannot be used to hold a specific speed. Instead, its used exclusively for landing. It is controlled via the throttle mode switch on the left of the throttle quadrant.To engage the autothrottle, the pilot needs to have the flaps fully deployed and the landing gear down, ideally, the DLC should also be engaged and the speedbrake deployed. Then, move the throttle mode switch into the "AUTO" position and let go of the throttle. Once engaged, the authrottle will automatically adjust the engine RPM to bring the plane to "Onspeed AoA" as indicated on the left canopy frame, the HUD or the AOA tape. The pilot should now only fly the plane with stick pitch, roll and DLC inputs until touchdown. The system can be disengaged by moving the throttle manually and thus overriding it, putting the switch back into the "boost" position or by applying weight to the wheels.
Digital Systems Overview
Pilot
The F-14 Tomcat comes with 2 digital display screens in the Pilot cockpit:
- Vertical Display Indicator (VDI): a multifunction display that allows for the pilot to see their HUD in a form of a repeater, and the TCS.
- Horizontal Situation Display Indicator (HSD): a multifunction display that allows for the pilot to see their virtual compass for navigation modes, and the AWG-9 Radar from the RIO TID as a repeater.
Heads Up Display
The head-up display (HUD) is a projected display at the front of the cockpit that serves as the primary flight instrument. It also provides various indications for weapon delivery; this section will cover the HUD's indications in NAV master mode. Master mode/weapon-specific indications on the HUD will be covered in the relevant section.
Reject Modes
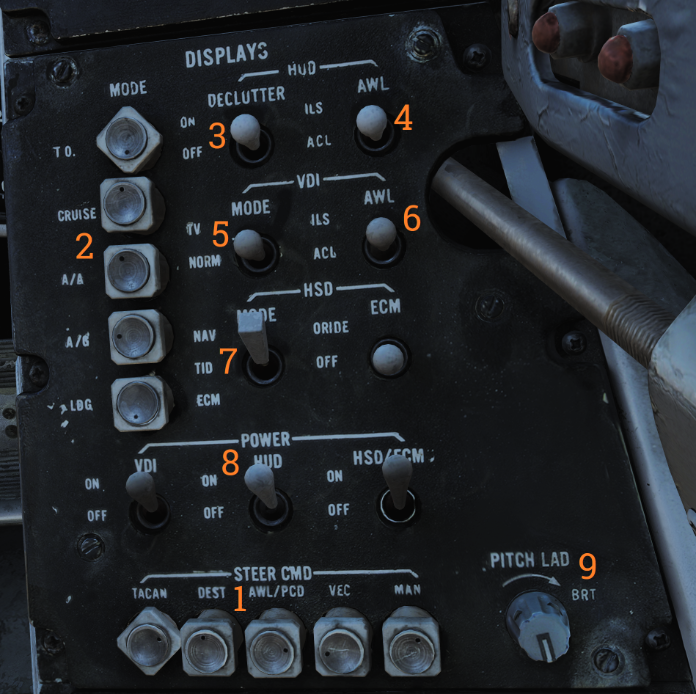
Via the switches next to the TO button on the displays panel, you are able to "declutter" or remove information off of the HUD.
Radar Intercept Officer
The Radar Intercept Officer (RIO) comes with 3 digital display screens in the RIO cockpit:
- Detail Data Display (DDD): a dual-purpose display that allows for the RIO to see contacts on the radar, based on the range and radar mode.
- Tactical Information Display (TID): a multi-purpose display that allows for the RIO to see their AWG-9 situational awareness, TCS, TARPS and LANTIRN pods.
- Horizontal Situation Display Indicator (HSD): a multi-purpose display as to the one in the pilot cockpit.
Master Modes
The F-14 Tomcat has 5 primarily modes for information displayed. The 5 master modes are:
- TO: switch. Displays takeoff information on HUD and VDI for degrees.
- CRUISE: single-purpose button. Displays in-air flight information on HUD and VDI for degrees.
- A/A: single-purpose button. Displays air-to-air information on HUD and VDI for degrees; and weapon employment.
- A/G: single-purpose button. Displays air-to-ground information on HUD and VDI for degrees; and weapon employment.
- LDG: single-purpose button. Displays landing information on HUD and VDI for degrees.
Additionally, the F-14 Tomcat has an Air Combat Maneuver (ACM) panel which controls all air-to-air and air-to-ground aspects for armament.
The F-14 Tomcat has an inertial navigation system (INS) that allows the pilot to navigate by internal gyros aligned. However, due to the fault of having no GPS assistance, these gyros slowly drift over time and cause misalignment for visual information.
HSD
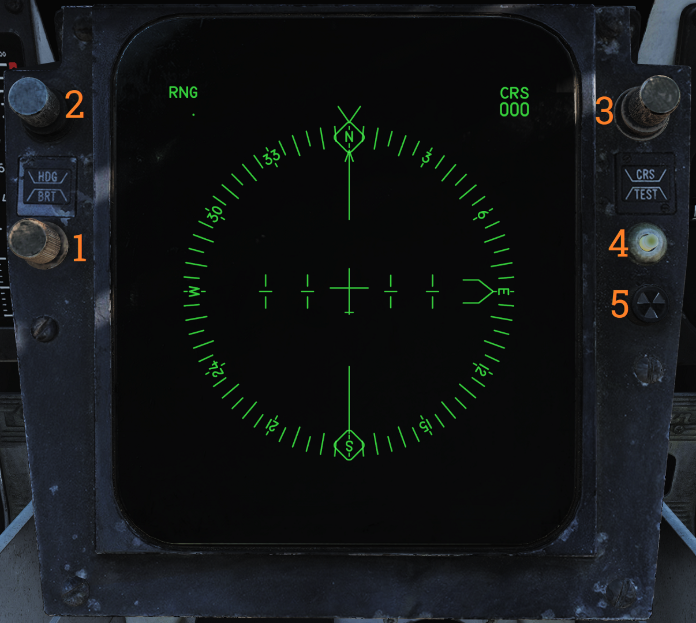
The Horizontal Situation Display Indicator (HSD) is the primary interface with the airplane's navigation systems. The HSI can be accessed from the bottom display screen. The basic function of the HSI is a rotating compass with a looking-from-above perspective. The controls for this screen are:
- BRT Control: dial. Controls the brightness of the HSD screen.
- HDG Control: dial. Controls the heading reference in TACAN mode.
- CRS Control: dial. Controls the course heading reference in MAN and TACAN modes.
- Test Button: single-purpose button. Resets the HSD screen if overload protection activates.
- BIT Indicator: light. Shows a white light if a failure produces in the HSD.
Steering Commands
The HSD comes with a set of 5 different steering commands, which each have their own purpose towards displaying certain information:
- TACAN: single-purpose button. Displays information based off of a radio beacon with range and direction.
- DEST: single-purpose button. Displays information off of a selected waypoint from the RIO with range and direction.
- AWL/PCD: single-purpose button. Displays information off of an ICLS frequency with azimuth and elevation bars (on VDI and HUD)
- VEC: single-purpose button. ? (needs more info.)
- MAN: single-purpose button. Displays information off of an entered heading (HDG Control) with direction.
Waypoints
The F-14B comes with an onboard flight computer system that handles waypoint navigation during in-air flight. The navigation system in the F-14B Tomcat gives a variety of waypoint holders, along with information for a set home plate.
Pilot
For the F-14B pilot, the waypoint information is able to be accessed by the DEST steering command and by using the NAV HSD display mode.
Radar Intercept Officer
For the F-14B Radar Intercept Officer, (RIO) the waypoints must be manually assigned by the RIO through the Computer Address Panel (CAP) system under the TAC DATA category. Once done, the waypoint must be selected through the CAP and entered in with coordinates similar to how INS alignment procedures are done.
TACAN
Tactical Air Navigation (TACAN) is a military radio navigation system. A TACAN beacon allows for an aircraft to determine its bearing and range from it, and using this information can navigate. TACAN's may be ground-based or be broadcasted by an airplane. TACAN channels have two bands, X and Y, and range from 1-126. 2 TACAN channels may be set present in the aircraft by both the Pilot and RIO for simultaneous use.
The TACAN setting knobs give a range of these options:
- T/R: Transmit and receive. Gets bearing and range from the TACAN.
- RCV: Receive. Gets bearing from the TACAN.
- A/A: Air-to-air TACAN mode.
- X: Tunes the selected frequency on the X band.
- Y: Tunes the selected frequency on the Y band.
ICLS
For night and low visibility operations, aircraft carriers have an Instrument Carrier Landing System (ICLS) to allow for instrument approaches to the carrier. ICLS provides horizontal and vertical guidance. The F-14 is equipped with ICLS.
To activate the airplane's ICLS antenna, an ICLS dial is present to the right of the warning lights advisory panel, with an ARA on/off switch, used to toggle power to the system.
When ILS is selected on the HSI, two bars, one horizontal and one vertical, appear near the velocity vector on the HUD. These indicate a vertical and horizontal deviation from the optimal glideslope (3°) and course to the deck. When they are both aligned with the velocity vector (making a "+"), the aircraft is on course.
ACLS
For CAT III conditions and poor visibility, the F-14 is equipped with the Automatic Carrier Landing System (ACLS) to allow an automatic flight to the carrier via. a radio-guided input from a Landing Signal Officer. (LSO) The auto-throttle and autopilot systems must be engaged and present during the time of activation with this system, along with lights given to the left of the VDI display.
Datalink is required between the aircraft and the carrier in order for ACLS to work. When the best position of the azimuth and glideslope bars are within parameters, the nosewheel steering button is pressed in order to engage guidance.
The F-14B has a variety of navigation failures that may/can occur, including methods to fix them.
An error of latitude or longitude in the computer position of the aircraft can be corrected by a navigation fix update. Updating is especially important in the backup modes (AHRS AM and IMU/ AM) because of the estimated winds and magnetic variation changes. A nav fix is done via a ground-reference-point (latitude and longitude) position. The range and bearing of this position to the present aircraft position are used to update or correct existing values. The nav system may be updated by either a radar fix, a TACAN fix, or a visual fix.
Before performing a nav fix, the latitude and longitude of the desired update point (radar, TACAN, or visual) must be stored in one of eight navigation point locations (three WPs, FIX PT, HOME BASE, HOST AREA, DEF PT, and IP). This data can be stored prior to flight by data link or by manual insertion. Then follow these steps:
- Hook the Waypoint you choose to select for the nav fix.
- Check the stored latitude and longitude on the TID.
- Rotate the CATEGORY switch to NAV and select the desired type of update.
Note that updating the position while in INS, and to a lesser degree while in IMU, can introduce a greater navigational position error than already present, in particular, if radar fix is used to update the nav system. Updates with a visual or TACAN fix provide reasonable accuracy (assuming a good MAG VAR during TACAN updates). Updating your nav system via a nav fix should be primarily used in the AHRS mode.
Radar Fix Update
An RDR FIX may be selected before or after positioning the DDD cursors. If the RDR FIX button is depressed, the computer computes the present position of the aircraft by measuring the range and bearing from the selected point. The delta between the computer position and the position determined by the INS is then displayed on the TID. If the entry of this delta into the navigation computations is desired, press the FIX ENABLE button. If the delta does not appear to be correct, the computer and the readout can be cleared by pressing the RDR FIX button. The fix may then be attempted again. The RIO should also perform periodic checks of own aircraft system altitude and update the altitude if necessary.
Radar updating is performed as follows:
- TID CURSOR/CAP - Hook Desired Navigation Point for Update.
- PULSE SRCH button - Depress.
- On sensor control panel: STAB switch - IN. EL BARS switch - 1. AZ SCAN switch - As Desired.
- RDR FIX button - Depress.
- DDD CURSOR button - Depress.
- Action switch - Half Action (first detent).
- Cursor is displayed on DDD.
- Manipulate hand control DDD cursor over desired ground map point.
- Action switch - Full Action and Release. (This will cause the DDD cursor to remain at the selected position.
- Observe the delta for LAT and LONG on TID.
- If readouts are unsatisfactory, deselect RDR FIX and repeat steps 4 through 12.
- FIX ENABLE button - Depress.
TACAN Update
To perform a nav fix by TACAN requires that a restored waypoint shares identical LAT and LONG values with the TACAN station that will be used for the fix. Select the TACAN channel for the desired station and verify by listening to the coded identifier tone in the headset.
Press the TACAN FIX button to update the aircraft position from a TACAN station. The WCS computer then calculates the own aircraft position error based on the range and bearing from the TACAN station. The delta is then entered in the same manner as with a radar fix.
Perform a TACAN fix following these steps:
- Select a TACAN channel whose latitude and longitude correspond to an update point.
- Hook desired update point (WAYPT 1, FIX PT, HOME BASE, etc.).
- CATEGORY switch - NAV.
- TACAN FIX button - Depress.
- Observe present position delta readout.
- If delta is unsatisfactory, deselect TACAN FIX and repeat steps 2 through 7.
- FIX ENABLE button - Depress.
Visual Update
To perform a visual fix, fly over a restored waypoint and press the VIS FIX button. Estimate your timing, because the aircraft nose and fuselage can obscure the fixed point during an overflight. It is also difficult to estimate when directly overhead a waypoint if the aircraft altitude is greater than 10.000 feet. The delta for the visual fix is displayed on the TID. Enter the delta by pressing FIX ENABLE.
To perform a visual fix use the following steps:
- Hook desired update point (WAY PT, HB, IP, etc.).
- Select NAV category on CAP.
- Overfly the selected restored point and when over the point, depress the VIS FIX button on the cap.
- If the delta is not satisfactory, press VIS FIX again to clear the delta and repeat from step 1.
- If a satisfactory delta is displayed, depress the FIX ENABLE button; this causes the delta correction of own-aircraft position to be inserted into the computer.
Datalink Update
To perform a data link update of the aircraft INS to the TDS frame of reference, the aircraft and TDS must share a prebriefed waypoint, identical in latitude and longitude. Enter this LAT/LONG data into the HOST AREA pseudo target file. The TDS will uplink the common reference point as a data link waypoint. When the aircraft and TDS INS systems agree, the data link waypoint and host area symbols will be superimposed on the TID. If they drift apart, the two pseudo targets on the TID will drift as well.
To perform an update via data link, use the following steps:
- Hook data link waypoint corresponding prebriefed reference point.
- Select NAV category on CAP.
- Overfly the hooked data link waypoint. When immediately over the point, press VIS FIX button on CAP.
- Observe delta LAT and LONG on TID.
- If deltas are satisfactory and update is desired, depress FIX ENABLE.
- After a data link update, HOST AREA and data link waypoint should be superimposed on the TID again.
Net aircraft that use fighter-to-fighter data link can update their navigation system in the FF/DL mode. To update LAT/LONG hook the net aircraft symbol of an aircraft that is in close proximity and select F/F NAV UPDATE on the CAP. This will enter the hooked aircraft’s coordinates into the INS as own-aircraft coordinates. To update the nav system on an aircraft that is not close, first obtain a radar STT on that aircraft, hook the STT-ed aircraft on the TID and then press F/F NAV UPDATE on the CAP.
Defensive Systems
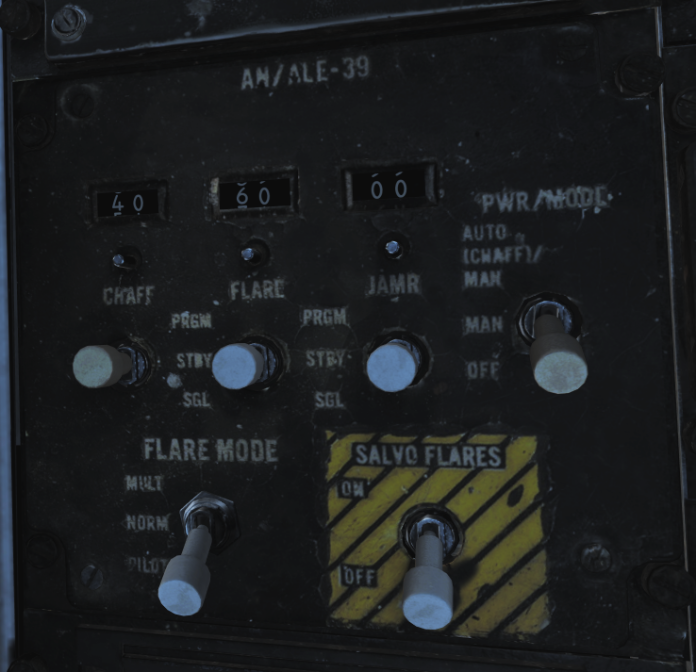
The F-14B is equipped with various defensive systems: the AN/ALE-39 Countermeasure Dispensing System (CMDS), for the release of chaff and flares, the AN/ALQ-126 Deception ECM (DECM), for jamming enemy radar, and the AN/ALR-67 Radar Warning Reciever (RWR), for detection of enemy radar emitters and missile launches.
AN/ALR-67 RWR
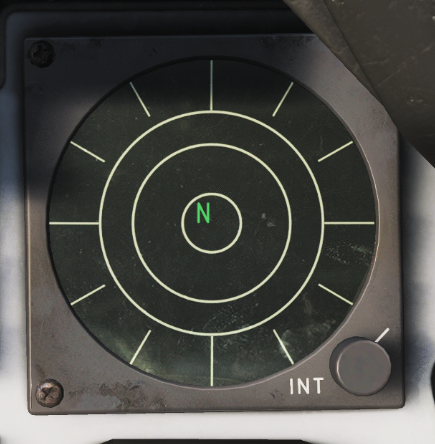
The AN/ALR-67 Radar Warning Receiver (RWR) provides the Hornet the ability to detect radars via the radio/microwave radiation they emit.
Audio Tones
Accompanying the RWR are various audio feedback tones:
- Single Beep: A new ground- or sea-based emitter has been detected.
- Double Beep: A new airborne emitter has been detected.
- Repeating Beep: An emitter is tracking.
- Faster Repeating Beep: An emitter is guiding a missile or is a missile.
On the RWR gauge, the RWR knob will control the volume of the RWR tones.
Emitter Identifiers
This list is, at present, not complete.
| Type | RWR ID |
|---|---|
| U | Unknown |
| M | Active radar-homing missile |
| S | Search radar |
| 3 | SA-3 "Goa" |
| 6 | SA-6 "Gainful" |
| 8 | SA-8 "Gecko" |
| 10 | SA-10 "Grumble" |
| 11 | SA-11 "Gadfly" |
| 11 | F-111 Aardvark |
| 12 | SA-12 "Gladiator" |
| 13 | SA-13 "Gopher" |
| 13 | C-130 Hercules |
| 14 | F-14 Tomcat |
| 15 | F-15 Eagle |
| 15 | SA-15 "Gauntlet" |
| 16 | F-16 Fighting Falcon |
| 17 | C-17 Globemaster III |
| 18 | F/A-18 Hornet |
| 22 | Tu-22 "Blinder" |
| 23 | MiG-23 "Flogger" |
| 24 | Su-24 "Fencer" |
| 25 | MiG-25 "Foxbat" |
| 29 | MiG-29 "Fulcrum" |
| 29 | Su-27 "Flanker" |
| 29 | Su-33 "Flanker-D" |
| 30 | Su-30 "Flanker-C" |
| 31 | MiG-31 "Foxhound" |
| 34 | Su-34 "Fullback" |
| 39 | Su-25M "Frogfoot" |
| 40 | Spruance-class destroyer |
| 48 | Nimitz-class carrier |
| 49 | Oliver Hazard Perry-class frigate |
| 50 | A-50 "Mainstay" |
| 52 | B-52 Stratofortress |
| 76 | IL-76 "Candid" |
| 78 | IL-78 "Midas" |
AN/ALE-39 CMDS
The AN/ALE-39 is the countermeasures dispensing set installed in the F-14B in this simulation. It controls its own set of launchers located between the engine nozzles on the underside of the so-called beaver-tail. The launchers each have two sections, one containing 10 cartridges and the other 20. They are referred to the left and right dispensers even though the left is really the front one and the right the back one with both being mounted inline on the left side of the tailhook. This is a remnant from the earliest model F-14s carrying the AN/ALE-29.
This all sums up to a capacity of 60 cartridges in the system with each section necessarily holding one type of cartridges meaning that any combination of cartridges is possible as long as each type’s quantity is a multiple of 10. The system itself has no real knowledge of what is loaded where so incorrectly programming the system can lead to the wrong type of cartridge being ejected.
Cockpit Controls
The system itself can be operated manually from the control panel in the RIO pit or the DLC thumbwheel on the pilot stick when the flaps lever is in the up position. It is also capable of running programmed sequences of ejection which in turn can be initiated manually by the RIO from the control panel or the direction hats mounted on the handhold over the DDD. In addition, the AN/ALR-67 can also initiate the chaff ejection program if set up correctly on the AN/ALE-39 control panel.
AN/ALQ-126 DECM
The AN/ALQ-126 deception jammer is designed to detect radar threats, analyze them, select the optimum countermeasure technique available and apply it. Available techniques for jamming are amongst others, main lobe blanking, inverse con-scan, range-gate pull-off and swept square modes. In DCS this is modeled as a simple noise jammer due to engine limitations but controlled by the DECM logic as to when it’s on or off.
Cockpit Controls
The controls for the AN/ALQ-126 DECM are all located on the right horizontal panel in the RIO pit, the panel as the image above. In addition, there are two indication lights co-located with the RWR threat indicators on the right side of the TID. The mode selector knob controls power and operational mode that the system is in. The modes for the DECM are as follows:
- OFF: turns off power to the system. STBY begins pre-warming of the system, taking in all-around 5 minutes.
- TEST HOLD 3 SEC: is used to prepare the system for BIT, after 3 seconds in this mode, turn the knob to TEST - ACT.
- TEST ACT: starts the BIT in the system. The BIT takes approximately 30 seconds and the RCV light will be illuminated the whole time while the XMIT light will flash twice. If the STANDBY light illuminates it indicates that a no-go condition exists in the system.
- REC: enables the system to receive the only mode, enabling analyzation of threats and also the threat audio.
- RPT: enables full system functionality, in addition to REC it also now tries to jam threats according to the selected method.
Television Camera Set
The F-14B is outfitted with the ALQ-100 Television Camera Set (TCS) pod, used for visually identifying aircraft during the time of which IFF was not a trusted/more inferior method to confirming hostile aircraft and to keep track of their position, as well as their living status.
Symbology
On the TID, in non-TV mode, a TCS track is indicated by a 1.5” strobe at TCS LOS azimuth with a hollow circle at the end.
The symbology on the video feed from the TCS has indicators for the FOV and two crosshairs indicating TCS LOS relative own aircraft, GACH, and AN/AWG-9 radar LOS relative TCS LOS, RACH. Additionally, the track window is indicated by 4 small squares representing each corner of that window.
The gimbal angle crosshairs or GACH, which is a solid cross, indicate deflection of the TCS LOS from the aircraft datum line, ADL. GACH crosshair in the center indicates TCS LOS along ADL and deflection towards the edges indicate deflection towards the gimbal limits with the video edges being maximum deflection.
RACH or radar angle crosshairs, a dashed crosshair, indicate radar antenna LOS when inside the current TCS FOV. When the sensors slave to one another RACH and GACH will coincide creating a single solid crosshair.
The track window indicates the area that the TCS contrast tracker is currently locked on to if it has acquired a target. When not in an active track these squares collapse into the center of the display being 2% of the screen width when in manual mode and 5% when in an auto mode.
LANTIRN Targeting Pod
The F-14B can carry the AN/AAQ-14 Low Altitude Navigation and Targeting Infrared For Night (LANTIRN) targeting pod. This pod consists of a Forward-Looking Infrared (FLIR) camera (which also includes a digital charged coupled device camera) for target locating and observing, a Laser Target Designator/Ranger for firing a laser that both designates targets for laser-homing weapons and gathers ranging information for designating whatever the FLIR is pointed at as an air-to-ground, and a Laser Spot Tracker (LST) which can search for and track a laser, allowing for the FLIR to be cued onto an offboard (ground or air-designated) laser from another unit and then designate a Target off said point; this allows for most effective buddy-lasing. The targeting pod can be used in both air-to-ground and air-to-air functions, but the LTD/R and LST are only used for A/G operation.
Symbology
The following areas on the LANTIRN are to represent:
- A/C Position Data: Displays aircraft LAT/LON, altitude, and groundspeed information.
- LANTIRN Polarity: Displays white or hot background. AGC is for automatic gain control, MGC is for manual gain control.
- LANTIRN Information: Gives general information on the pod. SR is for slant range, AZ/EL for azimuth/elevation of sight, and rest is UTC time.
- LANTIRN Track Mode: Displays the current tracking mode. A/A is for air-to-air, A/G is for air-to-ground. Right side is for current selected weapon.
- Track Data: Displays information of LAT/LON and altitude of where the sight is at.
- Track: Displays the hairs for point and area track, and what the sight is directly pointed at.
- Launch Envelopes: The top tape is for the heading relative of the aircraft to the track. The right side tape is for the release point.
TARPS Pod
Not yet implemented.
Air-to-Air Radar
Detail Data Display
Among the 3 digital displays, the Detail Data Display gives the RIO information about contacts from the AWG-9 radar in terms of range and radar mode, with respect to the notch filter.
Notch Filter
The AWG-9 radar in the F-14B Tomcat has a notch filter when using the pulse-doppler radar modes under certain conditions. These conditions include, but are not limited to:
- ~100 knot difference of the aircraft relative to contact
- Contact flying 90 degrees perpendicular CW/CCW to aircraft
- Masking with ground terrain scan return
There is a rough line shown in the radar modes, likewise of the jamming lobe, for when considering the notch filter that the contact will disappear from.
Tactical Information Display
The Tactical Information Display (TID) gives the RIO of the F-14B the main information on the AWG-9 radar, including situational awareness, range, altitude, and contact heading.
Display Modes
The TID comes with a total of 8 display modes available, that can be toggled either on or off for purposes of gathering more information or decluttering:
- RID DISABLE: ? needs more info. Not yet implemented.
- ALT NUM: Displays the altitude of contact with a singular digit rounded to the nearest thousand.
- SYM ELEM: Displays the symbology of contacts corresponding to HAFU.
- DATA LINK: Displays contacts from the datalink frequency.
- JAM STROBE: Displays the jamming strobes. Not yet implemented.
- NON-ATTK: Displays determined (manual IFF or datalink) HAFU of friendly contacts.
- VEL VECTOR: Displays the velocity vectors of contacts.
- LAUNCH ZONE: Displays contact approximate missile launch zones.
AN/AWG-9 Radar
The F-14 Tomcat is equipped with the AN/AWG-9 all-weather and pulse-doppler radar. It is a very long-range radar used for the main purpose of intercept.
Radar Modes
The AWG-9 in the F-14B comes with 2 types of radar modes: doppler and pulse-doppler search. Of those two, subsets are able to be observed as 5 in this list:
- PD SRCH: Pulse-Doppler Search mode. No bias factor of the radar, but impedes to pulse-doppler methods.
- PD STT: Pulse-Doppler Single Target Track mode. By default upon acquiring a lock with the AWG-9, the radar will move to this function mode. It is currently suspectable to the notch filter.
- RWS: Range While Search mode. The radar will prioritize the range of targets but not other factors. Falls under pulse-doppler.
- TWS MAN: Track While Scan - Manual mode. The radar will prioritize the situational awareness of other targets but not give information on every target. The radar will also prioritize targets by threat importance.
- TWS AUTO: Track While Scan - Auto mode. The radar will perform the same as TWS Man, but the elevation and azimuth controls will be automated in the process for an optimal scan.
- PULSE SRCH: Pulse Search mode. No bias factor of the radar and can not be impeded to the notch filter, unlike the pulse-doppler method. The radar will, however, output a return of everything that is scanned and requires tuning.
- PULSE STT: Pulse Single Target Track mode. Performing similarly to Pulse Search mode, this function mode applies to only a single target and is not suspectable to the notch filter.
Pulse-Doppler Search Mode
The pulse-doppler search mode is used mainly as a kind of early warning mode. It is the search mode with the greatest detection range but it can display no range to the RIO, only closure rate. For this reason, the TID can display no track information.
Pulse-Doppler STT Mode
The pulse-doppler STT works and looks much like the pulse STT mode. It does, however, have the same advantages and disadvantages compared to pulse STT as the other pulse-doppler modes compared to the pulse modes. This means that while much better at tracking a target close to the ground it is however vulnerable to notching.
The DDD display for pulse-doppler STT looks like pulse STT display except that the target return and antenna azimuth display are moved to the left side of the screen and a generated synthetic target marker is displayed at the correct azimuth instead. This is so that the targets range can be displayed by the synthetic target, unlike the other pulse-doppler modes which only shows closure rate. The other symbology on the DDD in this mode are the same as in pulse STT.
Range While Search Mode
In range while search, a frequency measuring ranging mode is added (FM ranging) to allow the radar to measure the range of tracked targets in addition to closure rate. This additional processing does, however, mean that the effective range of the radar is somewhat lesser. The display on the DDD is the same as in pulse-doppler search, the TID however also shows tracks in this mode showing the targets as tracks momentarily as they’re scanned and displaying their position and altitude.
The targets are shown for a maximum of two seconds or until the antenna again scans the same bar at the same azimuth at which time it is removed unless detected again. The maximum number of concurrently shown tracks are 48.
TWS Manual Mode
The track, while scan mode uses the same FM ranging as RWS with the same reduction in range compared to pulse-doppler search and the DDD display, is also the same. The main difference that the computer establishes track files and tracks up to 24 targets concurrently of which 18 can be shown on the TID at any given time.
As the computer routine calculating these tracks need a set track refresh time of 2 seconds this limits available azimuth scan area and bar settings to either 20° 4 bars or 40° 2 bars. When entering TWS the computer automatically selects the ±20° 4 bar scan disregarding the RIO set scan volumes unless those are set to ±40° 2 bars in which case that is used instead.
The TWS mode is also the only mode enabling guidance of the AIM-54 at multiple targets (up to six), and as soon as engageable targets are detected the computer starts assigning them a missile priority number according to optimal missile firing sequence.
TWS Auto Mode
Performing similarly to TWS Man mode, what differs between the two is that in TWS auto the computer takes control of used scan volume and scan pattern azimuth and elevation as soon as target tracks are present. The WCS computer automatically tries to optimize the scan volume and direction so that tracking of the prioritized targets is maximized. If not selected before launch the WCS overrides as soon as the first AIM-54 is launched and selects TWS Auto.
Pulse Search Mode
Pulse search is used to search for and find airborne targets at range. It is possible to use this radar mode as a basic ground mapper as well which can be useful for navigation and navigational fixes and can also be used in a pinch to detect larger surface targets like ships. Keep in mind though that the radar is not built with this as its main function and that a real air-to-ground radar will outperform it handily.
In this mode, the radar cannot by itself differentiate targets and generate tracks meaning that the WCS will not generate track files and display anything on the TID. This also means that pulse search is not capable of guiding missiles.
Pulse STT Mode
Pulse STT is used to track a single target, like pulse search mode it is not susceptible to notching but it is to ground clutter. The fact that the STT modes use gates to track the target, in this case, range gates, means that it is less susceptible to ground clutter but a target close enough to the ground that the ground return enters the range gates would be likely to shake the lock.
As it is only in the pulse-doppler modes that the missile guidance commands can be sent pulse STT is limited to launching AIM-7s in CW mode and AIM-54s in an active launch mode limiting their ranges. At short ranges, ACM ranges, it is possible to use the ASPECT switch to set what aspect of the target to track, this is just to counter different types of countermeasures. As an example, if set to NOSE the radar will be less susceptible to chaff as the radar weights its track towards the targets leading-edge (nose) away from the chaff being launched behind the target.
A successful track is indicated by the ANT TRK and RDROT indicator lights on the DDD, meaning that the antenna is tracking the target and that the target is within the range gates. If the target is jamming with sufficient strength, negating a range track, the radar will transition to a jam angle track instead, indicated by the JAT indicator light on the DDD illuminating instead of the RDROT. When range tracking is again possible at closer ranges the radar will transition to that instead.
The DDD in this mode will be similar to the pulse search mode but the antenna will be locked onto the target and not scan. Additionally, the DDD will show the range gates around the target, a closing rate symbol at the right scale and applicable attack symbology if a valid missile is selected.
Anti-Jamming Modes
Not yet implemented.
AN/APX-76 IFF Interrogator
The AN/APX-76 IFF (Identification Friend or Foe) interrogator is integrated into the AN/AWG-9 operation. Then interrogator antenna itself is located on the AN/AWG-9 antenna gimbal platform. An IFF system works by sending out an interrogation pulse and then listening for returns from cooperating transponders. In addition to the unencrypted civilian mode the AN/APX-76 is capable of interrogating in the encrypted military mode 4. This ensures that targets replying to mode 4 interrogations are indeed friendly. The AN/APX-76 can be used both in search radar modes and in STT radar modes. To enable interrogation the IFF switch is depressed on the Detail Data Display Panel which then activates the interrogator for as long as the button is held up to 10 seconds max.
When enabled IFF received IFF returns are then overlaid on the normal AN/AWG-9 radar returns on the DDD. A friendly target will be indicated with two bars, one above and one below the normal radar return. As the AN/APX-76 is a separate radar, secondary mode, radar apart from the AWG-9 the IFF can sometimes also detect targets not detected by the AWG-9. In this case the IFF return will not have a radar echo inside it. In the search mode this is overlaid over each target replying and in STT over the STT target. Additionally, if the STT target is hooked on the TID the DDD will switch from normal range display to a ±10 NM display to enable display of multiple returns in case of closely grouped targets.
TID Symbology
Similarly to the F-18, the F-14 uses a series of shapes with assorted lines to display the identity and direction of travel of a track. Unlike the F-18 however, the Tomcat does not have the ability to display colours apart from green and white on the TID. Therefore, symbology takes a high priority and you must learn how to read it as a pilot and how to set it as a RIO. The full list of TID symbols can be found in heatblurs * full manual on the F-14
- WIP
Air-to-Air Weapons
This area will cover over all the different air-to-air weapons brought with the F-14B Tomcat.
Air-to-Air Gun
Using Real-Time mode.
The F-14 Tomcat is outfitted with the M61A1 Vulcan 6-barreled Gatling cannon, being able to hold up a maximum of 675 rounds internally.
Gun Fire Rate
The F-14's pneumatically driven M61 cannon is able to fire at 2 rates of fire which are selectable in flight by the pilot on the ACM panel below the HUD. The GUN RATE pushbutton voth served as an indicator and as a toggle for the two possible fire rates with the currently enabled one being illuminated with a red backlight.
- Low
The low fire rates put ammo preservation firet and decreases the fire rate to 4000 RPM. This can be useful for destroying slow moving aircraft such as bombers or ground targets.
- High
High fire rate lets the cannon fire at its maximum rate of 6000RPM and is usually used in close quarters fights with enemy fighter aircraft.
Gun Modes
The cannon for Air-to-Air mode is able to be placed into 2 following positions:
- Manual: this mode is able to be selected by depressing the CAGE/SEAM button, which will then only display the pipper and ammo count.
- Real-Time: this mode is the regular, default mode. Along with a radar lock, the pipper will calculate to be accurate when directed to the diamond contact box. This will also give a closure rate towards the contact and the range relative to the aircraft.
Symbology
The symbology for the cannon is displayed on the HUD with the weapon master selector in the GUN position, and display in A/A. By default, the gun rounds indicator will be displayed as 0 for rounds per 100. Located next to the display panel to the right is the gun ammo counter. Additionally, the gunsight elevation is also able to be adjusted underneath the steer commands on the display panel.
Air-to-Air Missiles
Missile Preparation
Missile preparation in the F-14B Tomcat is started by moving the master arm switch on the ACM panel underneath the HUD to ON. This is then followed by pressing the MSL PREP and SW COOL buttons to be ON, depending on the armament type. Radar guided missiles give the ready indication with white flags appearing the the station indicator windows on the ACM panel, or when the "HOT TRIG" light illuminates with either a Sparrow or Phoenix selected. The AIM-9s indiacted their ready to use state, by an audible tone that, when a monotonous tone can be heard through the pilots headphones.
AIM-54 Phoenix
The AIM-54 is a long-range, semi-active and active radar missile for Air-to-Air use. The F-14 was the only aircraft to carry it in service. The missile itself is designed to be used against large bomber formations attacking US aircraft carriers, but is also very capable against smaller enemy aircraft, such as fighters. The AIM-54 comes with a proximity fuse and missile gate suite for non-direct contact explosions and radar tracking methods.
Upon the launch of the missile, active input from the AN/AWG-9 radar is used to guide itself towards the contact. If commanded by the AN/AWG-9 in TWS or prior to launch, the missile will go "pitbull" or active and use its own on-board radar to guide itself to its target this can either be the last stretch of the flight in TWS, or throughout the whole flight in the "short range" modes.
A table of when the Phoenix will use its active seeker can be found below.
| Condition | Missile seeker mode | |
|---|---|---|
| "PH ACT" selected by RIO | Phoenix goes active of the rail and if able to, towards the STT target locked during launch. | |
| AWG-9 in "TWS" | Phoenix will fly towards the assigned target and go active on command by the AWG-9.(Fallible. No guarantee that Phoenix will receive command) | |
| AWG-9 in "P-STT" on launch | Phoenix will go active towards last known location | |
| AWG-9 in "PD-STT" | Phoenix launches in SARH mode and will not go active. | |
| Target within 10nm, closing. AWG-9 in "PD-STT" | Phoenix will go active towards last known location immdediately. | |
| Target within 6nm, cold. AWG-9 in "PD-STT" | See above | |
| Phoenix launched with "ACM cover" up | Phoenix will go active, either towards a locked target or as a maddog along the ADL. | |
| Phoenix launched with Boresight selected | See above |
The time until impact will be calculated during the whole flight of the missile and will be displayed on the right side of the contact in the measure of seconds. The maximum displayed amount is 150 seconds TTI (Time To Impact).
Missile Variants
Like most missiles, the AIM-54 was continously developed throughout its service life and received many modifications and upgrades. In DCS, the AIM-54 "family" is represented by 3 variants. Here, listed in chronological order.
- AIM-54A Mk.47 The oldest version of the Phoenix. It is equipped with the original analogue guidance section and an older rocket motor with a shorter burn time compared to the Mk.60.
- AIM-54A Mk.60: A modified version of the Phoenix with a longer burning Mk.60 rocket motor that provides ~30 seconds of burntime, vastly increasing the potential range of the missile. It still uses the analogue seeker and guidance system. Not smokeless, but provides an effective range in excess of 35nm miles against fighters and can strike larger targets more than 100nm away from the Tomcat.
- AIM-54C Mk.47: The C variant of the Phoenix is a self cooling modernized version, equipped with a digital guidance section and a smokeless rocket motor with slightly shorter burn time than the Mk.60. In the near future, its DCS implementation will also receive an on board INS system, allowing it to go active, even when no signal is received from the AN/AWG-9.
Launch Modes
The main seeker in the AIM-54 is able to be fired through 3 launch modes in according:
- Semi-active Radar Homing (SARH): In the first stage of the AIM-54 engagement, the missile is guided semi-actively by the AN/AWG-9 radar using both guidance commands transmitted via the radar and radar energy reflected off the target. Then when the missile is within range of its seeker’s ARH mode the AN/AWG-9 commands the missile to switch to ARH. In pulse doppler STT the AIM-54 uses SARH all the way to the target receiving guidance commands at a greater rate than in TWS and also continuous spotlighting of the target because of the STT mode being used. This increases the effective range of the AIM-54 seeker slightly.
- Active Radar Homing (ARH): This tells the WCS to immediately command the AIM-54 to go active in the first guidance command after launch. If launched at a target within 6 NM if in the targets rear hemisphere or 10 NM miles if in its forward hemisphere the WCS will also automatically command this mode instead of a SARH mode. If the target is not detected actively by the seeker it will still fall back to SARH until the seeker can acquire on its own like in the two SARH modes.
- ACM Active: The missile is commanded active before launch making this the only mode where the missile is truly fire and forget. The AIM-54 missile receives the active message before launching from the WCS in addition to a command prepositioning the seeker-head to have it look at the current WCS track if available.
Additionally, the AIM-54 has an unofficial method of launching the missile:
- Mad-dogging: A method that uses the aircraft relative to their contact altitude and airspeed and firing the AIM-54 in the direction, which will force it to become semi-active within the pitbull range.
HUD Symbology
The pilot will receive standard symbology of the AIM-54 missile selected when the display is in A/A mode. Similar to the GUNS format, displayed on the HUD will be the weapon type denoted in 2 letters, and the number of missiles. Additionally, any more advanced symbology will occur by lock, which is required at first to fire the missile without "mad-dogging."
VDI Symbology
The pilot will also receive additional symbology on the VDI whenever a radar lock occurs with the AIM-54 selected.
WIP.
AIM-7 Sparrow
The AIM-7 Sparrow is a semi-active-radar homing medium range air to air missile. As such, it requires guidance all the way to impact. The F 14 is equipped with 4 variants of the sparrow. The F, M, MH, and P.
Upwards of the MH, these missiles are capable of lofting to increase their range, while the F has a worse motor and seeker compared to the M. All of these missiles can be guided by PD-; and P-STT radar locks and if necessary by the AWG-9s flood mode. Unlike the Phoenix, the Sparrow only provides medium range capabilities, but is quite lethal at ranges up to 15nm while being less clunky to operate than the Phoenix.
AIM-9 Sidewinder
The AIM-9 Sidewinder is an IR-guided missile that self tracks based off of thermal energy (heat) of an aircraft. This missile should be used for close quarters range, where agility and speed are a high priority. The benefit of this missile is how quickly it can turn onto a contact. However, a con to this can be "sun-aiming," where the missile follows a contact that flies directly to the sun and immediately flanks out of the sensor sight of the Sidewinder.
The maximum range on this missile is ~10 nmi., but recommended range is within ~5 nmi. under optimal conditions.
Air-to-Ground Weapons
The F-14B Tomcat comes with a variety of air-to-ground weapons after the upgrade to the Bombcat.
Air-to-Ground Gun
The symbology of the Air-to-Ground Gun is similar to of the Air-to-Air mode. The weapon will instead keep a diamond inside with the cross until passing the horizon threshold. All happens with the Gun selected and the HUD steering command in A/G mode.
Air-to-Ground Bombs
The F-14 Tomcat is able to carry numerous types of munitions that act as bombs, whether dumb or laser-guided.
Mk81/82/83/84 GPB
The "Mk 80" series of general purpose bombs is the main general purpose bomb use by Western militaries. After being used mainly for fighter operations, slowly, due to necessity the F-14 started using bombs more frequently. Among these the Mk 80 series.
As general purpose bombs, these are unguided, simple, "dumb" bombs that are simply dropped from the aircraft in a free fall style and detonate on impact or with a small delay.
The DCS F-14 has 4 of these bombs available. The Mk.81 is the smallest of the series with 250 pounds. The Mk82 is double the weight, being a 500 pound class bomb. The Mk 83 doubles the load again to reach 1000 pounds per bomb, while the largest is the Mk84 with 2000 pounds of weight behind it. The RIO selects which bomb type is on the stores he selected with a rotating wheel on the armament panel on the left of his cockpit. This provides the computer with the necessary information to compute the impact point in all computer bombing modes, and fulfills the same function for the LANTIRN. The RIO then simply needs to select the stations on which the desired weapons hang, the ripple interval and the ripple quantity, to allow the pilot to employ the weapons.
To deploy these weapons, the crew of the F-14 has two main computer aiming options. Firstly, it can use "Computer Pilot", a CCIP equivalent which uses radar rangefinding to deliver bombs on target with an aiming cross displayed on the HUD. The Pilot simply puts the target under the crosshair and depresses "stores release" to employ the selected weapon at that location. This mode is the default and can be accessed if the pilot simply puts the PDCP selector to "A/G". The RIO can, change the modes manually, should the crew so desire. The "Bombing mode selector knob" is used to either make sure that computer pilot is selected, or to swap to the alternative modes. Secondly, the Tomcat has a mode similar to "CCRP" know as "Computer target". If this mode is selected while the A/G mode is active, the pilots symbology will change to add a diamond to the bomb fall line which the pilot can move up and down by using the VSL HI and VSL LO switch on the sidewall. Then, once the diamond is over the target, he can press the rocker in to the PLM/Target designate position to fix the diamond in place. The AN/AWG-9s radar is then, similar to certain AJS-37 bombing modes slaved to the target point for rangefinding. After designating the target, the pilot simply needs to fly his flight path vector on the hud onto the bomb fall line and hold the stores release.
The Mk.82 specifically also comes in two high drag variants. One with a drogue and the "snakeeye". These bombs, are designed to be dropped while in low, level flight.
Additionally, the Tomcat also posses the option to release in "manual" mode as selected by the RIO. This will remove any altitude, or release time restrains from the computer and allow you to drop the selected bombs at any time without any aiming aide. In DCS this is mainly used for Laser Guided bombs, for which aiming is provided by the LANTIRN.
GBU-12/14/16 LGB
WIP.
BDU-33 Training Bomb
The BDU-33 is a training bomb that emits smoke upon impact on a hard surface. This is generally used in training for Air-to-Ground in the Tomcat, and among other aircraft.
ADM-141 TALD
The ADM-141 Towed Air Launch Defense (TALD) missile is a decoy weapon that is employed for doing Suppression of Enemy Air Defenses. (SEAD) The TALD missile represents one of the only true SEAD weapons used in DCS World that is not DEAD-related. The objective of the TALD is to be dropped to confuse SAM sites that use radar guidance so other aircraft are able to destroy them, hence being "suppressed."
The TALD is only able to be successfully launched when the RWR is receiving a radar lock warning or missile warning in the F-14 Tomcat. Only the F-14B Tomcat is able to use this weapon.
Air-to-Ground Rockets
The F-14 Tomcat carries 4 4-count Zuni rockets, which are precision, unguided rockets that are able to be fired in an Air-to-Ground configuration.
Resources
Contributors
- Jak: An early contributor who wrote information on what the aircraft was and helping serve filler content.
- Nullspec: Contributor towards the F/A-18C Hornet on implemented/non-implemented for the formatting.
Manuals & Documents
Heatblur's Videos
- Episode 1: Overview
- Episode 2: Pilot's Cockpit Walkaround
- Episode 3: Cold And Dark (Full Startup)
- Episode 4: The RIO's Office
Jabbers' Tutorial Videos
(They're good!)
- Pilot - Startup/Taxi/Takeoff with JESTER AI
- Pilot - Maneuvering and Flight Characteristics
- Pilot - Air-to-Air Refueling
- Pilot - ACM - Radar Acquisition Modes
- Pilot - Weapons - Zuni Rockets with JESTER AI
- Pilot - Weapons - AIM-9 Sidewinder
- RIO - Startup
- RIO - AWG-9 Radar
- RIO - IFF Interrogation
- Overview - AIM-54C Mk.47 Phoenix - Tacview Debrief
- Overview - AIM-54A Mk.60 Phoenix - Tacview Debrief
- Quick Tips - AIM-54 Phoenix
- Quick Tips - Bombing
RedKite's Tutorial Videos
(More in-depth on particular systems, referenced throughout the guide.)

