Difference between revisions of "F-14A/B"
(→Gun Modes) |
(→Symbology) |
||
| Line 628: | Line 628: | ||
===Symbology=== | ===Symbology=== | ||
| − | |||
| − | |||
The symbology for the cannon is displayed on the HUD with the weapon master selector in the GUN position, and display in A/A. By default, the gun rounds indicator will be displayed as 0 for rounds per 100. Located next to the display panel to the right is the gun ammo counter. Additionally, the gunsight elevation is also able to be adjusted underneath the steer commands on the display panel. | The symbology for the cannon is displayed on the HUD with the weapon master selector in the GUN position, and display in A/A. By default, the gun rounds indicator will be displayed as 0 for rounds per 100. Located next to the display panel to the right is the gun ammo counter. Additionally, the gunsight elevation is also able to be adjusted underneath the steer commands on the display panel. | ||
Revision as of 00:15, 6 September 2019
Credits to Jak for having the F/A-18C page serve as a guide and filler content on related systems.
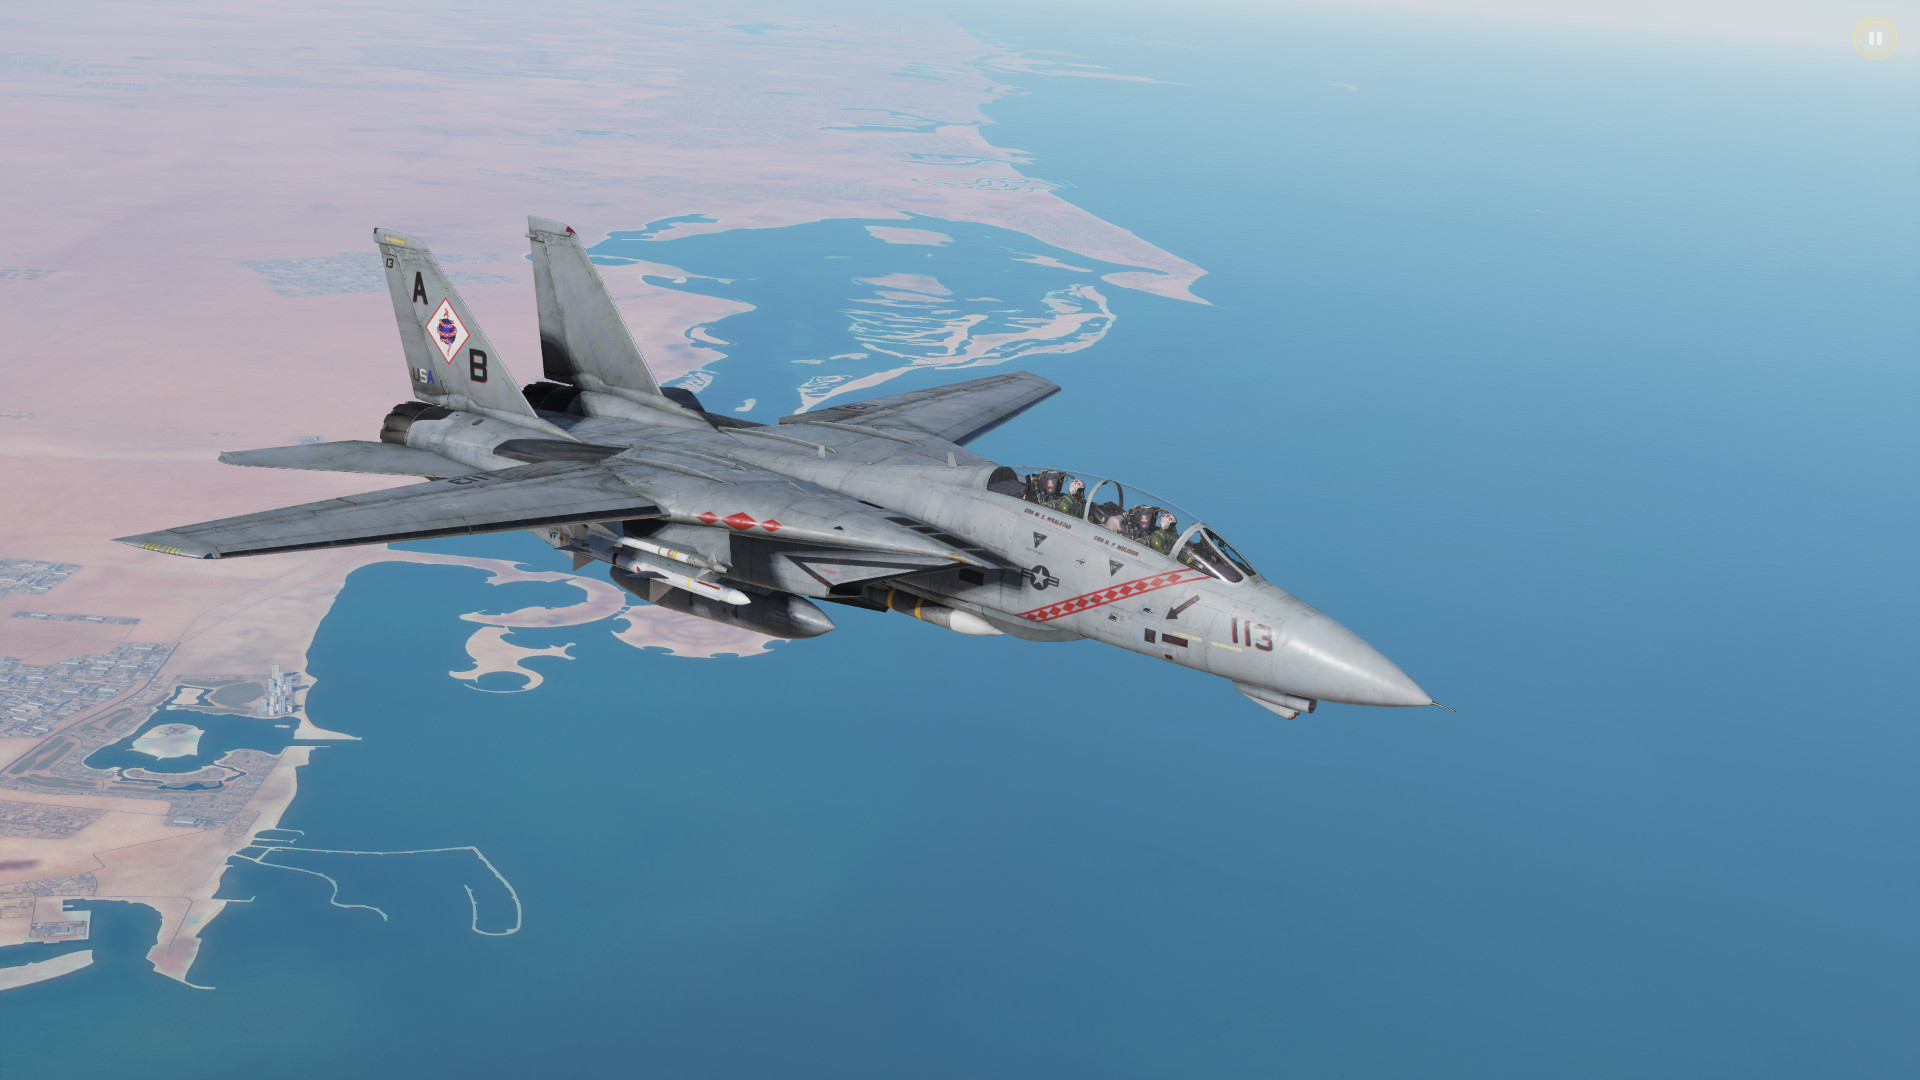
The Grumman F-14A/B Tomcat is a two-seat, twin-engine supersonic variable wing-sweep fighter aircraft. The F-14 was the first US fighter jet with twin tails and was the largest & heaviest US fighter to ever fly from an aircraft carrier. The reason that the F-14 was so incredibly large and heavy was that it carried the large AWG-9 radar and accompanying AIM-54 Phoenix (air-to-air) missiles: this very capable combination allowed the F-14 to make shots of up to 200 nautical miles at the bad guys. Also, being big means you can carry a lot of fuel!
Of course, the practical range of the AWG-9 is rather more limited, especially if you are shooting at more maneuverable fighter-sized targets, but even at these closer ranges, the AIM-54 Phoenix is still a capable missile that should not be underestimated. The F-14 is also capable of carrying an array of air-to-ground weapons, such as dumb bombs in both high and low drag forms, air-to-ground Zuni rockets and even laser-guided bombs, which can be self-designated using the LANTIRN targeting pod on the F-14.
Most people will recognize and adore the F-14 because of its stardom presence in that one weird volleyball movie from the '80s. Its on-screen presence in movies will make the F-14 to appear docile and easy to fly, but due to lack of a fly-by-wire the F-14 can be a real handful: it being a pilot's aircraft however makes it fun to fly and learn. The analogous nature of the F-14 (comparable to the F-5E II Tigershark) will give you a good knowledge of the airplane over time but requires a bit of a different mindset that the computerized flight of the F/A-18C and the F-15.
Contents
- 1 Weapons List
- 2 Hands On Throttle And Stick (HOTAS)
- 3 Flight Controls & Landing Gear
- 4 Autopilot and Autothrottle
- 5 Digital Systems Overview
- 6 Navigation
- 7 Defensive Systems
- 8 Television Camera Set
- 9 LANTIRN Targeting Pod
- 10 TARPS Pod
- 11 Air-to-Air Radar
- 12 Air-to-Air Weapons
- 13 Air-to-Ground Weapons
- 14 Resources
Weapons List
Implemented
Partially or fully implemented weapons of the F14/A/B Tomcat:
- M61 Vulcan Six-Barreled Gatling Gun
- AIM-7M/F Sparrow
- CAP/AIM-9M Sidewinder
- AIM-54A Phoenix Mk. 60
- AIM-54C Phoenix Mk. 47
- Mk-81, 82, 83, and 84
- GBU-10, 12, 16, and 24
- MK-20 Rockeye
- Zuni Rockets
- BDU-33 Practice Bombs
- ADM-141 TALD
- LUU-2 Parachute Flare
- Smokewinder
- LANTIRN Pod
- FPU-1 Fuel Tank
Planned
Weapons not yet implemented into the Tomcat:
- TARPS Pod
Hands On Throttle And Stick (HOTAS)
Throttle
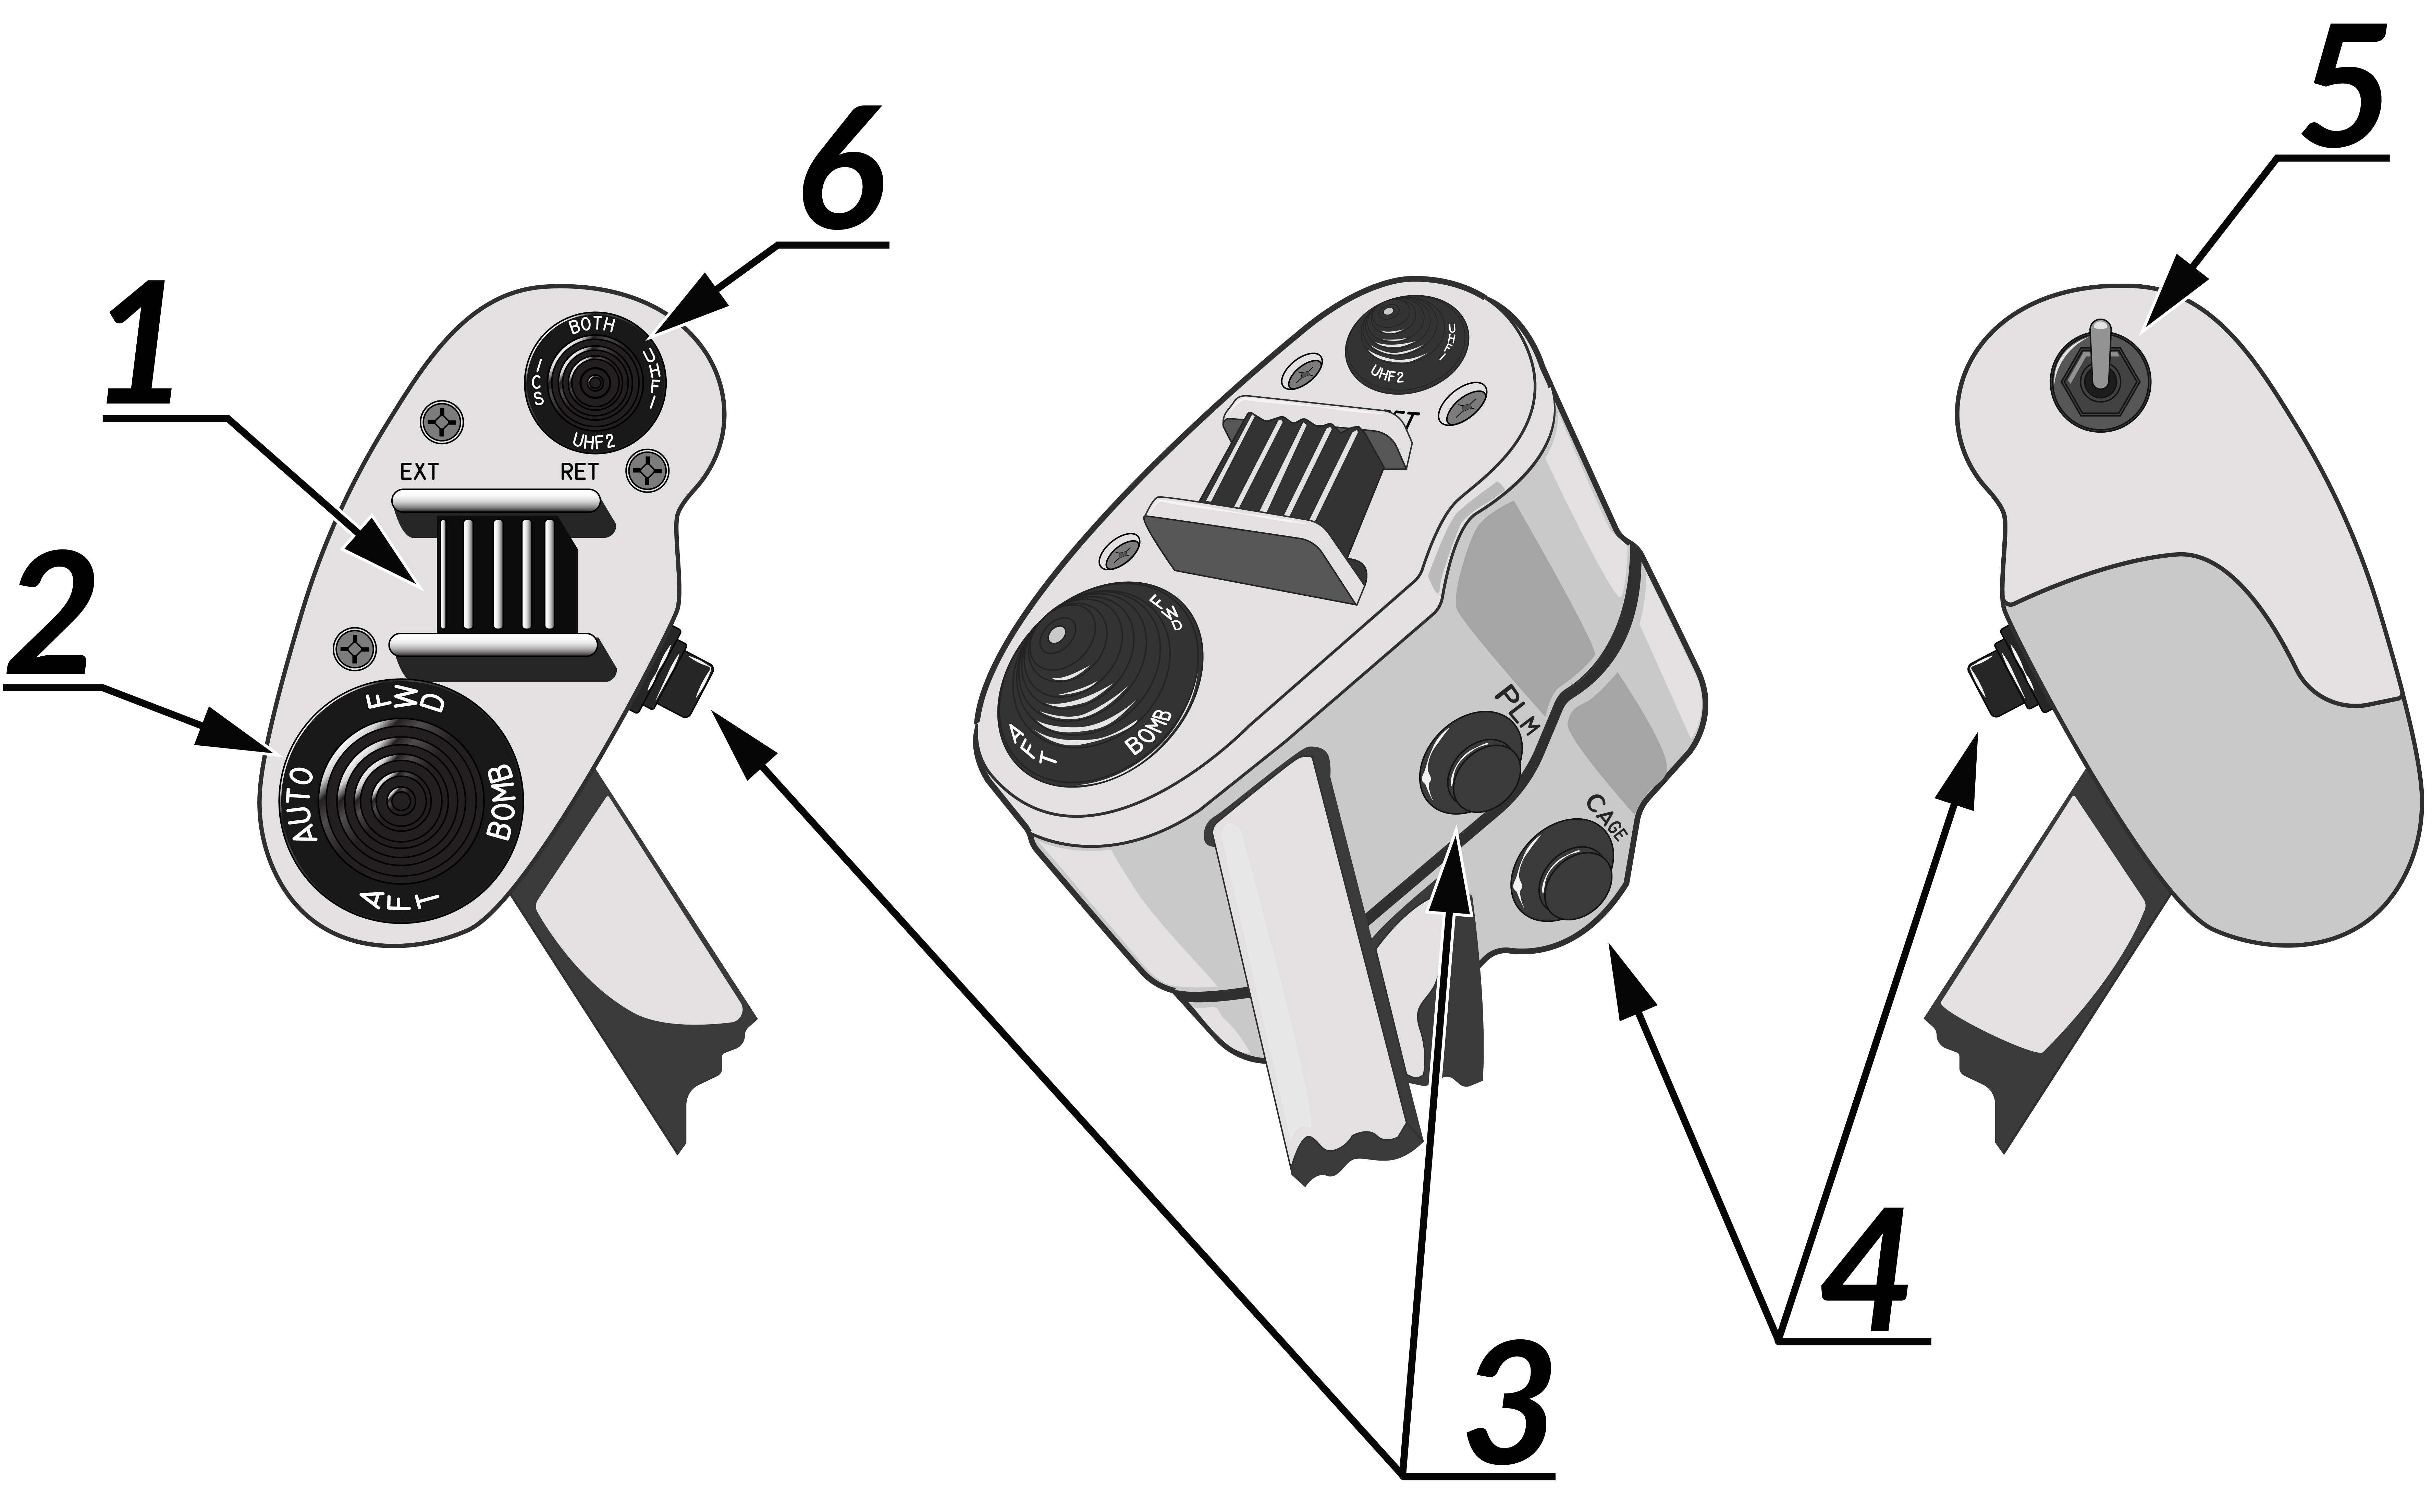
The throttle of the F-14 Tomcat consists of 2 quadrants, both for the left and right engines. There is an afterburner detent along with a cutoff detent for maximum throttle and shutdown of the engine for each quadrant.
The throttle has the following controls:
- Speed Brake Switch: 2-position switch. "EXT" is a momentary and needed input position that extends the speed brake outward depending on the aircraft speed.
- Wing Sweep Switch: 4-way hat switch. "AUTO" sets the wing to sweep automatically determined by an onboard computer, "BOMB" sets the wing to sweep in an angled position between fully extended and retracted and dependent on speed for the air-to-ground bombing.
- PLM Button: multifunction button. When the steering command is in A2A mode, this acts as a pilot lock-on tool for the AWG-9 radar. But when used for landing and/or in the LDG steering command mode, this allows for disengagement of the ACLS.
- CAGE/SEAM Button: multifunction button. When the steering command is in A2A mode, this allows for CAGE/SEAM lock-on of the AIM-9 Sidewinder. But when used for landing and/or in the LDG steering command mode, this allows for disengagement of the APC.
- Exterior Light Switch: 2-position switch. Used to toggle the exterior lights of the aircraft.
- ICS PTT Switch: 2-position switch. Acts as a push-to-talk system for the ICS system inside of the aircraft used between the Pilot and RIO. (or JESTER AI)
Control Stick
The control stick is located in the center of the cockpit, mounted onto the floor. Left and right movements of the control stick direct hydraulic movement to the spoilers and horizontal stabilizers of the aircraft. Forward and backward movement result to respectively the same but to the horizontal stabilizers.
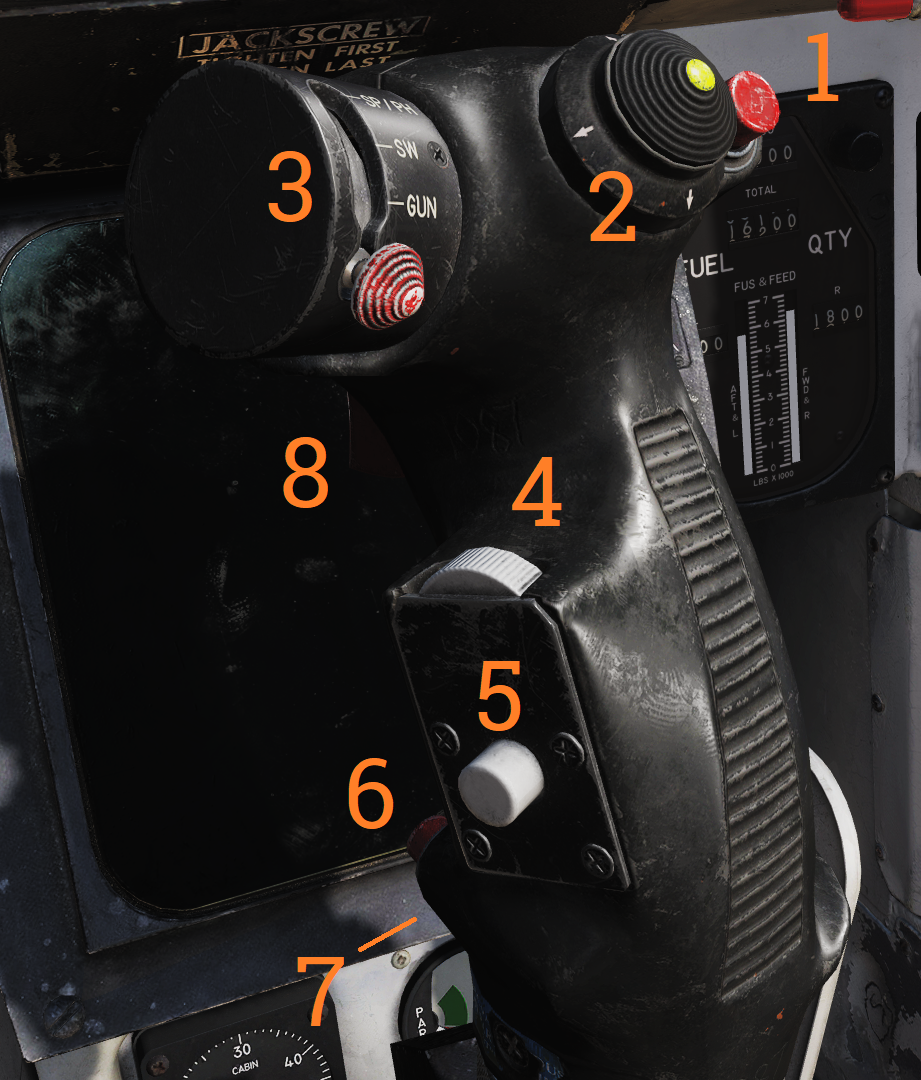
The control stick has the following controls:
- Bomb Release Button: single-purpose button. When pressed in A2G steering command mode, all pylons selected with bombs will release respective of the ripple settings, type, and interval.
- Trim Hat: 4-way hat switch. Upward movement moves the aircraft downward, and downward movement moves the aircraft upward. Both left and right movements follow to their directions according to their name.
- Weapon Select Hat: 4-way hat switch. Bottom selection is OFF, and a ridge requires a momentary push action to move in/out of to GUN. Following all to the top are SW, then SP/PH which requires a momentary push action to switch between.
- DLC & Maneuver Flap Command Wheel: scrollable dial. Moving it with the landing gears fully deployed acts as a variable control for spoiler extension. With the landing gears up, the dial also acts the same but for flaps and slats.
- DLC Engage/Disengage & CMS Dispense Button: multifunction button. When pressed with the landing gears fully deployed, this controls the engagement and disengagement of the DLC system. But with the landing gears fully retracted, this allows for pilot control of the CMS system.
- Autopilot Reference & NWS Button: multifunction button. When the aircraft is up in the air, this controls specific autopilot settings. But when the aircraft is on the ground, this controls the activation of the nosewheel steering system.
- Autopilot Emergency Disengage Paddle: multifunction button. Disengages all autopilot modes and DLC and releases all autopilot switches and roll and pitch SAS switches to OFF position.
- Weapon Firing Trigger: two-stage trigger switch. The first detent enables CTVS and gun camera. Second detent releases selected forwards firing the weapon.
Flight Controls & Landing Gear
Flight Controls
The F-14B has a large hydraulic system which covers for all of the control surfaces of the aircraft. Without the hydraulic system, or taking damage the controls are in risk of improperly working. The F-14 Tomcat was the last of its generation to have no integration of an FBW or FCS system, which was introduced with the F-15 Eagle.
The F-14's primary flight controls are:
- Left Spoilers (LES): A set of spoilers that lie within the left wing of the aircraft that help with aileron movement and control that react opposite of the intended direction.
- Right Spoilers (RES): A set of spoilers that lie within the right wing of the aircraft that help with aileron movement and control that react opposite of the intended direction.
- Tailerons (TAIL): Two horizontal stabilizers located on the rear end of the aircraft that control both pitch and aileron movement.
- Leading Edge Flaps (LEF): Normal slats located on the leading (front) edge of the wings to add lift.
- Trailing Edge Flaps (TEF): Normal flaps located on the trailing (back) edge of the wings to add lift.
The control stick controls the stabilators, ailerons, and rudder and the rudder pedals control the rudder.
Flaps System
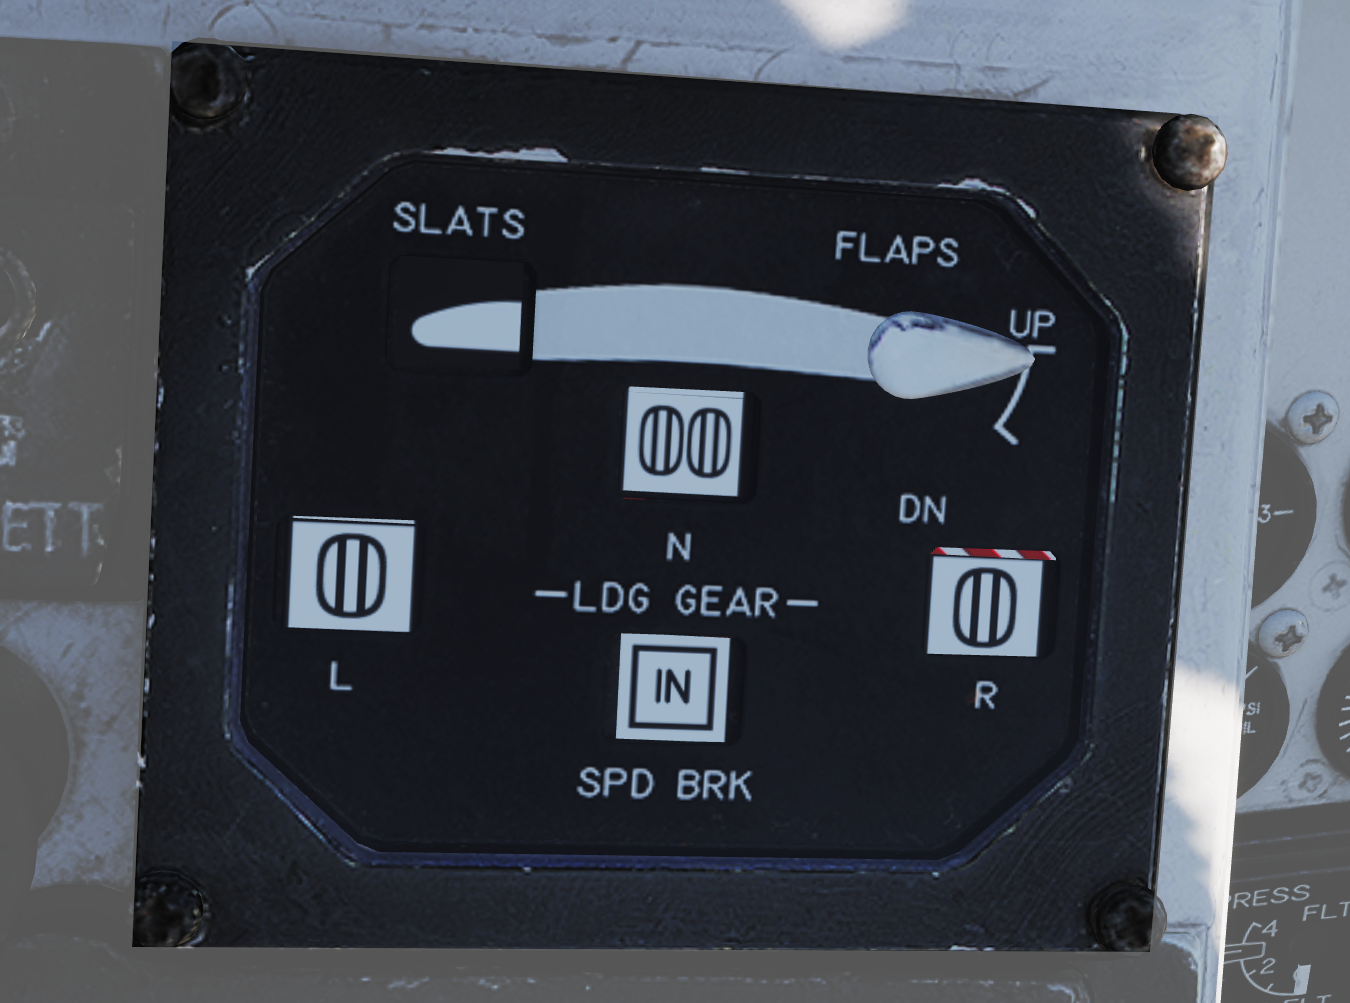
The aircraft's flap system provides more lift (and as a byproduct, drag). The flaps lever has two positions:
- NONE: This applies no flap whatsoever to the wings of the aircraft.
- FULL: This applies full movement of flaps to the wings of the aircraft.
The flaps lever allows for variable movement, which gives the pilot the ability to control the amount of flap they wish for.
Speed Brake
The speed brake is a flap located on the end of the aircraft designed to provide drag to decelerate faster. It is activated via the speed brake switch on the throttle. The two positions are:
- EXT: When the switch is moved aft, this extends the speed brake of the aircraft out depending on the airspeed.
- RET: When the switch is moved forward, this retracts the speed brake.
Trim
The tailerons are capable of being trimmed to make roll and pitch corrections. This is accomplished with the trim hat on the controls stick. When the autopilot system is engaged, the onboard computer will attempt to make active trim movements in order to keep the aircraft within the specified attitude when set, along of the setting parameters. As speed is either gained or lost, the trim will actively move the stick as well along of the tailerons to adapt.
Wing Sweep
The wings of the aircraft are a variable-sweep design allowing for automatic or manual movements from pilot input on the right throttle quadrant. Similar to wing fold, the wings are able to be overswept from its maximum position through a master reset of the system in order to allow tighter space and closer parking on the carrier deck.
Landing Gear
The F-14 Tomcat has 3 retractable landing gears: the nose gear, the left gear, and the right gear. The gear is moved via the gear lever on the left side of the cockpit. In the up position, the gear will retract. In the down position, the gear will extend. The gear lever cannot be put up with weight on wheels. The gear will not retract with the launch bar extended.
Nosewheel Steering
The nose gear features nosewheel steering (NWS) controlled by the rudder pedals. With the weight off of the wheels, it is disengaged. It automatically engages upon there being the weight on wheels. NWS is disengaged manually via the button on the stick.
Launch Bar
On the front nosegear is a launch bar that attaches the airplane to a catapult from launches from an aircraft carrier. Its deployment is pilot-controlled, but it is connected to the catapult by the ground crew (DCS default binding is U).
It is controlled via the launch bar switch on the left upper console. When the switch in the RETRACT position, the launch bar will retract, but physically cannot do so when connected to the catapult. The switch will move to the RETRACT position automatically when there is a weight off wheels. In the EXTEND position, the launch bar will extend if there is the weight on wheels.
Autopilot and Autothrottle
The F-14 Tomcat has the ability to automate certain types of flight via its Automatic Flight Control System (AFCS) and Automatic Throttle Control (ATC). The AFCS, or simply the autopilot, control the flight surfaces and the ATC controls the throttles.
AFCS
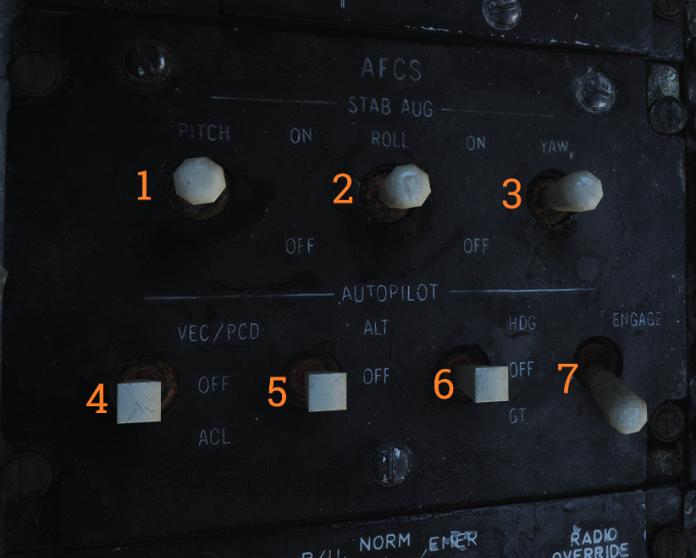
The Automatic Flight Control System (AFCS), or just the "autopilot", controls the aircraft's flight controls to automate maneuvering. It is interfaced on the autopilot panel via the A/P engage switch. On the autopilot panel, there are 7 modes able to be toggled:
- Pitch Stabilizer Augmentation: 2-position switch. This switch controls the ability for the pitch to be augmented for dampening.
- Roll Stabilizer Augmentation: 2-position switch. This switch controls the ability for the roll to be augmented for dampening.
- Yaw Stabilizer Augmentation: 2-position switch. This switch controls the ability for the yaw to be augmented for dampening.
- VEC/PCD/ACL Switch: 3-position switch. This switch controls the remote control modes of autopilot with the steering bars and ACLS.
- ALT Switch: 2-position switch.' This switch controls the ability to maintain the current altitude when autopilot is engaged.
- HDG/GT Switch: 3-position switch. This switch controls the ability to maintain the current heading when autopilot is engaged.
- ENGAGE Switch: 2-position switch. This switch engages and disengages the autopilot.
ATC
The automatic throttle control (ATC), or just "autothrottle", controls the physical throttles and thereby automated thrust control. ATC is toggled via ATC engage/disengage switch next to the throttle. When the ATC is engaged, the physical means of the throttle quadrants will begin to move on their own. However, whenever the pilot makes any new movement to the throttle whatsoever, the ATC will disengage to allow pilot control over both of the engines. The ATC is primarily used for landing on a carrier along of the ACLS system.
Digital Systems Overview
Pilot
The F-14 Tomcat comes with 2 digital display screens in the Pilot cockpit:
- Vertical Display Indicator (VDI): a multifunction display that allows for the pilot to see their HUD in a form of a repeater, and the TCS.
- Horizontal Situation Display Indicator (HSD): a multifunction display that allows for the pilot to see their virtual compass for navigation modes, and the AWG-9 Radar from the RIO TID as a repeater.
Heads Up Display
The head-up display (HUD) is a projected display at the front of the cockpit that serves as the primary flight instrument. It also provides various indications for weapon delivery; this section will cover the HUD's indications in NAV master mode. Master mode/weapon-specific indications on the HUD will be covered in the relevant section.
Reject Modes
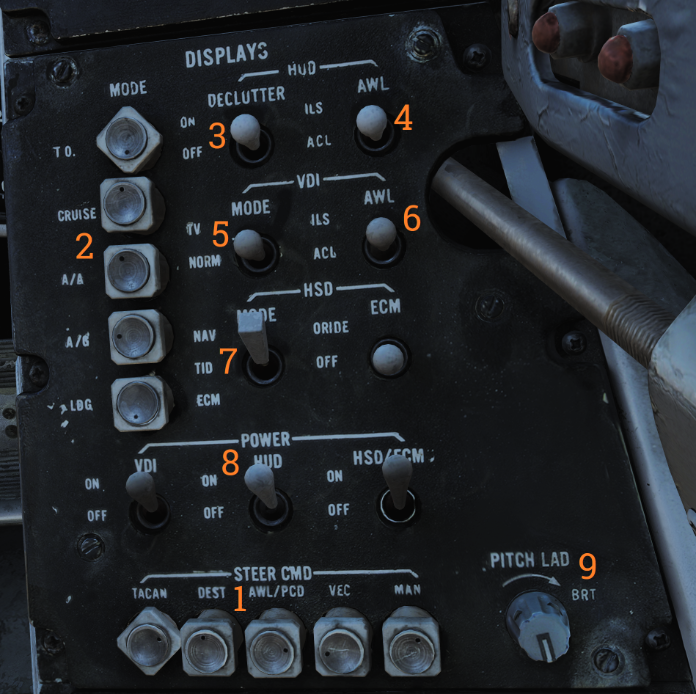
Via the switches next to the TO button on the displays panel, you are able to "declutter" or remove information off of the HUD.
Radar Intercept Officer
The Radar Intercept Officer (RIO) comes with 3 digital display screens in the RIO cockpit:
- Detail Data Display (DDD): a dual-purpose display that allows for the RIO to see contacts on the radar, based on the range and radar mode.
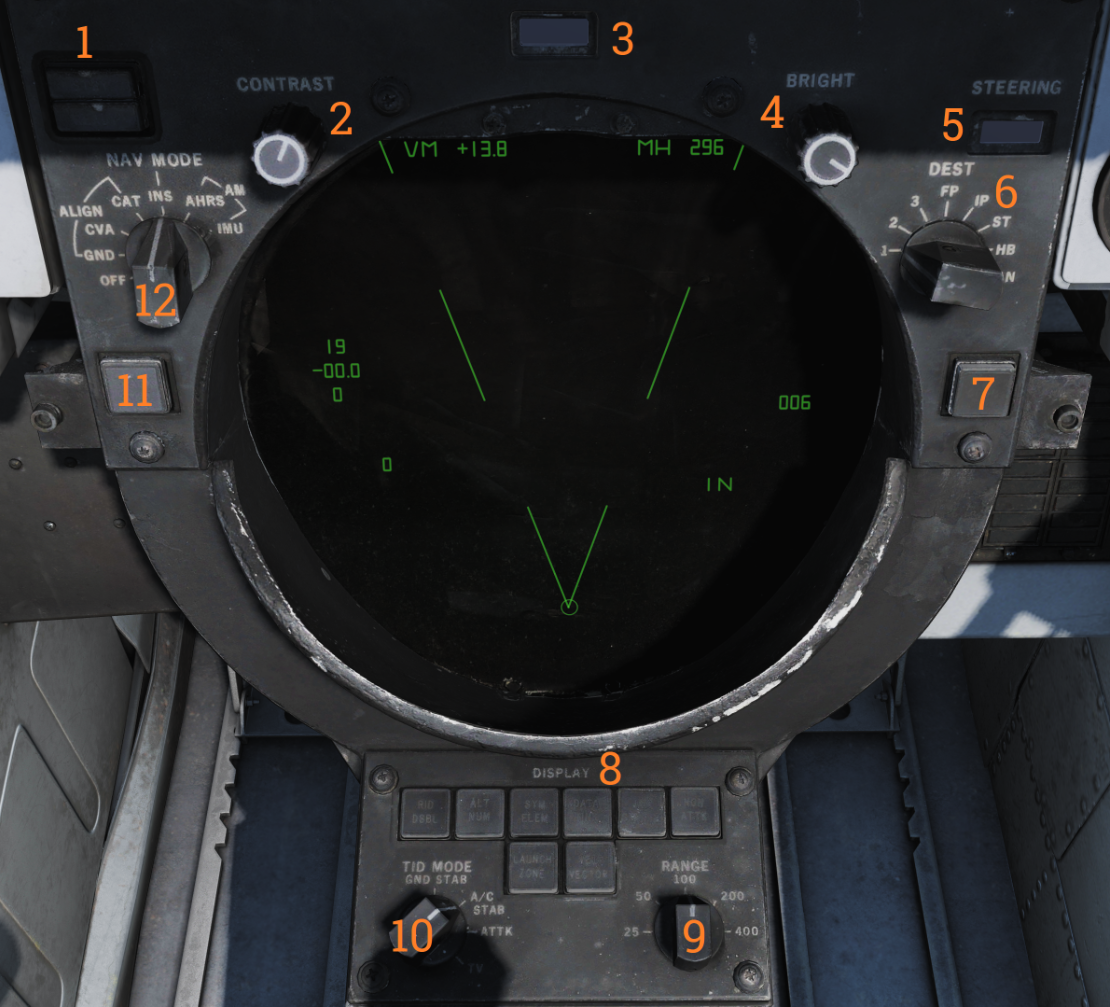
- Tactical Information Display (TID): a multi-purpose display that allows for the RIO to see their AWG-9 situational awareness, TCS, TARPS and LANTIRN pods.
- Horizontal Situation Display Indicator (HSD): a multi-purpose display as to the one in the pilot cockpit.
Master Modes
The F-14 Tomcat has 5 primarily modes for information displayed. The 5 master modes are:
- TO: switch. Displays takeoff information on HUD and VDI for degrees.
- CRUISE: single-purpose button. Displays in-air flight information on HUD and VDI for degrees.
- A/A: single-purpose button. Displays air-to-air information on HUD and VDI for degrees; and weapon employment.
- A/G: single-purpose button. Displays air-to-ground information on HUD and VDI for degrees; and weapon employment.
- LDG: single-purpose button. Displays landing information on HUD and VDI for degrees.
Additionally, the F-14 Tomcat has an Air Combat Maneuver (ACM) panel which controls all air-to-air and air-to-ground aspects for armament.
The F-14 Tomcat has an inertial navigation system (INS) that allows the pilot to navigate by internal gyros aligned. However, due to the fault of having no GPS assistance, these gyros slowly drift over time and cause misalignment for visual information.
HSD
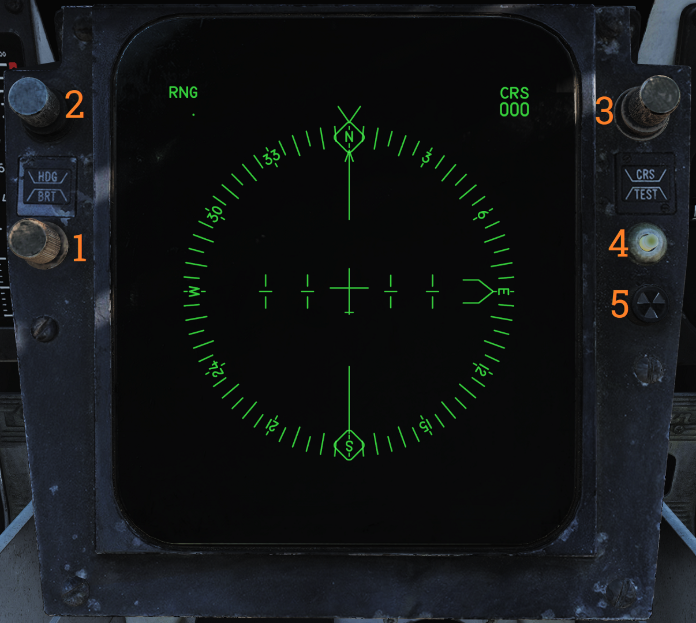
The Horizontal Situation Display Indicator (HSD) is the primary interface with the airplane's navigation systems. The HSI can be accessed from the bottom display screen. The basic function of the HSI is a rotating compass with a looking-from-above perspective. The controls for this screen are:
- BRT Control: dial. Controls the brightness of the HSD screen.
- HDG Control: dial. Controls the heading reference in TACAN mode.
- CRS Control: dial. Controls the course heading reference in MAN and TACAN modes.
- Test Button: single-purpose button. Resets the HSD screen if overload protection activates.
- BIT Indicator: light. Shows a white light if a failure produces in the HSD.
Steering Commands
The HSD comes with a set of 5 different steering commands, which each have their own purpose towards displaying certain information:
- TACAN: single-purpose button. Displays information based off of a radio beacon with range and direction.
- DEST: single-purpose button. Displays information off of a selected waypoint from the RIO with range and direction.
- AWL/PCD: single-purpose button. Displays information off of an ICLS frequency with azimuth and elevation bars (on VDI and HUD)
- VEC: single-purpose button. ? (needs more info.)
- MAN: single-purpose button. Displays information off of an entered heading (HDG Control) with direction.
Waypoints
The F-14B comes with an onboard flight computer system that handles waypoint navigation during in-air flight. The navigation system in the F-14B Tomcat gives a variety of waypoint holders, along with information for a set home plate.
Pilot
For the F-14B pilot, the waypoint information is able to be accessed by the DEST steering command and by using the NAV HSD display mode.
Radar Intercept Officer
For the F-14B Radar Intercept Officer, (RIO) the waypoints must be manually assigned by the RIO through the Computer Address Panel (CAP) system under the TAC DATA category. Once done, the waypoint must be selected through the CAP and entered in with coordinates similar to how INS alignment procedures are done.
TACAN
Tactical Air Navigation (TACAN) is a military radio navigation system. A TACAN beacon allows for an aircraft to determine its bearing and range from it, and using this information can navigate. TACAN's may be ground-based or be broadcasted by an airplane. TACAN channels have two bands, X and Y, and range from 1-126. 2 TACAN channels may be set present in the aircraft by both the Pilot and RIO for simultaneous use.
The TACAN setting knobs give a range of these options:
- T/R: Transmit and receive. Gets bearing and range from the TACAN.
- RCV: Receive. Gets bearing from the TACAN.
- A/A: Air-to-air TACAN mode.
- X: Tunes the selected frequency on the X band.
- Y: Tunes the selected frequency on the Y band.
ICLS
For night and low visibility operations, aircraft carriers have an Instrument Carrier Landing System (ICLS) to allow for instrument approaches to the carrier. ICLS provides horizontal and vertical guidance. The F-14 is equipped with ICLS.
To activate the airplane's ICLS antenna, an ICLS dial is present to the right of the warning lights advisory panel, with an ARA on/off switch, used to toggle power to the system.
When ILS is selected on the HSI, two bars, one horizontal and one vertical, appear near the velocity vector on the HUD. These indicate a vertical and horizontal deviation from the optimal glideslope (3°) and course to the deck. When they are both aligned with the velocity vector (making a "+"), the aircraft is on course.
ACLS
For CAT III conditions and poor visibility, the F-14 is equipped with the Automatic Carrier Landing System (ACLS) to allow an automatic flight to the carrier via. a radio-guided input from a Landing Signal Officer. (LSO) The auto-throttle and autopilot systems must be engaged and present during the time of activation with this system, along with lights given to the left of the VDI display.
Datalink is required between the aircraft and the carrier in order for ACLS to work. When the best position of the azimuth and glideslope bars are within parameters, the nosewheel steering button is pressed in order to engage guidance.
The F-14B has a variety of navigation failures that may/can occur, including methods to fix them.
An error of latitude or longitude in the computer position of the aircraft can be corrected by a navigation fix update. Updating is especially important in the backup modes (AHRS AM and IMU/ AM) because of the estimated winds and magnetic variation changes. A nav fix is done via a ground-reference-point (latitude and longitude) position. The range and bearing of this position to the present aircraft position are used to update or correct existing values. The nav system may be updated by either a radar fix, a TACAN fix, or a visual fix.
Before performing a nav fix, the latitude and longitude of the desired update point (radar, TACAN, or visual) must be stored in one of eight navigation point locations (three WPs, FIX PT, HOME BASE, HOST AREA, DEF PT, and IP). This data can be stored prior to flight by data link or by manual insertion. Then follow these steps:
- Hook the Waypoint you choose to select for the nav fix.
- Check the stored latitude and longitude on the TID.
- Rotate the CATEGORY switch to NAV and select the desired type of update.
Note that updating the position while in INS, and to a lesser degree while in IMU, can introduce a greater navigational position error than already present, in particular, if radar fix is used to update the nav system. Updates with a visual or TACAN fix provide reasonable accuracy (assuming a good MAG VAR during TACAN updates). Updating your nav system via a nav fix should be primarily used in the AHRS mode.
Radar Fix Update
An RDR FIX may be selected before or after positioning the DDD cursors. If the RDR FIX button is depressed, the computer computes the present position of the aircraft by measuring the range and bearing from the selected point. The delta between the computer position and the position determined by the INS is then displayed on the TID. If the entry of this delta into the navigation computations is desired, press the FIX ENABLE button. If the delta does not appear to be correct, the computer and the readout can be cleared by pressing the RDR FIX button. The fix may then be attempted again. The RIO should also perform periodic checks of own aircraft system altitude and update the altitude if necessary.
Radar updating is performed as follows:
- TID CURSOR/CAP - Hook Desired Navigation Point for Update.
- PULSE SRCH button - Depress.
- On sensor control panel: STAB switch - IN. EL BARS switch - 1. AZ SCAN switch - As Desired.
- RDR FIX button - Depress.
- DDD CURSOR button - Depress.
- Action switch - Half Action (first detent).
- Cursor is displayed on DDD.
- Manipulate hand control DDD cursor over desired ground map point.
- Action switch - Full Action and Release. (This will cause the DDD cursor to remain at the selected position.
- Observe the delta for LAT and LONG on TID.
- If readouts are unsatisfactory, deselect RDR FIX and repeat steps 4 through 12.
- FIX ENABLE button - Depress.
TACAN Update
To perform a nav fix by TACAN requires that a restored waypoint shares identical LAT and LONG values with the TACAN station that will be used for the fix. Select the TACAN channel for the desired station and verify by listening to the coded identifier tone in the headset.
Press the TACAN FIX button to update the aircraft position from a TACAN station. The WCS computer then calculates the own aircraft position error based on the range and bearing from the TACAN station. The delta is then entered in the same manner as with a radar fix.
Perform a TACAN fix following these steps:
- Select a TACAN channel whose latitude and longitude correspond to an update point.
- Hook desired update point (WAYPT 1, FIX PT, HOME BASE, etc.).
- CATEGORY switch - NAV.
- TACAN FIX button - Depress.
- Observe present position delta readout.
- If delta is unsatisfactory, deselect TACAN FIX and repeat steps 2 through 7.
- FIX ENABLE button - Depress.
Visual Update
To perform a visual fix, fly over a restored waypoint and press the VIS FIX button. Estimate your timing, because the aircraft nose and fuselage can obscure the fixed point during an overflight. It is also difficult to estimate when directly overhead a waypoint if the aircraft altitude is greater than 10.000 feet. The delta for the visual fix is displayed on the TID. Enter the delta by pressing FIX ENABLE.
To perform a visual fix use the following steps:
- Hook desired update point (WAY PT, HB, IP, etc.).
- Select NAV category on CAP.
- Overfly the selected restored point and when over the point, depress the VIS FIX button on the cap.
- If the delta is not satisfactory, press VIS FIX again to clear the delta and repeat from step 1.
- If a satisfactory delta is displayed, depress the FIX ENABLE button; this causes the delta correction of own-aircraft position to be inserted into the computer.
Datalink Update
To perform a data link update of the aircraft INS to the TDS frame of reference, the aircraft and TDS must share a prebriefed waypoint, identical in latitude and longitude. Enter this LAT/LONG data into the HOST AREA pseudo target file. The TDS will uplink the common reference point as a data link waypoint. When the aircraft and TDS INS systems agree, the data link waypoint and host area symbols will be superimposed on the TID. If they drift apart, the two pseudo targets on the TID will drift as well.
To perform an update via data link, use the following steps:
- Hook data link waypoint corresponding prebriefed reference point.
- Select NAV category on CAP.
- Overfly the hooked data link waypoint. When immediately over the point, press VIS FIX button on CAP.
- Observe delta LAT and LONG on TID.
- If deltas are satisfactory and update is desired, depress FIX ENABLE.
- After a data link update, HOST AREA and data link waypoint should be superimposed on the TID again.
Net aircraft that use fighter-to-fighter data link can update their navigation system in the FF/DL mode. To update LAT/LONG hook the net aircraft symbol of an aircraft that is in close proximity and select F/F NAV UPDATE on the CAP. This will enter the hooked aircraft’s coordinates into the INS as own-aircraft coordinates. To update the nav system on an aircraft that is not close, first obtain a radar STT on that aircraft, hook the STT-ed aircraft on the TID and then press F/F NAV UPDATE on the CAP.
Defensive Systems
The F-14B is equipped with various defensive systems: the AN/ALE-39 Countermeasure Dispensing System (CMDS), for the release of chaff and flares, the AN/ALQ-126 Deception ECM (DECM), for jamming enemy radar, and the AN/ALR-67 Radar Warning Reciever (RWR), for detection of enemy radar emitters and missile launches.
AN/ALR-67 RWR
The AN/ALR-67 Radar Warning Receiver (RWR) provides the Hornet the ability to detect radars via the radio/microwave radiation they emit.
Audio Tones
Accompanying the RWR are various audio feedback tones:
- Single Beep: A new ground- or sea-based emitter has been detected.
- Double Beep: A new airborne emitter has been detected.
- Repeating Beep: An emitter is tracking.
- Faster Repeating Beep: An emitter is guiding a missile or is a missile.
On the RWR gauge, the RWR knob will control the volume of the RWR tones.
Emitter Identifiers
This list is, at present, not complete.
| Type | RWR ID |
|---|---|
| U | Unknown |
| M | Active radar-homing missile |
| S | Search radar |
| 3 | SA-3 "Goa" |
| 6 | SA-6 "Gainful" |
| 8 | SA-8 "Gecko" |
| 10 | SA-10 "Grumble" |
| 11 | SA-11 "Gadfly" |
| 11 | F-111 Aardvark |
| 12 | SA-12 "Gladiator" |
| 13 | SA-13 "Gopher" |
| 13 | C-130 Hercules |
| 14 | F-14 Tomcat |
| 15 | F-15 Eagle |
| 15 | SA-15 "Gauntlet" |
| 16 | F-16 Fighting Falcon |
| 17 | C-17 Globemaster III |
| 18 | F/A-18 Hornet |
| 22 | Tu-22 "Blinder" |
| 23 | MiG-23 "Flogger" |
| 24 | Su-24 "Fencer" |
| 25 | MiG-25 "Foxbat" |
| 29 | MiG-29 "Fulcrum" |
| 29 | Su-27 "Flanker" |
| 29 | Su-33 "Flanker-D" |
| 30 | Su-30 "Flanker-C" |
| 31 | MiG-31 "Foxhound" |
| 34 | Su-34 "Fullback" |
| 39 | Su-25M "Frogfoot" |
| 40 | Spruance-class destroyer |
| 48 | Nimitz-class carrier |
| 49 | Oliver Hazard Perry-class frigate |
| 50 | A-50 "Mainstay" |
| 52 | B-52 Stratofortress |
| 76 | IL-76 "Candid" |
| 78 | IL-78 "Midas" |
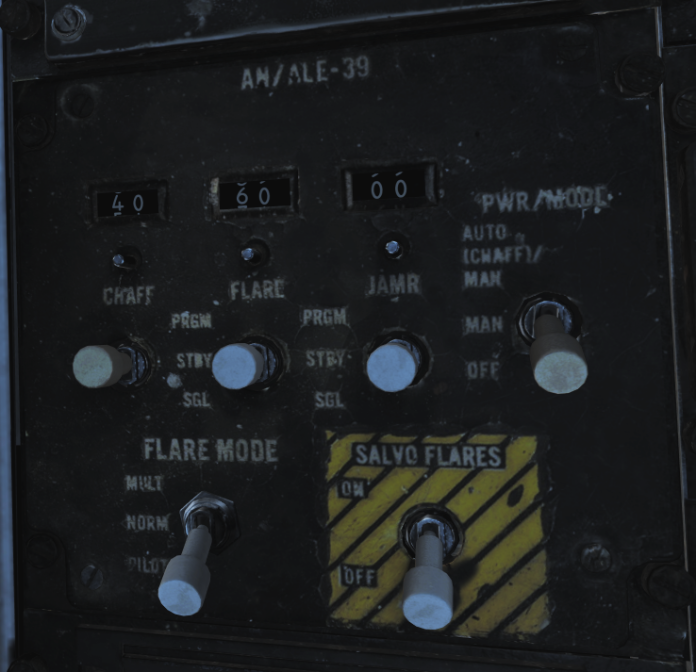
AN/ALE-39 CMDS
The AN/ALE-39 is the countermeasures dispensing set installed in the F-14B in this simulation. It controls its own set of launchers located between the engine nozzles on the underside of the so-called beaver-tail. The launchers each have two sections, one containing 10 cartridges and the other 20. They are referred to the left and right dispensers even though the left is really the front one and the right the back one with both being mounted inline on the left side of the tailhook. This is a remnant from the earliest model F-14s carrying the AN/ALE-29.
This all sums up to a capacity of 60 cartridges in the system with each section necessarily holding one type of cartridges meaning that any combination of cartridges is possible as long as each type’s quantity is a multiple of 10. The system itself has no real knowledge of what is loaded where so incorrectly programming the system can lead to the wrong type of cartridge being ejected.
Cockpit Controls
The system itself can be operated manually from the control panel in the RIO pit or the DLC thumbwheel on the pilot stick when the flaps lever is in the up position. It is also capable of running programmed sequences of ejection which in turn can be initiated manually by the RIO from the control panel or the direction hats mounted on the handhold over the DDD. In addition, the AN/ALR-67 can also initiate the chaff ejection program if set up correctly on the AN/ALE-39 control panel.
AN/ALQ-126 DECM
The AN/ALQ-126 deception jammer is designed to detect radar threats, analyze them, select the optimum countermeasure technique available and apply it. Available techniques for jamming are amongst others, main lobe blanking, inverse con-scan, range-gate pull-off and swept square modes. In DCS this is modeled as a simple noise jammer due to engine limitations but controlled by the DECM logic as to when it’s on or off.
Cockpit Controls
The controls for the AN/ALQ-126 DECM are all located on the right horizontal panel in the RIO pit, the panel as the image above. In addition, there are two indication lights co-located with the RWR threat indicators on the right side of the TID. The mode selector knob controls power and operational mode that the system is in. The modes for the DECM are as follows:
- OFF: turns off power to the system. STBY begins pre-warming of the system, taking in all-around 5 minutes.
- TEST HOLD 3 SEC: is used to prepare the system for BIT, after 3 seconds in this mode, turn the knob to TEST - ACT.
- TEST ACT: starts the BIT in the system. The BIT takes approximately 30 seconds and the RCV light will be illuminated the whole time while the XMIT light will flash twice. If the STANDBY light illuminates it indicates that a no-go condition exists in the system.
- REC: enables the system to receive the only mode, enabling analyzation of threats and also the threat audio.
- RPT: enables full system functionality, in addition to REC it also now tries to jam threats according to the selected method.
Television Camera Set
The F-14B is outfitted with the ALQ-100 Television Camera Set (TCS) pod, used for visually identifying aircraft during the time of which IFF was not a trusted/more inferior method to confirming hostile aircraft and to keep track of their position, as well as their living status.
Symbology
On the TID, in non-TV mode, a TCS track is indicated by a 1.5” strobe at TCS LOS azimuth with a hollow circle at the end.
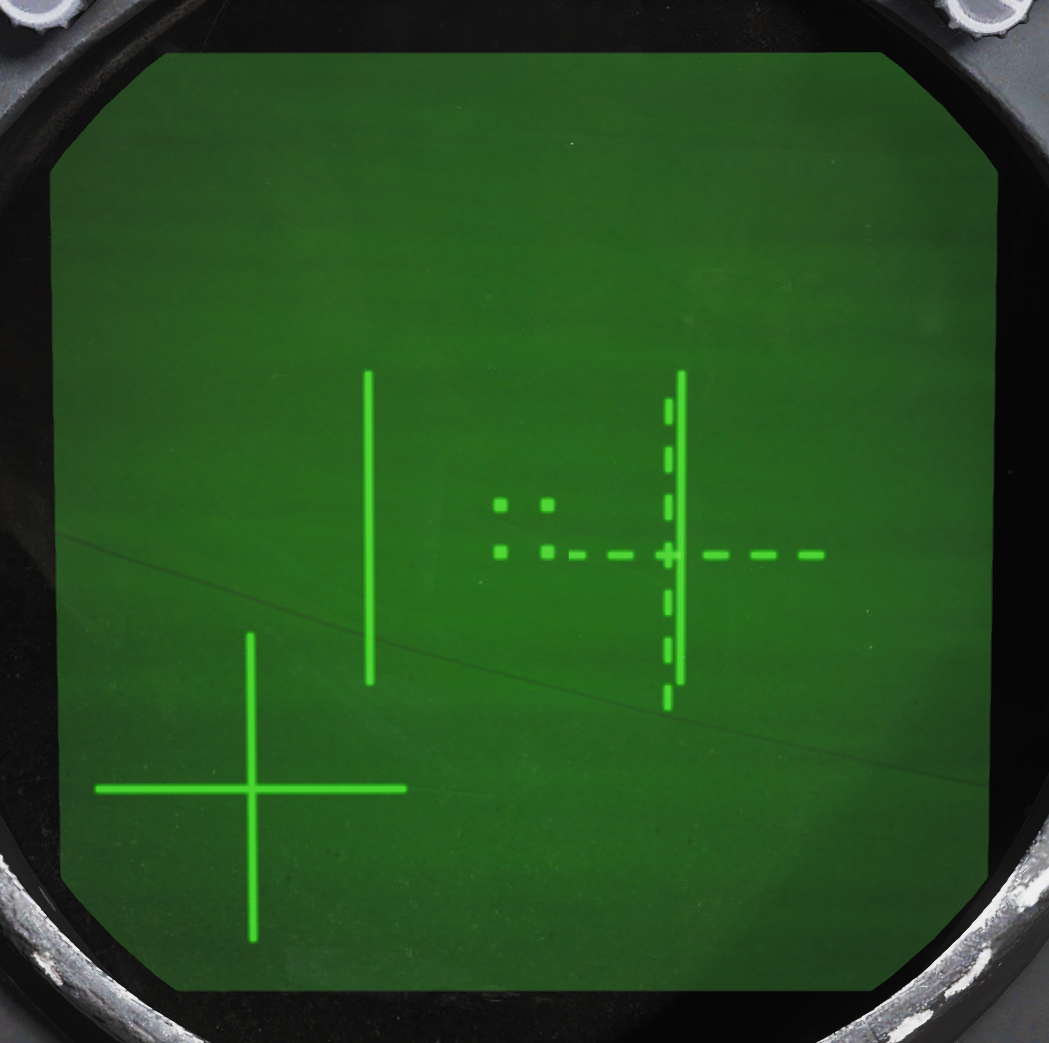
The symbology on the video feed from the TCS has indicators for the FOV and two crosshairs indicating TCS LOS relative own aircraft, GACH, and AN/AWG-9 radar LOS relative TCS LOS, RACH. Additionally, the track window is indicated by 4 small squares representing each corner of that window.
The gimbal angle crosshairs or GACH, which is a solid cross, indicate deflection of the TCS LOS from the aircraft datum line, ADL. GACH crosshair in the center indicates TCS LOS along ADL and deflection towards the edges indicate deflection towards the gimbal limits with the video edges being maximum deflection.
RACH or radar angle crosshairs, a dashed crosshair, indicate radar antenna LOS when inside the current TCS FOV. When the sensors slave to one another RACH and GACH will coincide creating a single solid crosshair.
The track window indicates the area that the TCS contrast tracker is currently locked on to if it has acquired a target. When not in an active track these squares collapse into the center of the display being 2% of the screen width when in manual mode and 5% when in an auto mode.
LANTIRN Targeting Pod
The F-14B can carry the AN/AAQ-14 Low Altitude Navigation and Targeting Infrared For Night (LANTIRN) targeting pod. This pod consists of a Forward-Looking Infrared (FLIR) camera (which also includes a digital charged coupled device camera) for target locating and observing, a Laser Target Designator/Ranger for firing a laser that both designates targets for laser-homing weapons and gathers ranging information for designating whatever the FLIR is pointed at as an air-to-ground, and a Laser Spot Tracker (LST) which can search for and track a laser, allowing for the FLIR to be cued onto an offboard (ground or air-designated) laser from another unit and then designate a Target off said point; this allows for most effective buddy-lasing. The targeting pod can be used in both air-to-ground and air-to-air functions, but the LTD/R and LST are only used for A/G operation.
Symbology
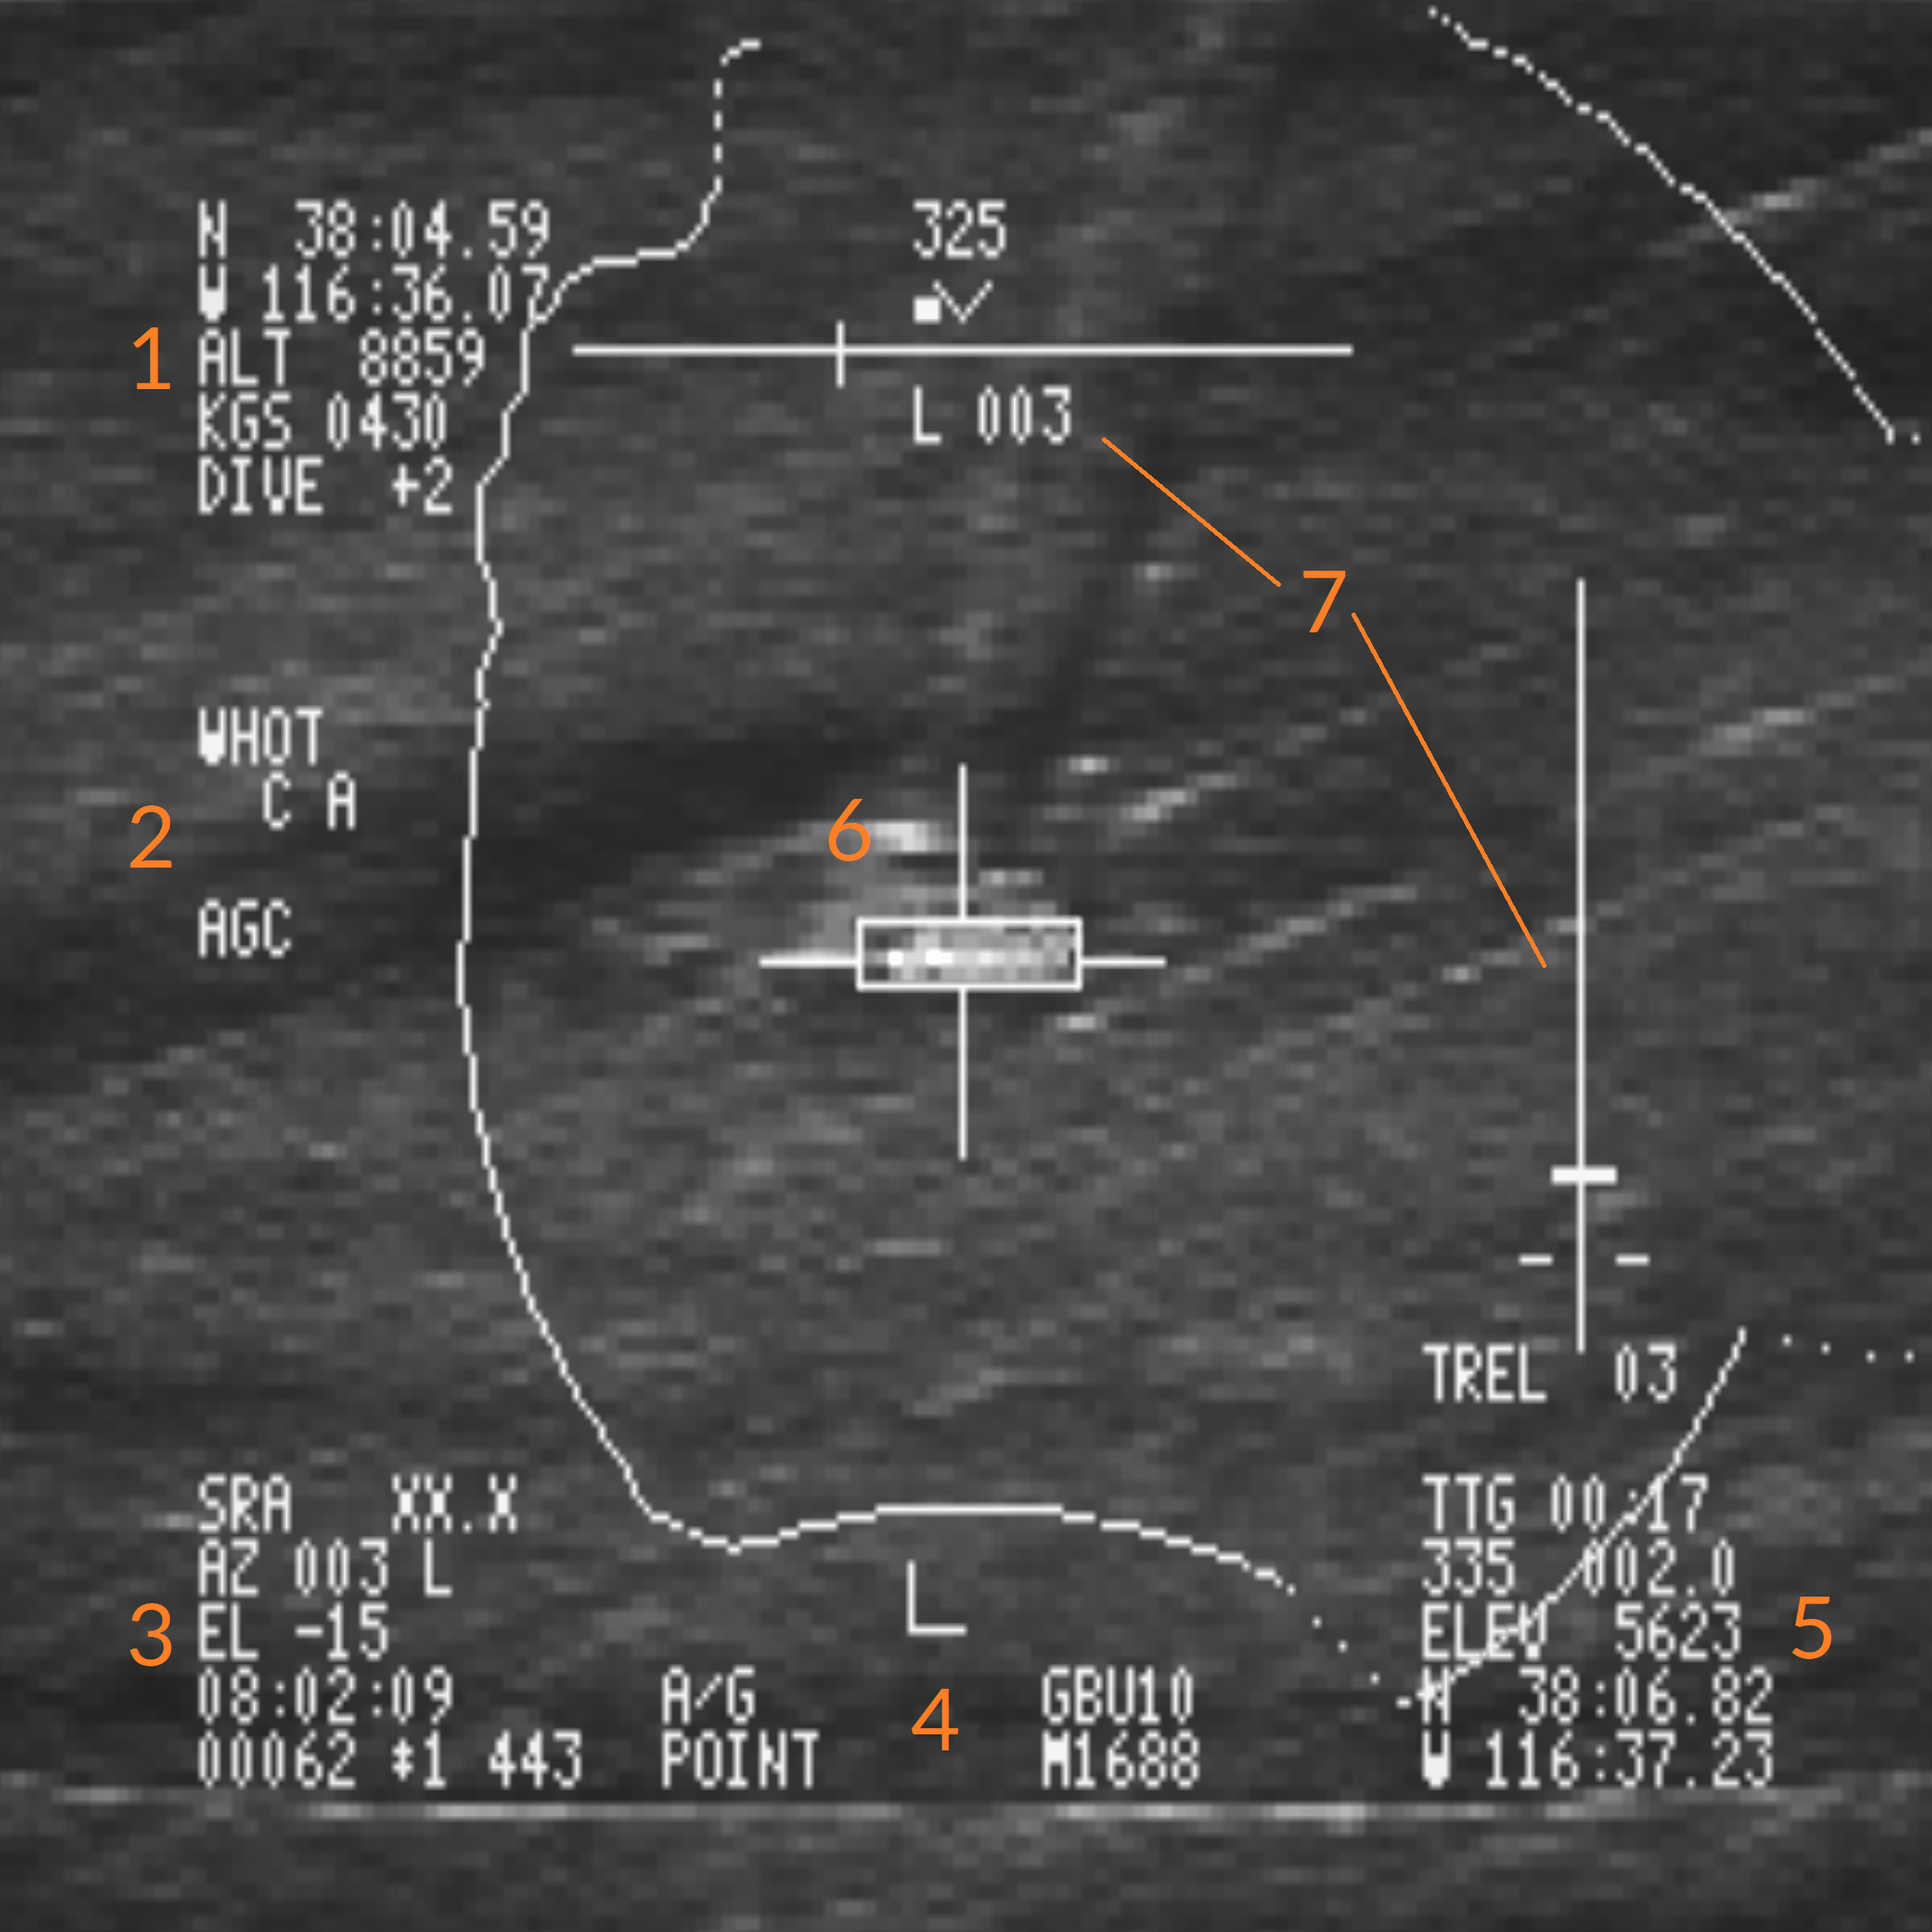
The following areas on the LANTIRN are to represent:
- A/C Position Data: Displays aircraft LAT/LON, altitude, and groundspeed information.
- LANTIRN Polarity: Displays white or hot background. AGC is for automatic gain control, MGC is for manual gain control.
- LANTIRN Information: Gives general information on the pod. SR is for slant range, AZ/EL for azimuth/elevation of sight, and rest is UTC time.
- LANTIRN Track Mode: Displays the current tracking mode. A/A is for air-to-air, A/G is for air-to-ground. Right side is for current selected weapon.
- Track Data: Displays information of LAT/LON and altitude of where the sight is at.
- Track: Displays the hairs for point and area track, and what the sight is directly pointed at.
- Launch Envelopes: The top tape is for the heading relative of the aircraft to the track. The right side tape is for the release point.
TARPS Pod
Not yet implemented.
Air-to-Air Radar
Detail Data Display
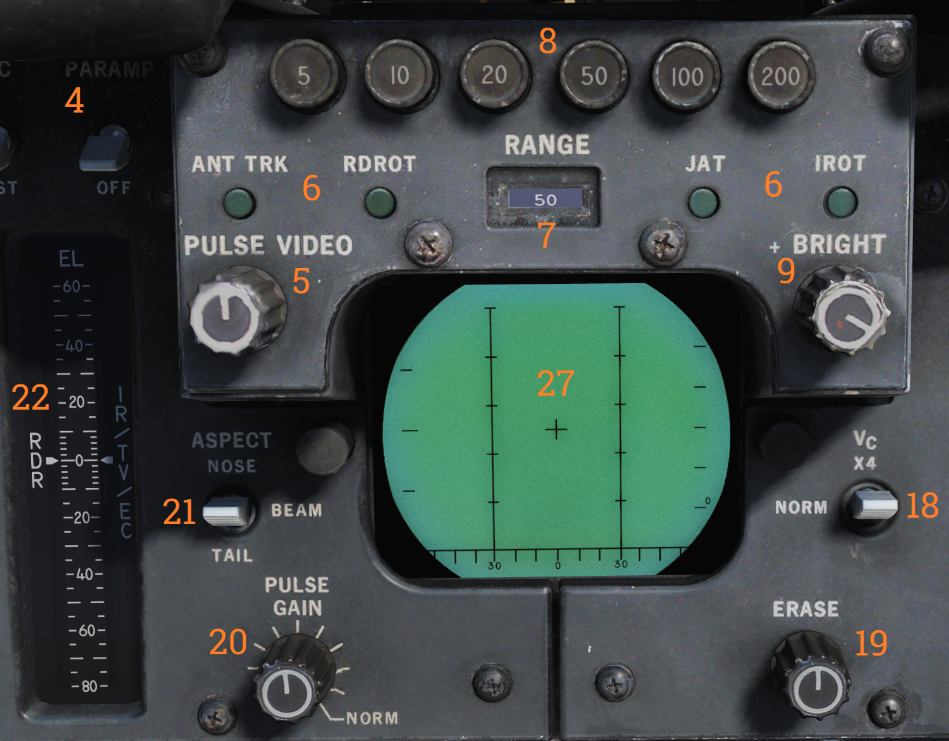
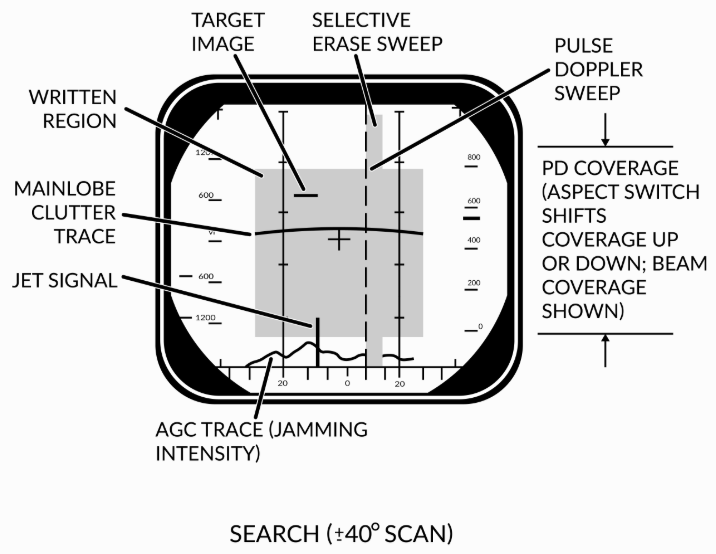
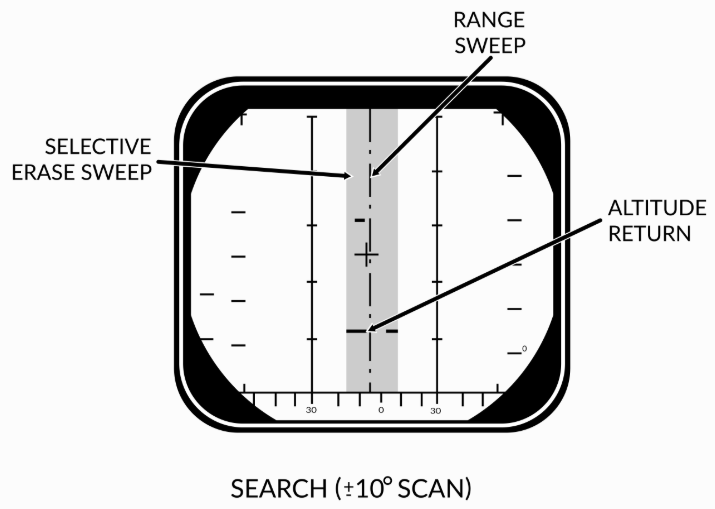
Among the 3 digital displays, the Detail Data Display gives the RIO information about contacts from the AWG-9 radar in terms of range and radar mode, with respect to the notch filter.
Notch Filter
The AWG-9 radar in the F-14B Tomcat has a notch filter when using the pulse-doppler radar modes under certain conditions. These conditions include, but are not limited to:
- ~100 knot difference of the aircraft relative to contact
- Contact flying 90 degrees perpendicular CW/CCW to aircraft
- Masking with ground terrain scan return
There is a rough line shown in the radar modes, likewise of the jamming lobe, for when considering the notch filter that the contact will disappear from.
Tactical Information Display
The Tactical Information Display (TID) gives the RIO of the F-14B the main information on the AWG-9 radar, including situational awareness, range, altitude, and contact heading.
Display Modes
The TID comes with a total of 8 display modes available, that can be toggled either on or off for purposes of gathering more information or decluttering:
- RID DISABLE: ? needs more info. Not yet implemented.
- ALT NUM: Displays the altitude of contact with a singular digit rounded to the nearest thousand.
- SYM ELEM: Displays the symbology of contacts corresponding to HAFU.
- DATA LINK: Displays contacts from the datalink frequency.
- JAM STROBE: Displays the jamming strobes. Not yet implemented.
- NON-ATTK: Displays determined (manual IFF or datalink) HAFU of friendly contacts.
- VEL VECTOR: Displays the velocity vectors of contacts.
- LAUNCH ZONE: Displays contact approximate missile launch zones.
AN/AWG-9 Radar
The F-14 Tomcat is equipped with the AN/AWG-9 all-weather and pulse-doppler radar. It is a very long-range radar used for the main purpose of intercept.
Radar Modes
The AWG-9 in the F-14B comes with 2 types of radar modes: doppler and pulse-doppler search. Of those two, subsets are able to be observed as 5 in this list:
- PD SRCH: Pulse-Doppler Search mode. No bias factor of the radar, but impedes to pulse-doppler methods.
- PD STT: Pulse-Doppler Single Target Track mode. By default upon acquiring a lock with the AWG-9, the radar will move to this function mode. It is currently suspectable to the notch filter.
- RWS: Range While Search mode. The radar will prioritize the range of targets but not other factors. Falls under pulse-doppler.
- TWS MAN: Track While Scan - Manual mode. The radar will prioritize the situational awareness of other targets but not give information on every target. The radar will also prioritize targets by threat importance.
- TWS AUTO: Track While Scan - Auto mode. The radar will perform the same as TWS Man, but the elevation and azimuth controls will be automated in the process for an optimal scan.
- PULSE SRCH: Pulse Search mode. No bias factor of the radar and can not be impeded to the notch filter, unlike the pulse-doppler method. The radar will, however, output a return of everything that is scanned and requires tuning.
- PULSE STT: Pulse Single Target Track mode. Performing similarly to Pulse Search mode, this function mode applies to only a single target and is not suspectable to the notch filter.
Pulse-Doppler Search Mode
The pulse-doppler search mode is used mainly as a kind of early warning mode. It is the search mode with the greatest detection range but it can display no range to the RIO, only closure rate. For this reason, the TID can display no track information.
Pulse-Doppler STT Mode
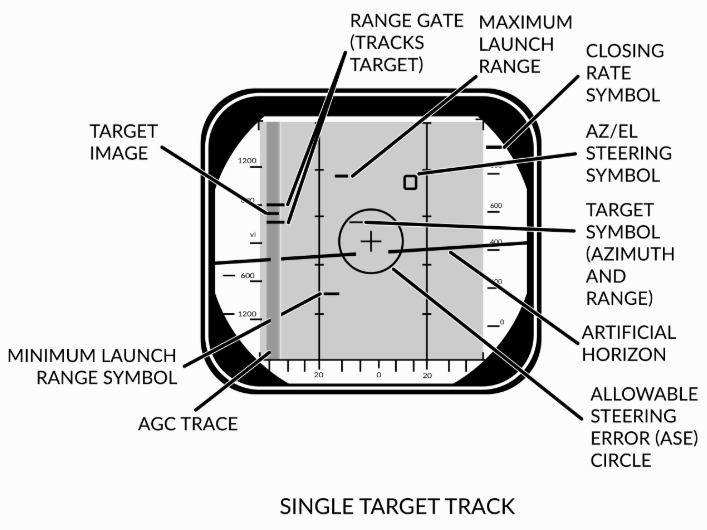
The pulse-doppler STT works and looks much like the pulse STT mode. It does, however, have the same advantages and disadvantages compared to pulse STT as the other pulse-doppler modes compared to the pulse modes. This means that while much better at tracking a target close to the ground it is however vulnerable to notching.
The DDD display for pulse-doppler STT looks like pulse STT display except that the target return and antenna azimuth display are moved to the left side of the screen and a generated synthetic target marker is displayed at the correct azimuth instead. This is so that the targets range can be displayed by the synthetic target, unlike the other pulse-doppler modes which only shows closure rate. The other symbology on the DDD in this mode are the same as in pulse STT.
Range While Search Mode
In range while search, a frequency measuring ranging mode is added (FM ranging) to allow the radar to measure the range of tracked targets in addition to closure rate. This additional processing does, however, mean that the effective range of the radar is somewhat lesser. The display on the DDD is the same as in pulse-doppler search, the TID however also shows tracks in this mode showing the targets as tracks momentarily as they’re scanned and displaying their position and altitude.
The targets are shown for a maximum of two seconds or until the antenna again scans the same bar at the same azimuth at which time it is removed unless detected again. The maximum number of concurrently shown tracks are 48.
TWS Manual Mode
The track, while scan mode uses the same FM ranging as RWS with the same reduction in range compared to pulse-doppler search and the DDD display, is also the same. The main difference that the computer establishes track files and tracks up to 24 targets concurrently of which 18 can be shown on the TID at any given time.
As the computer routine calculating these tracks need a set track refresh time of 2 seconds this limits available azimuth scan area and bar settings to either 20° 4 bars or 40° 2 bars. When entering TWS the computer automatically selects the ±20° 4 bar scan disregarding the RIO set scan volumes unless those are set to ±40° 2 bars in which case that is used instead.
The TWS mode is also the only mode enabling guidance of the AIM-54 at multiple targets (up to six), and as soon as engageable targets are detected the computer starts assigning them a missile priority number according to optimal missile firing sequence.
TWS Auto Mode
Performing similarly to TWS Man mode, what differs between the two is that in TWS auto the computer takes control of used scan volume and scan pattern azimuth and elevation as soon as target tracks are present. The WCS computer automatically tries to optimize the scan volume and direction so that tracking of the prioritized targets is maximized. If not selected before launch the WCS overrides as soon as the first AIM-54 is launched and selects TWS Auto.
Pulse Search Mode
Pulse search is used to search for and find airborne targets at range. It is possible to use this radar mode as a basic ground mapper as well which can be useful for navigation and navigational fixes and can also be used in a pinch to detect larger surface targets like ships. Keep in mind though that the radar is not built with this as its main function and that a real air-to-ground radar will outperform it handily.
In this mode, the radar cannot by itself differentiate targets and generate tracks meaning that the WCS will not generate track files and display anything on the TID. This also means that pulse search is not capable of guiding missiles.
Pulse STT Mode
Pulse STT is used to track a single target, like pulse search mode it is not susceptible to notching but it is to ground clutter. The fact that the STT modes use gates to track the target, in this case, range gates, means that it is less susceptible to ground clutter but a target close enough to the ground that the ground return enters the range gates would be likely to shake the lock.
As it is only in the pulse-doppler modes that the missile guidance commands can be sent pulse STT is limited to launching AIM-7s in CW mode and AIM-54s in an active launch mode limiting their ranges. At short ranges, ACM ranges, it is possible to use the ASPECT switch to set what aspect of the target to track, this is just to counter different types of countermeasures. As an example, if set to NOSE the radar will be less susceptible to chaff as the radar weights its track towards the targets leading-edge (nose) away from the chaff being launched behind the target.
A successful track is indicated by the ANT TRK and RDROT indicator lights on the DDD, meaning that the antenna is tracking the target and that the target is within the range gates. If the target is jamming with sufficient strength, negating a range track, the radar will transition to a jam angle track instead, indicated by the JAT indicator light on the DDD illuminating instead of the RDROT. When range tracking is again possible at closer ranges the radar will transition to that instead.
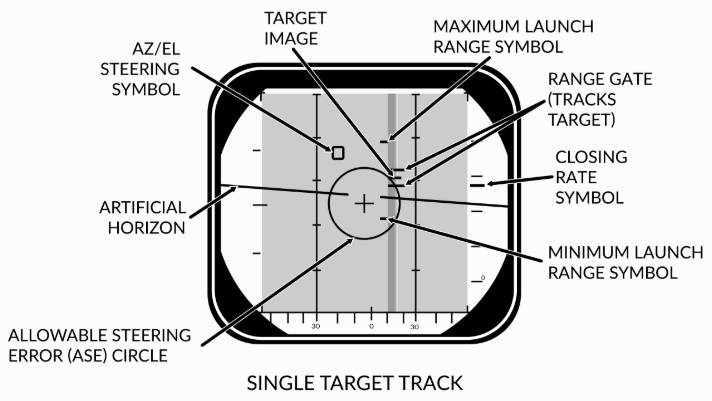
The DDD in this mode will be similar to the pulse search mode but the antenna will be locked onto the target and not scan. Additionally, the DDD will show the range gates around the target, a closing rate symbol at the right scale and applicable attack symbology if a valid missile is selected.
Anti-Jamming Modes
Not yet implemented.
AN/APX-76 IFF Interrogator
The AN/APX-76 IFF (Identification Friend or Foe) interrogator is integrated into the AN/AWG-9 operation. Then interrogator antenna itself is located on the AN/AWG-9 antenna gimbal platform. An IFF system works by sending out an interrogation pulse and then listening for returns from cooperating transponders. In addition to the unencrypted civilian mode the AN/APX-76 is capable of interrogating in the encrypted military mode 4. This ensures that targets replying to mode 4 interrogations are indeed friendly. The AN/APX-76 can be used both in search radar modes and in STT radar modes. To enable interrogation the IFF switch is depressed on the Detail Data Display Panel which then activates the interrogator for as long as the button is held up to 10 seconds max.
When enabled IFF received IFF returns are then overlaid on the normal AN/AWG-9 radar returns on the DDD. A friendly target will be indicated with two bars, one above and one below the normal radar return. As the AN/APX-76 is a separate radar, secondary mode, radar apart from the AWG-9 the IFF can sometimes also detect targets not detected by the AWG-9. In this case the IFF return will not have a radar echo inside it. In the search mode this is overlaid over each target replying and in STT over the STT target. Additionally, if the STT target is hooked on the TID the DDD will switch from normal range display to a ±10 NM display to enable display of multiple returns in case of closely grouped targets.
HAFU/Datalink
Hostile, Ambiguous, Friendly or Unknown (HAFU) is a symbology system used by the F/A-18 to represent trackfiles; specifically, to show its status as a friendly or hostile. It is usually what trackfiles are displayed as across the software.
There are four HAFU symbols:
- Triangle: Hostile (red when colored)
- Thick Staple: Ambiguous (yellow when colored)
- Half-Circle: Friendly (green when colored)
- Thin Staple: Unknown (yellow when colored)
All types except ambiguous can be manually assigned via the Situational Awareness format. Tracks will also be automatically identified as explained below.
A hostile HAFU will be assigned whenever:
- A negative IFF response is returned, and
- An NCTR print returns with an aircraft type that is on the hostile coalition; or
- A SURV (surveillance, like an AWACS) source over datalink also marks it hostile; or
- A F/F (fighter-fighter, like another F/A-18) source over datalink also marks it hostile.
An ambiguous HAFU will be assigned when the aircraft and a donor have conflicting identifications (friendly and hostile).
A friendly HAFU will be assigned whenever an IFF interrogation returns as friendly or the track itself is contributed to by the Precise Participant Location and Identification (PPLI) system.
An unknown HAFU will be assigned by default until it is updated by meeting one of the requirements above.
Air-to-Air Weapons
This area will cover over all the different air-to-air weapons brought with the F-14B Tomcat.
Air-to-Air Gun
The F-14 Tomcat is outfitted with the M61A1 Vulcan 6-barreled Gatling cannon, being able to hold up a maximum of 675 rounds internally.
Gun Rates
The cannon offers 2 modes of combat in the F-14B:
- LOW: mode which slows down the muzzle rate, used for Air-to-Ground.
- HIGH: mode which is to be used for Basic Fighter Maneuvering. (BFM)
Gun Modes
The cannon for Air-to-Air mode is able to be placed into 2 following positions:
- Manual: this mode is able to be selected by depressing the CAGE/SEAM button, which will then only display the pipper and ammo count.
- Real-Time: this mode is the regular, default mode. Along with a radar lock, the pipper will calculate to be accurate when directed to the diamond contact box. This will also give a closure rate towards the contact and the range relative to the aircraft.
Symbology
The symbology for the cannon is displayed on the HUD with the weapon master selector in the GUN position, and display in A/A. By default, the gun rounds indicator will be displayed as 0 for rounds per 100. Located next to the display panel to the right is the gun ammo counter. Additionally, the gunsight elevation is also able to be adjusted underneath the steer commands on the display panel.
Air-to-Air Missiles
AIM-54 Phoenix
WIP.
AIM-54A Mk.60
WIP.
AIM-54C Mk.47
WIP.
AIM-7 Sparrow
WIP.
AIM-9 Sidewinder
WIP.
Air-to-Ground Weapons
The F-14B Tomcat comes with a variety of air-to-ground weapons after the upgrade to the Bombcat.
Air-to-Ground Gun
WIP.
Air-to-Ground Bombs
WIP.
Mk-20/81/82/83/84 GPB
WIP.
GBU-12/14/16 LGB
WIP.
BDU-33 Training Bomb
WIP.
ADM-141 TALD
WIP.
Air-to-Ground Rockets
WIP.
Resources
Manuals & Documents
Heatblur's Videos
- Episode 1: Overview
- Episode 2: Pilot's Cockpit Walkaround
- Episode 3: Cold And Dark (Full Startup)
- Episode 4: The RIO's Office
Jabbers' Tutorial Videos
(They're good!)
- Pilot - Startup/Taxi/Takeoff with JESTER AI
- Pilot - Maneuvering and Flight Characteristics
- Pilot - Air-to-Air Refueling
- Pilot - ACM - Radar Acquisition Modes
- Pilot - Weapons - Zuni Rockets with JESTER AI
- Pilot - Weapons - AIM-9 Sidewinder
- RIO - Startup
- RIO - AWG-9 Radar
- RIO - IFF Interrogation
- Overview - AIM-54C Mk.47 Phoenix - Tacview Debrief
- Overview - AIM-54A Mk.60 Phoenix - Tacview Debrief
- Quick Tips - AIM-54 Phoenix
- Quick Tips - Bombing

