Difference between revisions of "Cockpit Views"
(server.lua link to the modified view limits file) |
|||
| Line 7: | Line 7: | ||
}}</center> | }}</center> | ||
| − | + | The guides on this page are focused on how to utilise the various ways that DCS can display your cockpit: you can use Snap Views to temporarily jump to a certain part of the cockpit (such as the radar screen) or edit the view limits of your cockpit to be able to zoom in more on your front dashboard in the cockpit, or be able to lean more to the left. | |
__TOC__ | __TOC__ | ||
Revision as of 23:32, 13 October 2018
The guides on this page are focused on how to utilise the various ways that DCS can display your cockpit: you can use Snap Views to temporarily jump to a certain part of the cockpit (such as the radar screen) or edit the view limits of your cockpit to be able to zoom in more on your front dashboard in the cockpit, or be able to lean more to the left.
Contents
Snap Views
Snap views allow you to set a preset view position in the cockpit, that you can then access at the press of a button. This can be an incredibly useful tool to create custom views that you can quickly for your radar / targeting screens; even for those with headtracking / VR setups this can be a valuable addition to your workflow in the cockpit.
Please note that by default the snap views are enabled, but they are not bound to any keys in the default bindings. That means that if you wish to use any of up to 10 snap views, you first have to allocate a key to do so. Snap Views are module specific to my knowledge, so you can have a ton of allocated Snap Views without having to worry about interfering with any of your other modules' Snap Views. Rebinding any Snap View saves it permanently for use in all sessions afterwards (even if you shutdown DCS).
To do this go to the 'adjust controls' menu, and go to the View Cockpit tab for your appropriate module. It lists the selected module (for example, 'FA-18C Sim') and then lists the subsection of that modules controls ('All', 'Sensors', 'View' and 'View Cockpit'). We want to go to view cockpit.
Please note that this menu also has the controls for manipulating the in-cockpit view (such as look up, zoom in, rotate left): if you do not own a headtracking solution (such as a VR headset or TrackIR) you may wish to familiarize yourself with these bindings and/or rebind them to a more easily accessible button on your keyboard / joystick / HOTAS. We will need these view controls in a second to get to our view that we wish to save as a snap view.
Default keybindings
The keybinds that are of particular interest to us in the View Cockpit tab are
- Save Cockpit Angles
- [default= Right Alt + Numpad 0]
- This allows you to save the current view to the last accessed Snap View:
- Snap Views
- [default= Left Windows + Numpad 0 (0 through 9)]
- This allows you to access any snap view: you can use cockpit view toggle to select if you have to hold down the keybind or press it
- Snap View 5
- [default= Left Windows + Numpad 5]
- This keybind is the default view for any cockpit (ie in the pilots chair) and should preferably not be rebound!
- Cockpit View Toggle
- [default= Right Control + Numpad 0]
- This toggle switches between having to hold down the Snap View key combination to view the Snap View associated, or having to press it once to 'toggle' this Snap View.
Custom Snap View(s)
By pressing one of these Snap View keybinds brings you to the default Snap View that is setup for that module: in my experience these are usually less then useful, so it is worth redoing them yourself for a more pleasant experience.
To alter a default Snap View first press the Snap View key that you wish to change: we are going to change the Snap View 6 (accessed by pressing Right Alt + Numpad 6) as an example. The game now remembers this as your last selected snap view, and pressing Save Cockpit Angles [default= Right Alt + Numpad 0] will bind your current view to this Snap View.
Lets say we want to have Snap View 6 [default= Left Windows + Numpad 6] to be our HUD display: 1. Move your camera in the cockpit (using the appropriate keybinds for moving the cockpit view or using our headtracking solution) and manipulate the cockpit zoom [default= Numpad forward slash '/' and Numpad asterisk '*'] until we are satisfied with the view we are going to save to a Snap View. 2. Now press the keybind for Snap View 6 [default= Left Windows + Numpad 6] to briefly show Snap View 6 so that we have selected this Snap View to redefine to our position 3. Now press the keybind for Save Cockpit Angles [default= Right Alt + Numpad 0] to save our current view to Snap View 6 (as this is our last selected Snap View, and thus will be redefined).
Cockpit View Limits
The ability to move your head in the cockpit is restricted to a certain area to enforce realism and avoid game breaking. For example, in the default situation is it impossible for your head to clip through the canopy of the aircraft, but this also imposes limited accessibility of many of the outside regions of the cockpit that you could (realistically) access with your head.
Via altering the Views.lua file (found in each module's own file directory) we can adjust these limits to suit our needs and give us a more accessible cockpit head movement area. For example, it will allow us to lean further to the left and right, as well as zoom in further on our instruments on the dashboard.
Prepared file to modify your view limits
This modified server.lua, kindly created and made available to us by Rudel_CH can be placed into the following folder, and after which a restart of DCS (if you have it open) all the view limits will be adjusted to allow a more open head movement area in the cockpits. This server.lua file needs to be placed at the path:
\C:\Users\Nanne118 (your pc name goes here)\Saved Games\DCS(.openbeta)\Config\View\
Manually adjusting cockpit view limits
Per the original source of this altering cockpit views article by Rudel_chw, we will be adjusting the cockpit view for the F-5E Tiger 2 module. I would recommend you read the original article for the excellent work done by this person.
For adjusting the view limits of the Flaming Cliffs 3, A-10C, KA-50, Su-25T, and P-51D we will want to copy over and adjust the file Server.lua to our Saved games directory. DO NOT EDIT YOUR STOCK FILES. The default location for the the Server.lua file is at
\DCS World (OpenBeta)\Config\View\
but again, we want to copy it over: if you leave it in place and alter it at the default location you will fail the integrity check (so you cannot play online), and it will also be overwritten if DCS has an update. DO NOT EDIT YOUR STOCK FILES. Instead, we want to move this server.lua file to our Saves Game directory, at
\C:\Users\Nanne118 (your pc name goes here)\Saved Games\DCS(.openbeta)\Config\View\
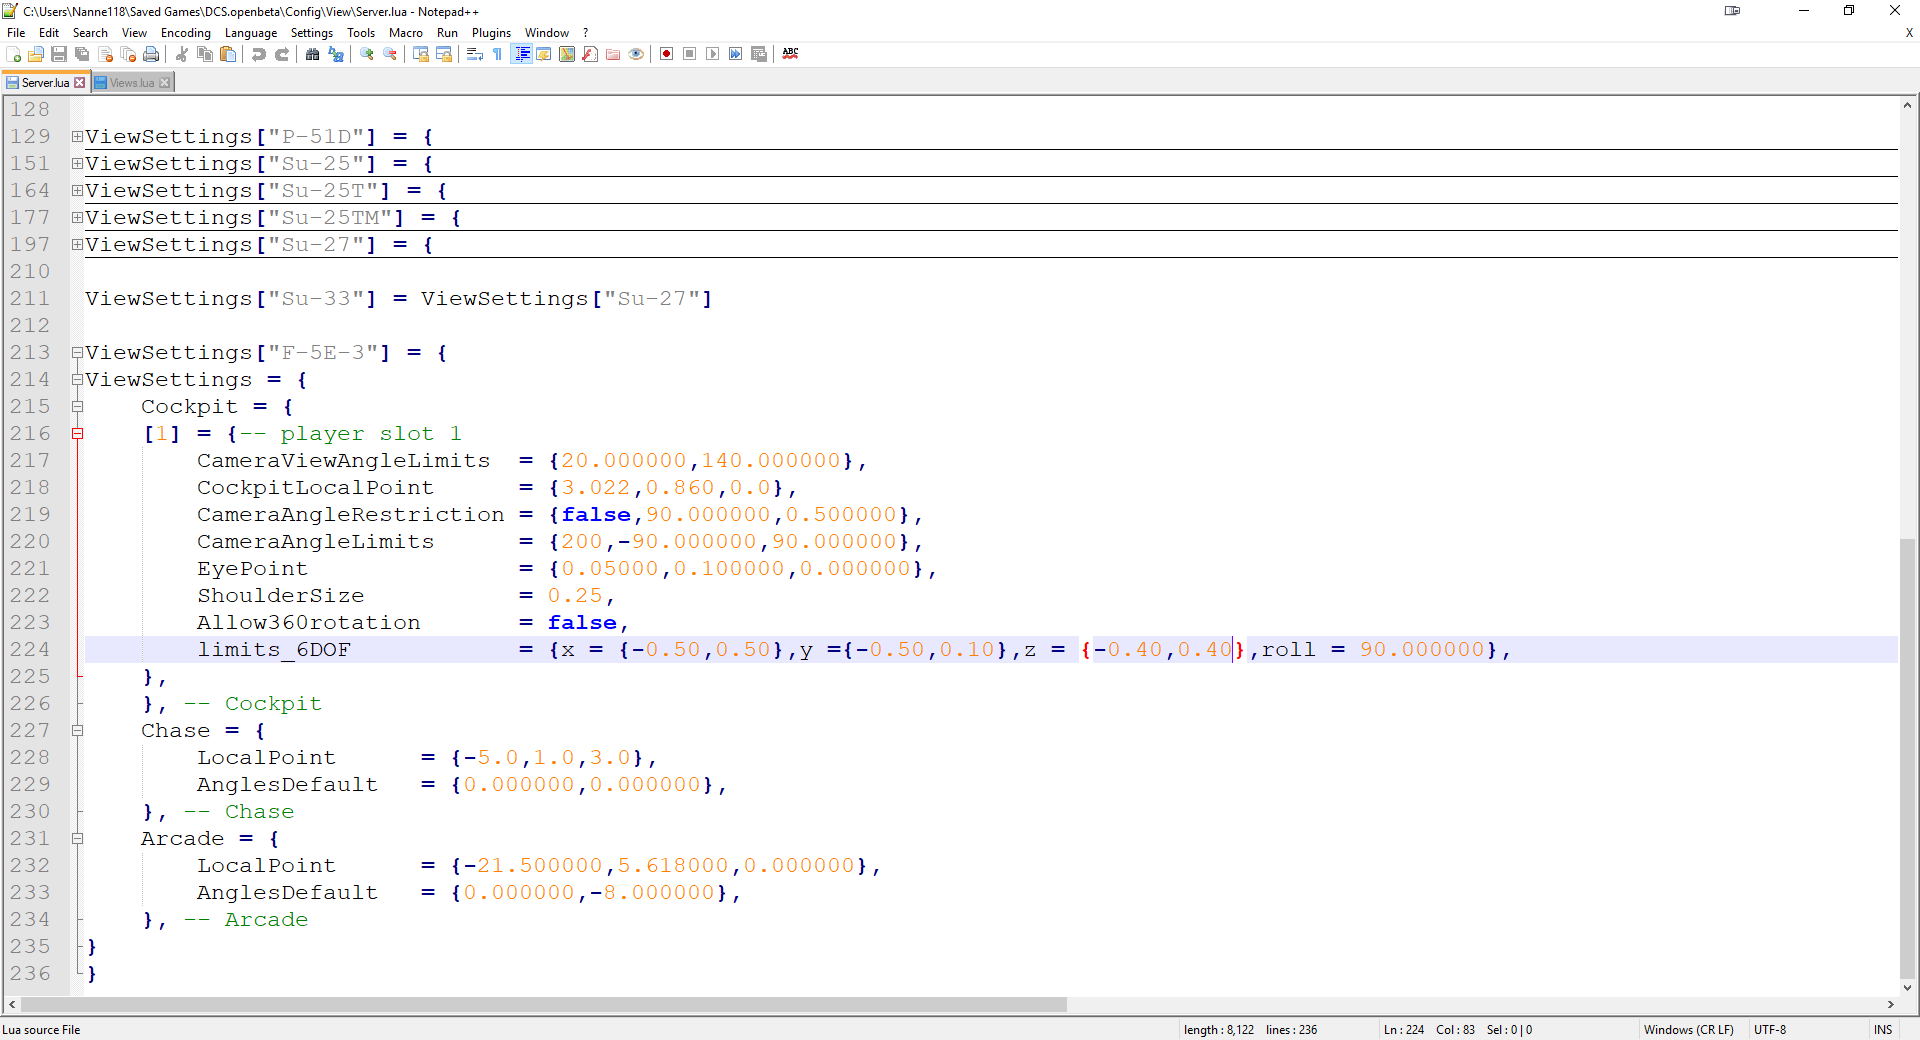
The line you will want to edit is the line 'limits_6DOF', which will have an x value denoting the limits back to front (aft-forward axis), an y value which denotes the limits from top to bottom (vertical axis), and an z value denoting the movement limits of our head side to side. To increase the overall area that you can move your head in, you will have to alter the limits as you desire; unfortunately this has to be done via trial and error as there is no direct feedback, save from booting up DCS and trying it out in the cockpit.
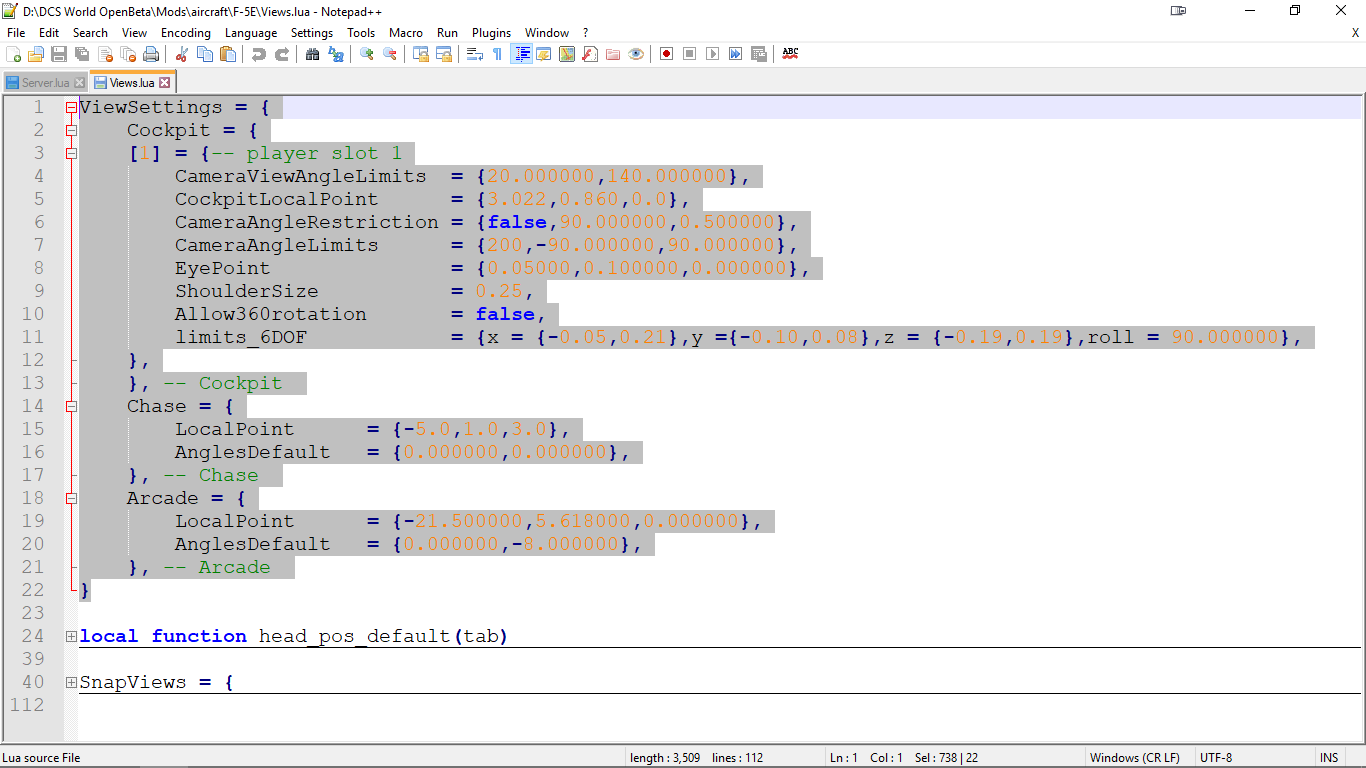
If we want to edit one of the other modules (the FA-18C, the F14, the F-5E) we first have to copy over the server.lua as mentioned above. We then have to go to each specific modules folder location and open the specific module 'Views.lua' file. These are located in
\DCS World (OpenBeta)\Mods\aircraft\F-5E(modulename)\
We have to copy over the 'ViewSettings' part of the 'Views.lua' file, which should be placed in to the server.lua file we copied to our \Saved Games\DCS(.openbeta)\Config\View\ directory earlier. Please note that to copy this text over into the 'server.lua' we have to create an appropriate structure within the server.lua file in our Saved Games directory.
Please reference the images above how the end result should look, but here is what to add: the line before your copied text should read
ViewSettings["F-5E-3"] = {
and the line after your copied text should have an additional curly bracket '}' to close off this section correctly.
As you may notice in the images, I have copied the F5 view limits from the original post on the forums as they were quite comfortable for me to work with in the cockpit. However, with some trial and error you should be able to also create your own head tracking area limits to suit your needs if you follow the guide above.


