
Carrier Air Operations

Carrier air operations are the various procedures and techniques that make up landing on a moving ship, called an aircraft carrier: both STOL / STOVL (such as the Harrier and F-35B's) and fixed wing (F-14, F/A-18) can land on a carrier. Because of the relatively small size of aircraft carriers there are a number of rules and procedures that you should follow when on or around an aircraft carrier.
Carrier Basics
Before we dive headfirst into the procedures and rules associated with carrier air operations, we will first go over the various basics that come into play when operating on a carrier. These include items such as how does a carrier work, what does a carrier look like, and what sort of key features should you pay attention to when you cannot make out left from right when operating on a busy carrier.
Carrier Features
Because of the limited length of an aircraft carrier some special equipment is used for launching (departure, taking off) and recovering (landing) aircraft. Whereas normally a runway would net you somewhere in the ballpark of 6000 - 12000 feet of usable space, having a total length of 1100 feet is already quite spacious for an aircraft carrier. There are various types of key equipment used on a carrier:
- 1. Arresting gear
- Used to slow down / landing aircraft (recoveries)
- 2. Catapults
- Used to speed up / launch aircraft
- 3. Launch ramp
- Used to launch aircraft
- 4. IFLOLS
- Used to guide aircraft into landing (recoveries)
Ski ramps (STOBAR)

Most modern aircraft tend to be quite heavy (due to radar / sensor electronics, as well as heavy jet engines) and as such they cannot simply run off the edge of the ship at full speed to get into the air (though this was common practice for the lighter World War 2 aircraft). Instead, you could use a ramp and a high power aircraft (with very little weight).

The procedure of using a ramp to launch aircraft is called STOBAR ( Short Take-Off But Arrested Recovery ) and is a simple (cost effective) manner of launching aircraft from a carrier. For this you only need a ramp (angled bit of deck) and you will need a high power to weight ratio (i.e. lot of power, little weight) on your aircraft to launch aircraft off of the carrier.
Launching via STOBAR is done by lining the aircraft up to go off the ramp, go full thrust and launch by running off of it. Removable wheel chocks are used to hold the aircraft in place whilst you run up to full power (in the designated spots): the JBD (Jet Blast Deflector, a big piece of metal behind the plane that can be raised) is used to prevent the exhaust from the airplane preparing to take-off from blowing away other aircraft lined up behind it.
Jets take a few seconds to spool up to full power (i.e. no full thrust from the get go), so the use of these chocks is pretty vital. On some (Russian) aircraft a thrust override (carrier takeoff) switch can be set to provide even more engine power, to be used when an aircraft is heavily loaded or in bad weather conditions.
The drawbacks of using STOBAR is that you get to bring less overall weight, so less weapons and fuel to maintain the amount of power versus weight (also called the thrust vs. weight) ratio to be able to safely launch (although you will typically top up on fuel after launching from any carrier). Also, because the ramp takes up valuable space on the carrier (you can't park aircraft on the ramp), you can typically bring less planes aboard and you will not be able to launch as many planes from a STOBAR carrier (as they all have to use the same ramp to launch).
Catapults (CATOBAR)

Rather than implement the STOBAR ramp system, the United States (whom pioneered the system) and most NATO countries instead use the CATOBAR (Catapult Assisted Take-Off But Arrested Recovery system. The aircraft catapult is a launcher to which an aircraft is hooked up, which is then launched using external power from the carrier (either steam or electromagnetic power).
Up to the Cold War most aircraft used a length of reinforced rope (called a bridle) to attach to the catapult shuttle, but in all aircraft after the Cold War the shuttle instead connects to the nose gear of the aircraft via the launch bar. The pilot can selectively lower the launch bar with a switch in the cockpit to hook up to the catapult (shuttle). This shuttle also holds back the aircraft, so that the engines can be run up to full (afterburning) mode before launching. The catapult is then set to the appropriate amount of power and the aircraft can be subsequently launched.
Although more expensive (maintenance costs) to operate than the comparative ramp system, the catapult system allows you more flexibility in operating it: you can increase the amount of power on the catapult for heavier aircraft (more fuel/ordinance), as well as being able to hookup and launch multiple aircraft in quick succession by using multiple catapults.
Arresting gear

To allow aircraft to land in a much smaller space, a number of wires (typically 4 or 5) are strung across the landing deck. The aircraft catches one of these arresting wires with the use of the hook built into the airframe, after which the aircraft slows down rapidly (though quite harshly). Obviously aircraft such as helicopters and STOL/STOVL (such as the Harrier or F-35) do not need these arresting wires, as they can simply land (semi) vertically.
Because of the limited length of the landing area and the harsh landing, the aircraft used for landing on a carrier (carrier aircraft) also have very robust landing gear to withstand the high rate of descend. In a way, landing on an aircraft carrier is more controlled crashing than actual landing.
To allow aircraft carriers to launch and recover aircraft at the same time, the landing deck often has an offset: this means the landing deck is at an angle compared to the rest of the ship (typically at 9 degrees). Typically you will visually adjust for this offset (respective of the carrier course) in your landing procedure, but during nighttime or bad visibility you will be given a different heading to adjust for this offset automatically.
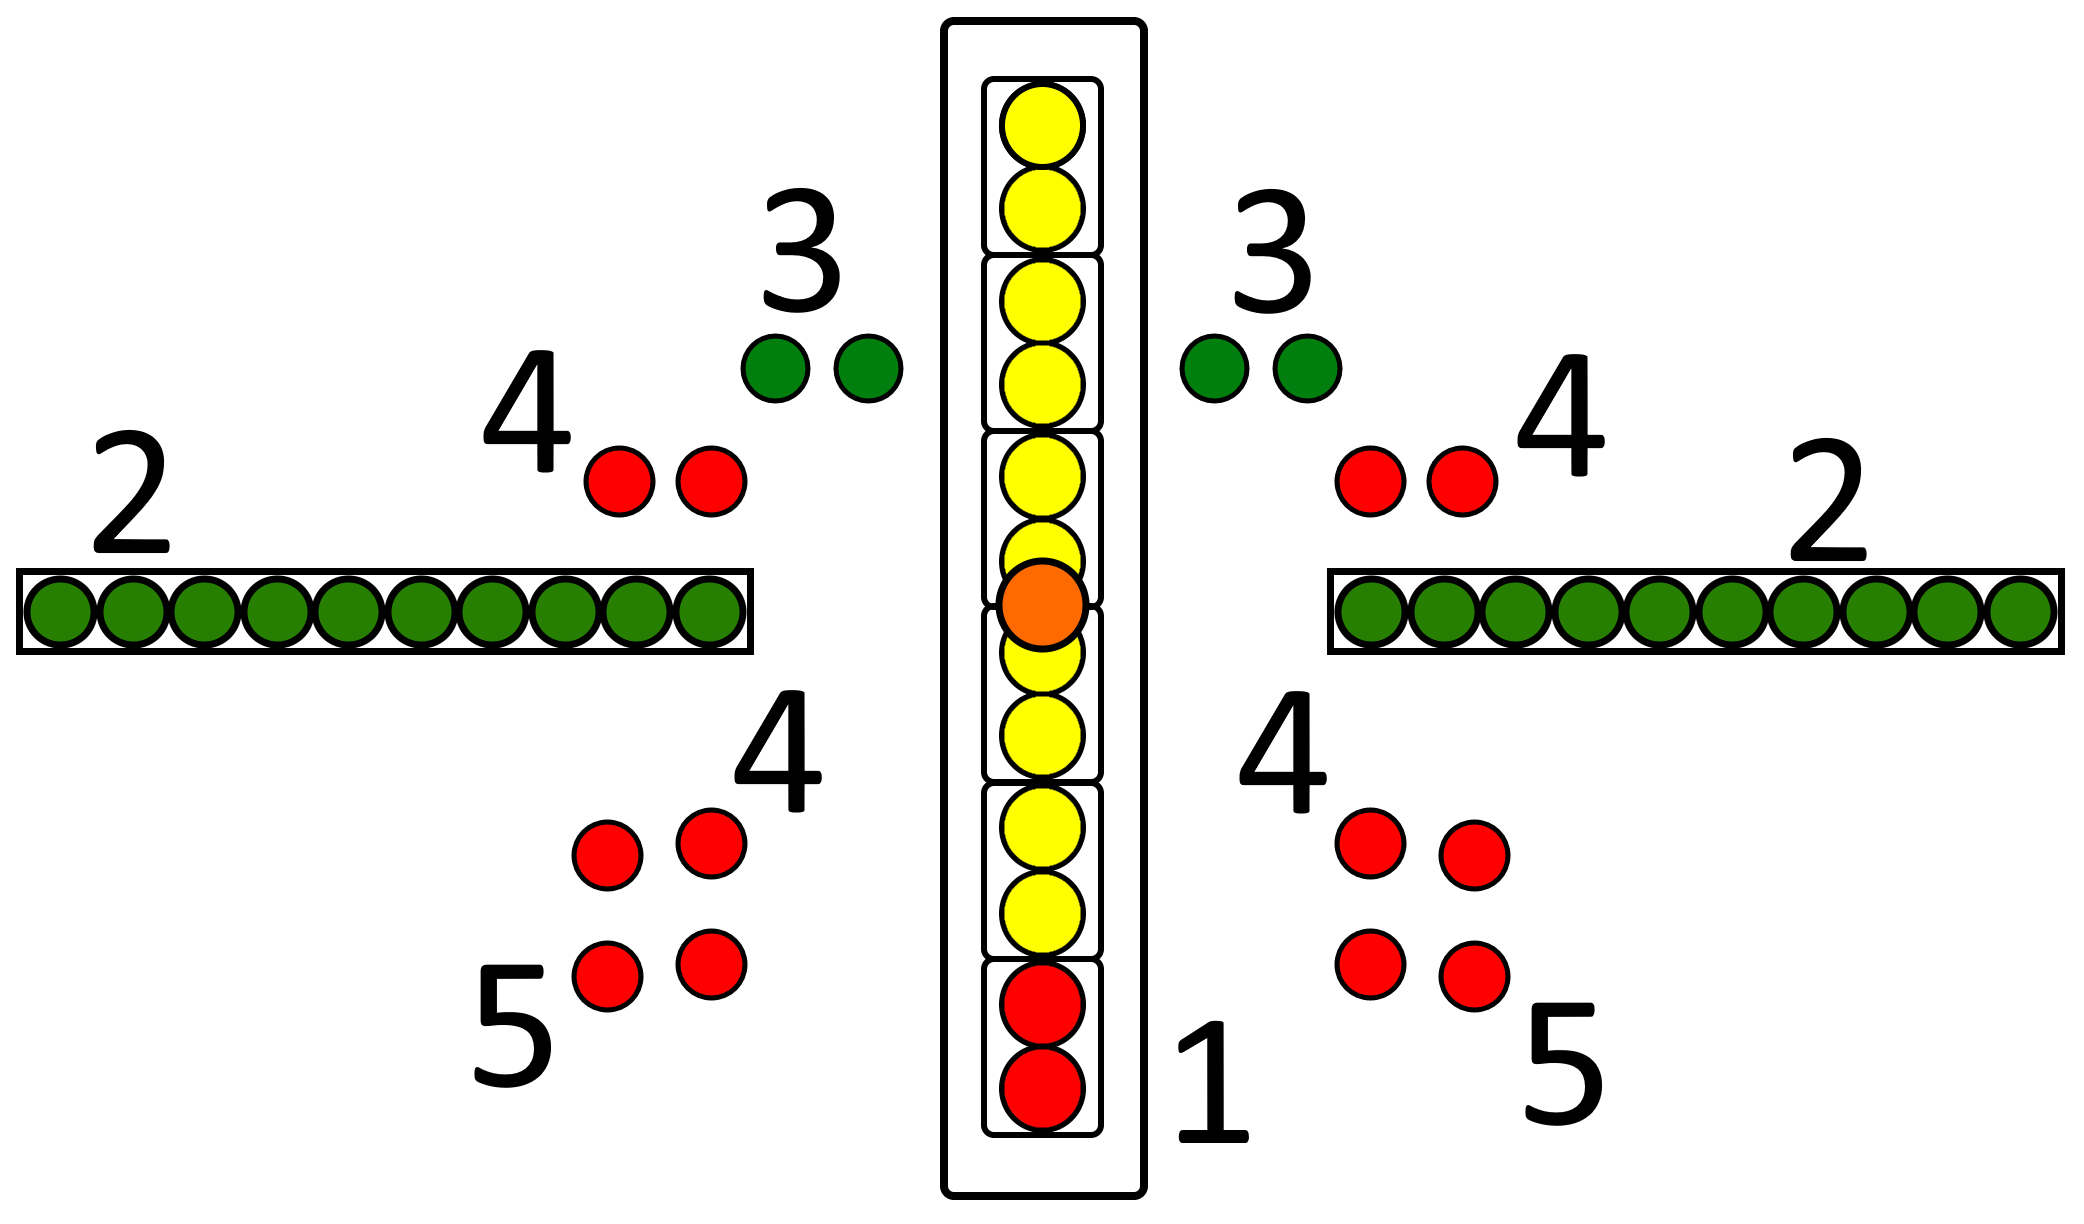
IFLOLS

The IFLOLS (Improved Fresnel Optical Landing System) is a system used on carriers to guide aircraft into the correct landing approach ('line-up'). Aside from extreme weather conditions or nighttime (both leading to limited visibility) landings, you will use this system to correctly line yourself up so that you may make a successful landing first time round.
The LSO (Landing Signal Officer) are in charge of operating these lights and will guide you on landing the aircraft, as well as grading the landing attempt afterwards. Please see the appropriate chapter for further information on LSO Grading: you can use the foldout button below to show the IFLOLS names for the lights.
| | IFLOLS: Carrier Landing Lights | | ||
|---|---|---|
| # | Name | Function |
| 1 | Ladder /
Meatball |
On this vertical bar with yellow/red lights, the orange ball ('meatball') will move up and down
according to aircraft position. If the ball is too low, your aircraft is too low. If the ball is too high, your aircraft is too high. The goal is to line it up with the datum lights (2) for optimal landing: should the orange ball fall into red lights you are dangerously low and you will need to wave off (stop) the landing attempt. |
| 2 | Datum lights | These green horizontal bar of lights indicates your ideal line up: the goal is to have the orange ball ('meatball')
line up with the datum lights for ideal vertical landing position. |
| 3 | Cut lights | On early approach the cut lights illuminate 2 ~ 3 seconds to indicate 'proceed with landing'. Any subsequent
illumination means 'add power', according to length of illumination of lights |
| 4 | Wave off lights | Should the landing fall outside safe parameters (for example you are way too low), the LSO will call 'Wave Off!'
and these lights will illuminate: you need to terminate the landing attempt and go around (climb away). |
| 5 | Emergency wave off lights | Identical in function to normal Wave Off Lights (4): for really dense pilots. |
ACLS / ICLS
Carrier Deck Layout
Let's first familiarize ourselves with the overall carrier deck layout (topology). Unlike an airfield, where there is space aplenty, the carrier is quite cramped and often busy with other aircraft, so knowing where you are going (and not hindering others) is vital.

All (modern) aircraft carriers more or less have the same layout: the figure here shows the diagram of the USS Nimitz class carriers, but we could still apply the location names to all other carriers (including carriers such as the Russian Admiral Kuznetsov).
Objects such as parked aircraft or munition carts can be placed on the aircraft deck (by the mission developer): even if they are not moving ('static') they can till be collideable. So ensure your path and catapult are clear before moving, before finding out on take-off that there is an aircraft parked on the catapult.
The most critical locations on an aircraft carrier are the catapults or ramp (marked in green and numbered), and the landing deck (between the red stripes, with yellow centerline). These are for respectively launching aircraft (taking off) and recovering aircraft (landing), so like a runway, do not block them. Typical recovery or departure intervals are approximately 20 to 30 seconds, so try to cross them quick if you have to and be wary of other aircraft.
| | Carrier Topology List | | |||||
|---|---|---|---|---|---|
| # | Name | Location | Colour | Function | Notes |
| 1 | Landing Deck | Slanted along deck | Between red lines,
with yellow centerline |
Landing aircraft | Keep clear at all times |
| 2 | Catapults | Bow (front) | In green,
JBD in light blue |
Launching aircraft | Be mindful about
parked aircraft obstructing catapults |
| 3 | Island | Starboard,
midways ship |
In purple | Ship control,
aircraft control tower |
Waive to your Airboss |
| 4 | Elevators | Edge of ship | In blue | Transporting aircraft
to hangar / deck |
|
| 5 | Crotch | Bow (front) | Black | Do NOT use for landing lineup | |
| 6 | Box | Between catapults
|
Black | Shooter /
catapult control |
Little hut where the
catapult controller sits |
| 7 | Point | Starboard bow | QRA: Quick Reaction Alert | Parking aircraft for quick
reaction air support | |
| 8 | Corral | Between elevators
|
Parking | ||
| 9 | Street | Midship / Center | Access to elevators, corral, sixpack | ||
| 10 | Sixpack | Midship / Center | Parking | ||
| 11 | Junkyard | Between island and
elevator #3 |
Parking of AWACS, Tanker,
Transport aircraft |
||
| 12 | Patio | Starboard stern | Parking | ||
| 13 | LSO | Port stern | Landing Officer | Bunch of guys grading
your landing | |
| 14 | Finger | Port stern | Parking | ||
Knowing these areas by name is certainly not required, but know to keep the landing deck clear!
Carrier Cases
During carrier operations we use 1 of 3 possible cases, with cases each having different approaches and procedures: this is to adjust to the weather and visibility conditions. The carrier will normally dictate which case is currently in use, but mainly it is dependant on the minimum visibility ('horizontal sightlines') and ceiling ('vertical visibility') according to the table below:
| Case | Conditions | Ceiling | Visibility |
|---|---|---|---|
| 1 | No instrument conditions during daytime departures/recoveries | > 3000 ft (910 m) | > 5 nm (9.3 km) |
| 2 | (Light) Instrument conditions during daytime departures/recoveries | > 1000 ft (300 m) | > 5 nm (9.3 km) |
| 3 | Severe instrument conditions during daytime and nighttime recoveries | < 1000 ft (300 m) | < 5 nm (9.3 km) |
Please note that recovering during night time automatically defers you to a case 3 landing, regardless of actual weather and visibility conditions.
Altitudes, ranges and distances
The Air Traffic Controller in charge of the flight procedures around the carrier is called the 'Marshall', and he gets to boss you around for not flying perfectly perpendicular to his nice pattern / approach. He will tell you what case the carrier is currently operating in, gives you permission to transition to a given holding stack (altitude) or move closer to the carrier (zone).
Most notably the Marshall should tell you the BRC, or Base Recovery Course. This the current course that the carrier is moving in, and should be the course that you adhere to for landing your aircraft on the carrier deck: please note that the actual carrier landing deck is offset by 9 degrees from the BRC. During Case 3 conditions you will instead be told the FB, or Final Bearing which is the BRC adjusted with the 9 degree offset (FB = BRC - 9).
Below are the altitude blocks and zone distances associated with carrier operations:
| Carrier Altitudes and Zoning | ||||||
|---|---|---|---|---|---|---|
| Altitude | Zone | Distance | Altitude | Zone | ||
| 6000+ ft | Case 3 Marshall (traffic) stack | 50 nm DME | Inf. | CCA, Carrier Controlled Area | ||
| 2000+ ft | Case 1 holding pattern / stack | 10 nm DME | Inf. | Marshall Controlled Area | ||
| 1200 ft | Case 3 approach and missed approach | 5 nm DME | 2500 ft | CCZ, Carrier Controlled Zone | ||
| 800 ft | Case 1 initial overhead break | |||||
| 600 ft | Case 1 downwind and missed approach | |||||
| 500 ft | Case 1 departure in CCZ | |||||
| 300 ft | Helicopter operations in CCZ | |||||
Distances given in DME (Distance Measuring Equipment) are thus identical to distance from the carrier: this distance can be obtained by using the TACAN signal of the carrier or similar equipment (ICLS).
Carrier TakeOff
Carrier Landing
For this chapter we have outline the various carrier cases landing procedures and approaches: for ease of use these are split into the traffic pattern and landing pattern. The traffic pattern is used for approaching to the carrier and holding the in the traffic pattern / stack until you it is your time to land on the carrier (which usually involves waiting for other pilots to land first). The landing pattern goes about explaining the actual steps for the landing approach. Thanks to Kola360 we have also been able to provide you with the relevant communications guide for these cases.
We would like to give a massive 'Thank you' to Jabbers, Kola360 and Redkite for their contributions to making these chapters.
Case 1 Landing
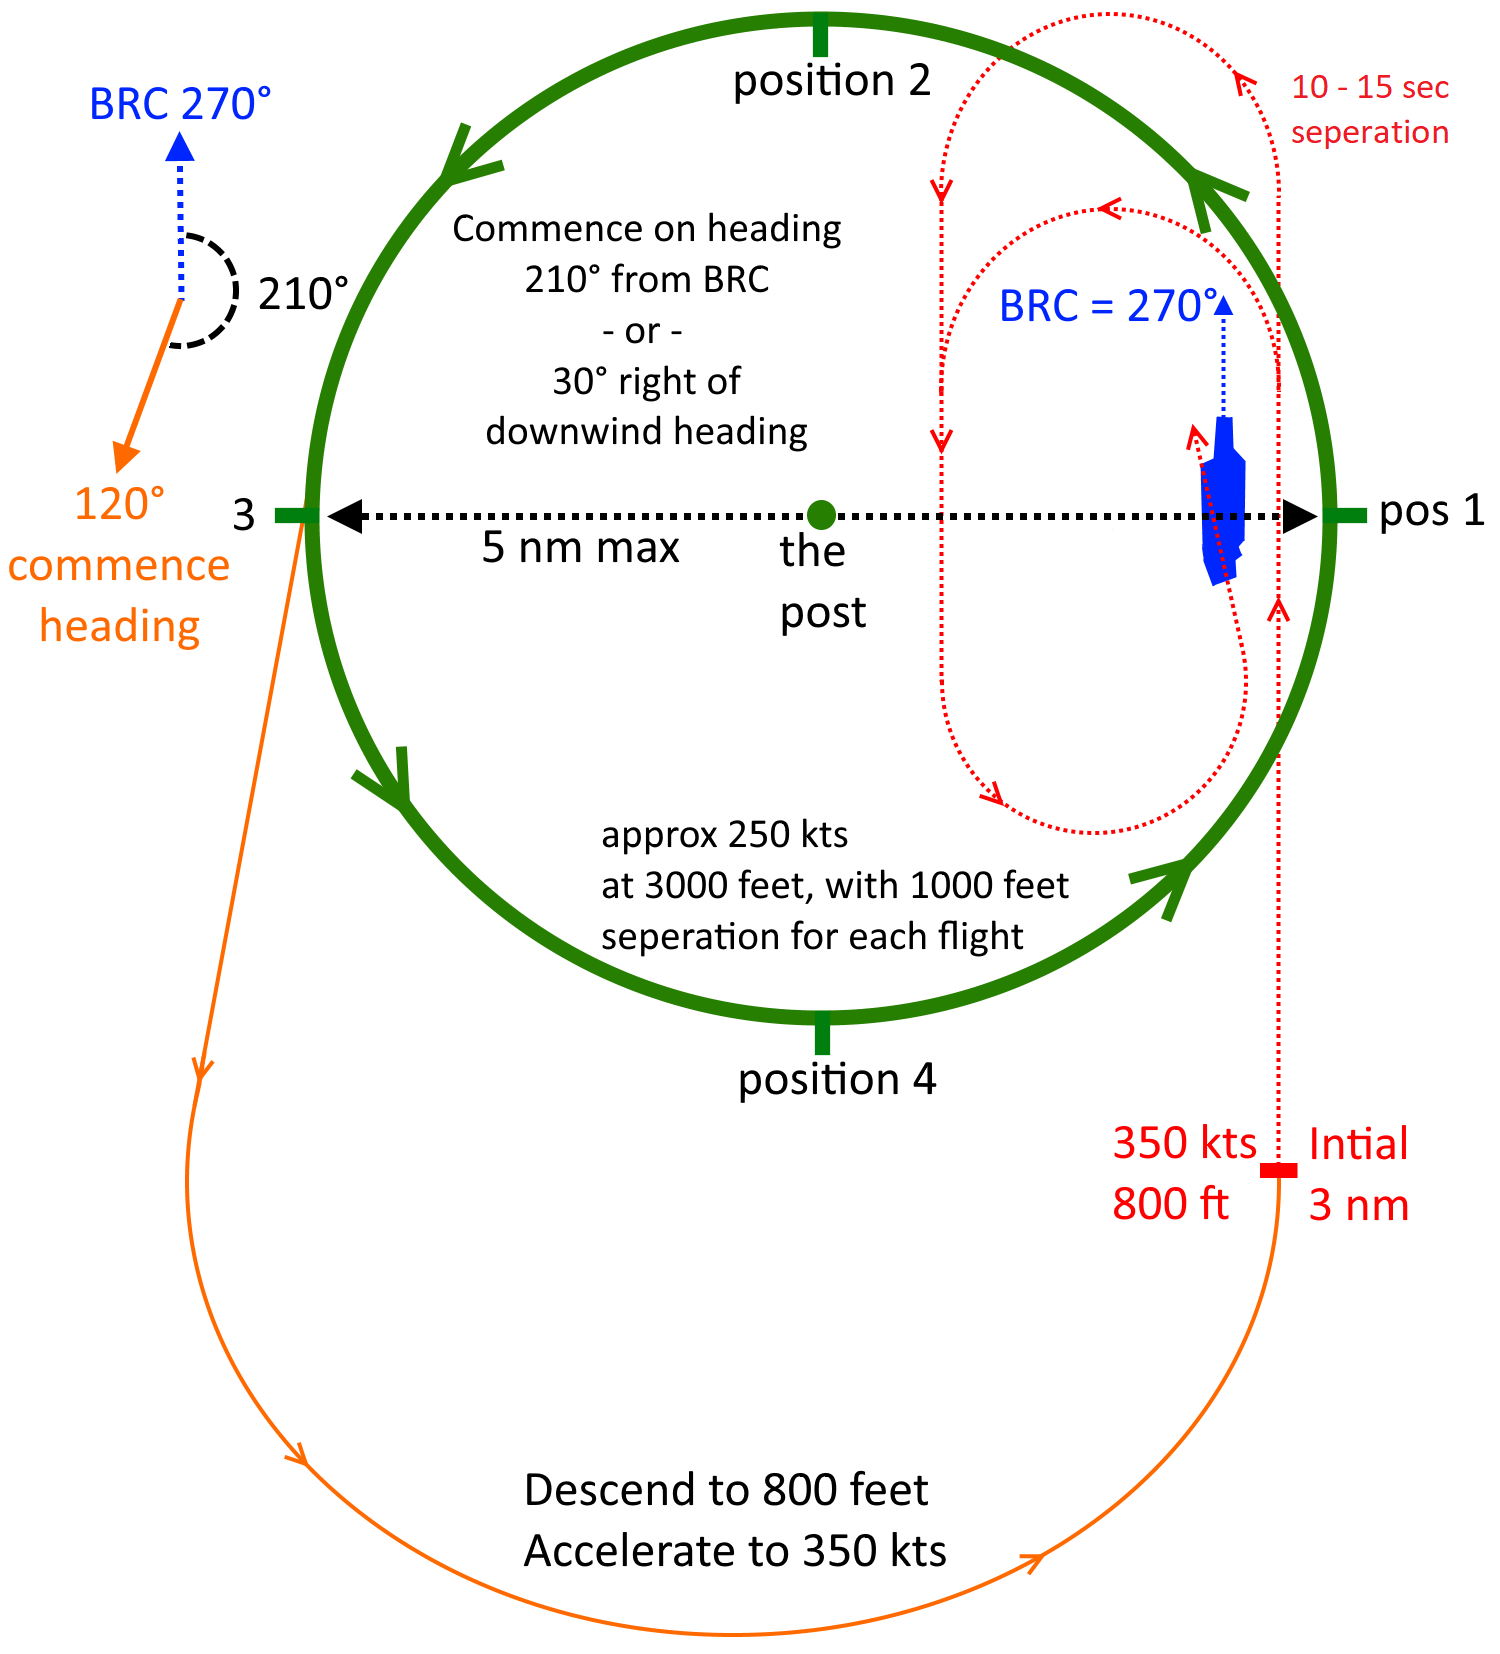
Case 1 Traffic Pattern
Case 1 Landing Pattern
IFLOLS


The Case 1 landing in good visibility conditions is (and probably should be) the first type of landing you learn for carrier recovery. It follows these 3 stages:
- 1. Enter traffic pattern
- For case 1 you will contact the relevant air controllers (see communications list), which will grant your permission to enter the airspace and direct you to a holding pattern / altitude (a circle of approx. 5 nm at 1000 feet intervals, starting at 2000 feet).
- 2. Fly landing pattern
- When you are cleared by the Marshall for landing, you will use the landing pattern to get to the carrier (on final, or 'in the groove')
- 3. Line up with IFLOLS
- The final stage of Case 1 is the line-up with the IFLOLS on final approach, or 'in the groove'
Instructions for Case 1 communications and approach pattern are in the table below. For this communications example our pilot has (side) number '118' and we have a number of radio frequencies (called 'buttons'): the pilot/side number and radio frequencies will most likely be different in your scenario.
| Case 1 Communication / Landing Pattern | ||||
|---|---|---|---|---|
| # | Location | Pilot action | Messages | Frequency |
| 1 | 17000 ft, 75+ DME
Outside of CCA (~ 50 nm) |
Ask permission from Red Crown to enter. | Pilot: [Red Crown, 118, Mother's 250 for 75, Angels 17]
|
Button 4,
256.000 AM |
| 2 | 12000 ft, 55 DME
Inside CCA Outside Marshall Area (10 nm) |
Ask permission from Strike to enter. | Pilot: [Strike, 118, flight of 2, Mother's 250 for 55, Angels 12] Pilot: [State 5.4, no Alibis] |
Button 3,
265.000 AM |
| 3 | 9000 ft, 52 DME | Pilot makes call outside 10 nm (but inside CCA).
Contact Marshall to enter CCA. |
Pilot: [Marshall, 118, 2050 for 52, Angels 9, State 5.3] Marshall: [118, Case 1, BRC is 010, hold at 2000, Charlie Time 22] |
Button 2,
264.000 AM |
| 4 | 5000 ft, 10 DME | Pilot has visual on carrier. Cleared to enter stack
(2000 ft, stack 1). Monitor button 1 for other traffic. |
Pilot: [118, See you at 10]
|
Button 2,
264.000 AM |
| 5 | 2000 ft, In the Stack | Pilot has obtained Charlie Time from Marshall and
must be 'At Ramp' at given time (2200 hours). |
Zip Lip, unless [safety concerns].
Monitor Button 1 for traffic |
Button 1,
301.000 AM |
| 6 | 2000 ft, In the Stack | Pilot matches speed so he is 'At Ramp'
on Charlie Time |
IMC ONLY
Pilot: [118, Commencing] |
Button 1,
301.000 AM |
| 7 | 800 ft | Case 1 Recovery | LSO: [3/4 mile, Call the Ball]
|
Button 1,
301.000 AM |
| Additional case 1 communication | ||||
| 8 | 2000 ft, In the Stack | Air Boss adds Delta Time to given Charlie Time:
'At Ramp' time becomes Charlie Time + Delta Time |
Air Boss: [118, Delta 6] | Button 1,
301.000 AM |
| 9 | 2000 ft, Commencing | Pilot has to go into spin pattern before
heading for the initial break |
Air Boss: [118, Spin It]
|
Button 1,
301.000 AM |
| 10 | 600 ft, Abeam carrier | Pilot has extend downwind too far and must
return to initial (800 ft starboard of carrier), to redo the case 1 pattern |
Air Boss: [118, too long in the groove,
(an airbus cut you off), wave off and return to pattern] |
Button 1,
301.000 AM |
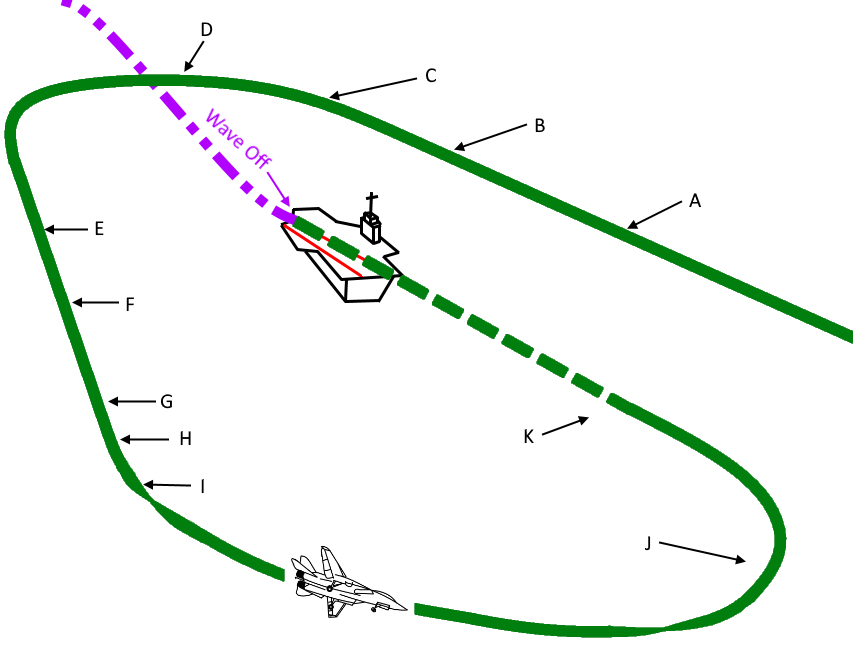
Once you have successfully reached step 7 in the communications example above you should now go into the Case 1 Landing Pattern, as follows in the table below:
| Case 1 Landing Pattern | ||
|---|---|---|
| # | F-14 | F/A-18 |
| A | 800 ft entry, approx. 300 - 350 kts,hook down, wing sweep 68 | 800 ft entry, approx. 300 - 350 kts,hook down |
| B | Speedbrake[1], radar altimeter to 370 ft | |
| C | Level break at 1.5 ~ 2.0 nm DME; 15 to 17 seconds between breaks,level turn at 800 ft.
Turn should be at 45 ~ 50 degrees of bank or at 10% in G of airspeed (i.e. 330 kts -> 3.3 G). | |
| D | Halfway into turn, set gear down at < 280 ktsand flaps/slats at < 225 kts | Halfway into turn, setgear/flaps/slats at < 250 kts |
| E | Descend to 600 ft, auto throttle[1] | |
| F | On-speed AOA at 15 units, set DLC | On-speed AOA at 8.1 units |
| G | 600 ft | |
| H | Prepare to turn once abeam of LSO station, at 1 ~ 1.3 nm abeam DME | |
| I | Commence turn once 'round down' visible, turn at ~ 30 degrees bank | |
| J | Maintain AOA, halfway into turn at 500 ft | |
| K | Enter groove at ~ 350 ft (altimeter!), at 3/4 miles, on-speed and call the ball:side number, tomcat/hornet, ball/clara[2], fuelstate[3], (auto[4]) | |
| W | Upon (or prior to) waveoff set full power: return to BRC paralleland intercept pattern at LSO / marshall discretion | |
| Speedbrake / ATC [1] | As desired | |
| Clara [2] | Ball is obscured, LSO will give instructions | |
| Fuelstate [3] | Remaining fuel in thousands of pounds:5100 pounds -> 5.1 | |
| Auto [4] | Auto throttle is engaged | |
Once you are on final approach / in the groove (K), you should now switch to the use of the IFLOLS system. This last phase should last around 15 - 17 seconds: any shorter and you may not be able to line up correctly, any longer and the LSO / Marshall will wave you off for being in the pattern for too long.
| IFLOLS | ||
|---|---|---|
| # | Name | Function |
| 1 | Ladder /
Meatball |
On this vertical bar with yellow/red lights, the orange ball ('meatball') will move up and down
according to aircraft position. If the ball is too low, your aircraft is too low. If the ball is too high, your aircraft is too high. The goal is to line it up with the datum lights (2) for optimal landing: should the orange ball fall into red lights you are dangerously low and you will need to wave off (stop) the landing attempt. |
| 2 | Datum lights | These green horizontal bar of lights indicates your ideal line up: the goal is to have the orange ball ('meatball')
line up with the datum lights for ideal vertical landing position. |
| 3 | Cut lights | On early approach the cut lights illuminate 2 ~ 3 seconds to indicate 'proceed with landing'. Any subsequent
illumination means 'add power', according to length of illumination of lights |
| 4 | Wave off lights | Should the landing fall outside safe parameters (for example you are way too low), the LSO will call 'Wave Off!'
and these lights will illuminate: you need to terminate the landing attempt and go around (climb away). |
| 5 | Emergency wave off lights | Identical in function to normal Wave Off Lights (4): for really dense pilots. |
The IFLOLS landing phase will typically be accompanied by call-outs from the LSO, which can be found in the next chapter.
LSO (Landing Signal Officer)
In here you will find the various relevant callouts the Landing Signal Officer (LSO) can make during landing. Please refer to the relevant Case 1, 2, 3 landings to find specifics as to the callouts in those situations: for example during Case 1 communications are kept to a minimum (unless there are safety concerns).
Carrier Landing LSO Callouts
| LSO Callouts | ||
|---|---|---|
| Callout | By | Meaning |
| Paddles Contact | LSO | You are abeam LSO platform, begin final turn |
| 3/4 mile call the ball | LSO | Can you see the meatball? |
| 118 Tomcat Ball 5.6 | Pilot | Modex / Aircraft Type / Meatball / Fuelstate / Auto* [1] |
| Go Manual | LSO | Disengage Autothrottles (ATC) |
| Roger Ball | LSO | Aircraft is cleared to continue |
| You are high | LSO | Aircraft is above glideslope |
| Power | LSO | Add power, aircraft below glideslope |
| Right for lineup | LSO | Come right to centerline |
| Come left | LSO | Come left to centerline |
| Easy with it | LSO | Control corrections are excessive |
| In Close | LSO | Aircraft at ramp |
| You are fast/slow | LSO | Adjust aircraft AOA, it is incorrect |
| Burner! | LSO | Select afterburner! |
| Wave-Off! | LSO | Execute Wave-Off! |
| Bolter | LSO | You missed all the arrestor wires |
As to the pilot 3/4 mile ball call, it used the following format:
Modex / Aircraft Type / Meatball / Fuelstate / Auto* [1]
- Modex
- Side number of aircraft
- Aircraft type
- Tomcat, Hornet, Harrier
- Meatball (IFLOLS)
- If you can visually acquire (see) the meatball, say 'ball'.
- If you cannot see the meatball, say 'clara' and the LSO will talk you in during your landing
- Fuelstate
- The fuel remaining in thoudands of pounds: 5100 pounds -> 5.1, 3500 pounds -> 3.5
- Auto
- Only say this if you are using autothrottles
So for a Hornet with 3400 pounds of fuel, with sidenumber 102, using autothrottles, of which the pilot can see the meatball, the ball call would be:
102 Hornet Ball 3.4 auto
And equally for a Tomacat with 4100 pounds of fuel, side number 118, of which the pilot cannot see the meatball:
118 Tomcat Clara 4.1
LSO Grading
After you have made a landing attempt you can expect an evaluation and grade for your landing: these are written in the LSO shorthand. On-board a carrier these are typically posted on a board, with on-going scoring: aside from bragging rights, scoring is kept to visualise performance and re-educate pilots doing poorly.

| Overall Grade | |||
|---|---|---|---|
| Grade | Score | Rating | Score |
| _OK_ | OK Underline | Perfect pass: rarely awarded | 5 |
| OK | OK Pass | Pass with very minor deviations | 4 |
| (OK) | Fair Pass | Pass with one or more safe deviations | 3 |
| B | Bolter | Safe pass where aircraft fails to hook a wire | 2.5 |
| -- | No Grade | Pass with gross (still safe) deviations:
failure to listen to LSO, inappropriate actions |
2 |
| TWO | Technique Waveoff | Pass with unsafe deviations: needed to be aborted | 1 |
| C | Cut Pass | Unsafe pass with unacceptable deviations | 0 |
| WO | Foul Deck Waveoff | Aborted pass after landing deck fouled (blocked):
no points and not counted towards average |
--- |
Aside from the overall grading board, there will also be a board or score sheet which has the development of each landing noted in the symbology. We can split this apart in the general symbology and the overall symbology, as per the LSO Natops Manual. The table below list the most frequently used entries:
| LSO General Symbology | ||||
|---|---|---|---|---|
| Symbology | Meaning | Symbology | Meaning | |
| WO | Waveoff | () | A little | |
| WOP | Waveoff Pattern | _Comment_ | A lot | |
| OWO | Own Waveoff | [] | Ignored signal LSO | |
| TWO | Technique Waveoff | O | Signal acknowledged
too slowly | |
| TLU | Test Lineup | OC | Over Corrected | |
| _OK_ | Perfect Pass | • | Indicates 'on' | |
| OK | Reasonable Pass | - | Indicates 'to' | |
| (OK) | Fair Pass | PATT | Pattern | |
| --- | No Grade | M1 | Mode 1 ACLS | |
| C | Cut | (A) | Auto | |
| B | Bolter | BC | Missed / incorrect
Ball Call | |
| NC | No Count | AFU | All 'Fouled' Up | |
Below are the additional (remaining) entries from the LSO Jargon table: these are not frequently used, unlike the ones in the general table.
| LSO Grading Jargon | ||||||||||
|---|---|---|---|---|---|---|---|---|---|---|
| SYM | Meaning | SYM | Meaning | SYM | Meaning | SYM | Meaning | |||
| AA | Angling Approach | HO | Hold Off | OR | Overrotate | TMP | Too Much Power | |||
| ACC | Accelerate | LIG | Long In Groove | OS | Overshoot | TMRD | Too Much Rate of Descent | |||
| AFU | All 'Fouled' Up | LL | Landed Left | OSCB | Overshoot Coming Back | TMRR | Too Much Right Rudder | |||
| B | Flat glideslope | LLU | Late LineUp | P | Power | TTL | Turned Too Late | |||
| C | Climbing | LO | Low | PD | Pitching Deck | TTS | Turned Too Soon | |||
| CB | Coming Back to lineup | LR | Landed Right | PNU | Pulled Nose Up | TWA | Too Wide Abeam | |||
| CD | Coming Down | LTR | Left To Right | ROT | Rotate | W | Wings | |||
| CH | Chased | LU | LineUp | RUD | Rudder | WU | Wrapped Up | |||
| CO | Come-On | LUL | Lined Up Left | RUF | Rough | XCTL | Cross Control | |||
| CU | Cocked Up | LUR | Lined Up Right | RWD | Right Wing Down (DWR) | / | Fly through glideslope (going up) | |||
| DD | Deck Down | LWD | Left Wing Down (DWL) | RR | Right Rudder | \ | Fly through glideslope (going down) | |||
| DEC | Decelerate | N | Nose | RTL | Right To Left | LLWD | Landed Left Wing Down | |||
| DL | Drifted Left | NC | Nice Correction | S | Settle | LRWD | Landed Right Wing Down | |||
| DN | Dropped Nose | ND | Nose Down | SD | Spotted Deck | LNF | Landed Nose First | |||
| DR | Drifted Right | NEA | Not Enough Attitude | SHT | Ship's Turn | ^ | Over the Top | |||
| DU | Deck up | NEP | Not Enough Power | SKD | Skid | |||||
| EG | Eased Gun | NERD | Not Enough Rate of Descent | SLO | Slow | |||||
| F | Fast | NERR | Not Enough Right Rudder | SRD | Stopped Rate of Descent | |||||
| FD | Fouled Deck | NESA | Not Enough Straight Away | ST | Steep Turn | |||||
| GLI | Gliding Approach | NH | No Hook | TCA | Too Close Abeam | |||||
| H | High | NSU | Not Set Up | TMA | Too Much Attitude | |||||
Case 2 Landing
Case 2 recoveries (landings) are in practice a weird (Frankenstein) mix of both Case 1 and Case 3 landings, so we advise you familiarise yourself with these cases first and then come back to the Case 2 recoveries.
In essence the Case 2 recoveries are flown by entering the Case 3 Stack pattern and pushing to the boat (aircraft carrier) as normal, but once you get within visual range of the carrier you instead transition to the Case 1 Landing Pattern.
Case 3 Landing
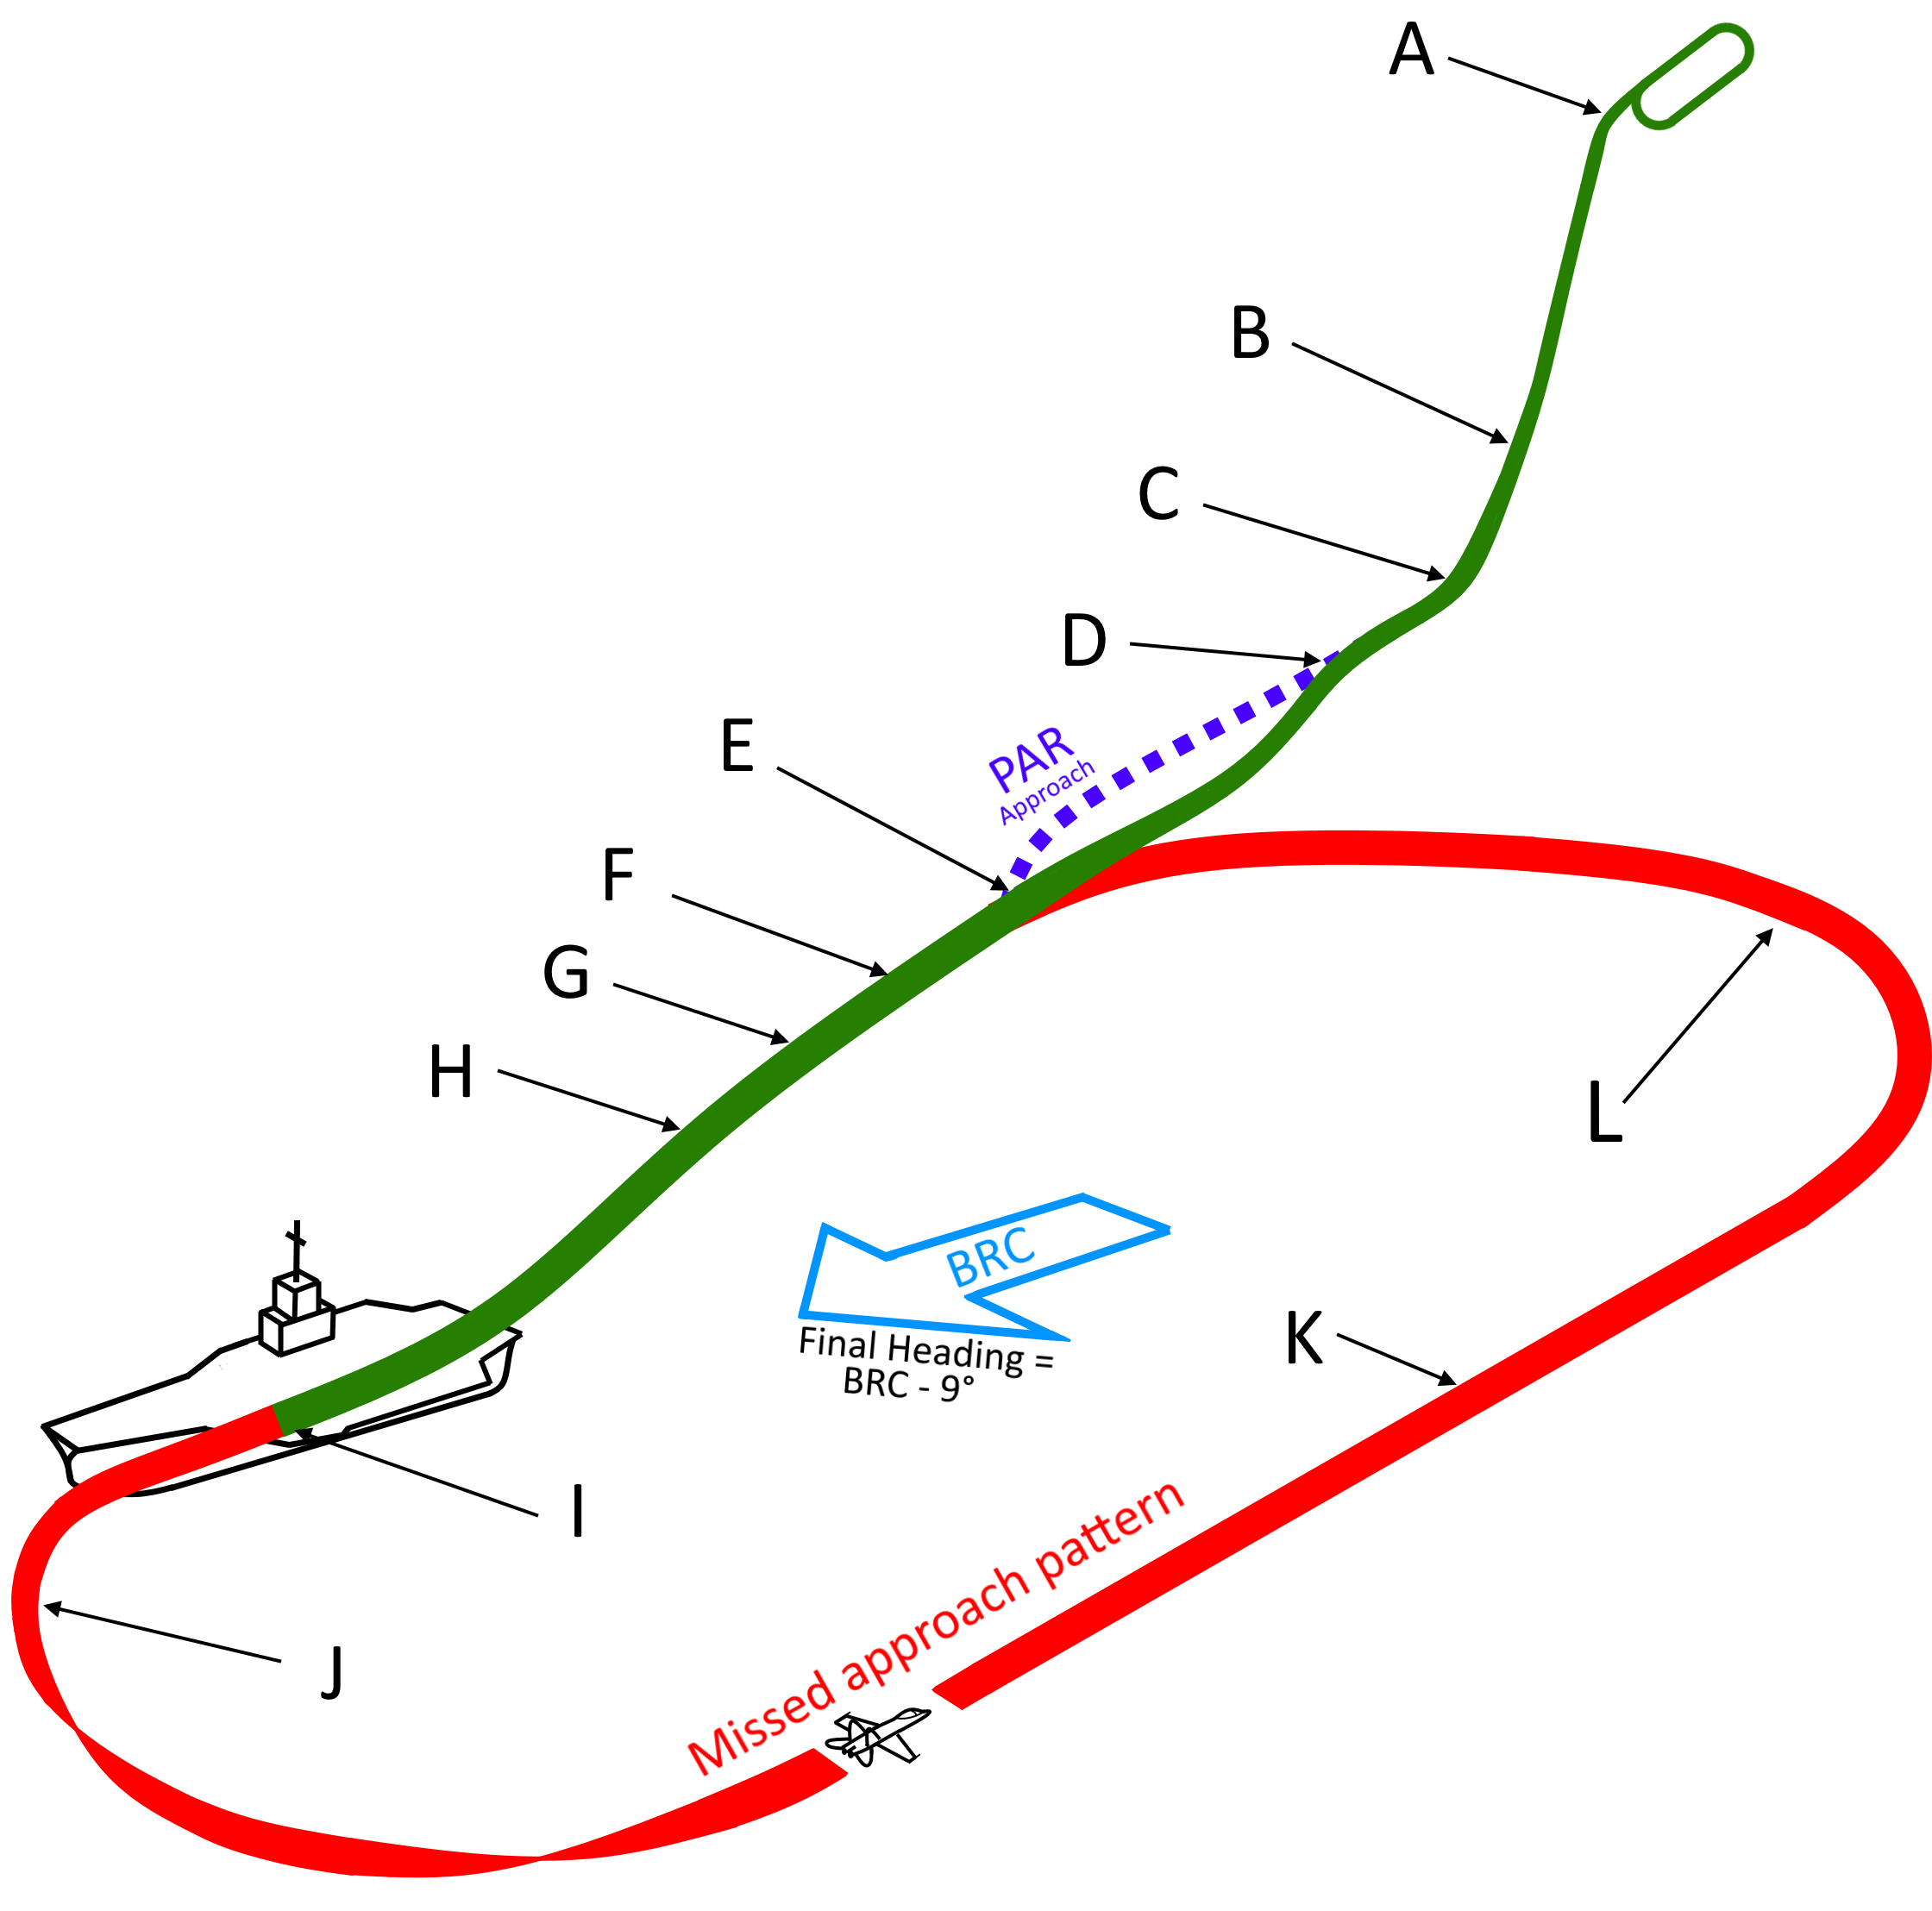
Case 3 Landing Pattern

| Case 3 Communication | ||||
|---|---|---|---|---|
| # | Location | Pilot Action | Messages | Frequency |
| 1 | 17000 ft, 75+ DME
Outside of CCA (~50 nm) |
Ask permission from Red Crown to enter. | Pilot: [Red Crown, 118, Mother's 250 for 75, Angels 17] Red Crown: [118, Sweet/Sweet, contact Strike on Button 3] |
Button 4,
256.000 AM |
| 2 | 16000 ft, 55 DME
Inside CCA (~ 50 nm), outside Marshall Area (10 nm) |
Ask permission from Strike to enter. | Pilot: [Strike, 118, flight of 1, Mother's 250 for 55, Angels 12] Pilot: [State 5.4, no Alibis] Strike: [118, Sweet/Sweet, Mother is IMC, Case 3] |
Button 3,
265.000 AM |
| 3 | 14000 ft, 52 DME | Ask for assigned stack from Marshall:
Stack is given on radial 082, 22 nm Marshall also gives other key |
Pilot: [Marshall, 118, 250 for 52, Angels 14, State 5.3]
Marshall: [Expected Final Bearing 262, Pilot: [118, Altimeter 29.87, Marshall on the 082, 22, angels 7. Expected approach time 22.] |
Button 2,
264.000 AM |
| 4 | 7000 ft, in holding pattern | Pilot has established holding pattern at 7000 ft: gives fuel state for Marshall to keep track off |
Pilot: [118, established angels 7. State 5.1] | Button 2,
264.000 AM |
| 5 | All flights | Marshall constantly updates all flights with new info: bearing, visibility, altimeter QFH |
Marshall: [118, altimeter 29.88. New final bearing is 265] | Button 2,
264.000 AM |
| 6 | 7000 ft, leaving holding pattern | Pilot notifies Marshall the descent from holding pattern has begun, |
Pilot: [118, Commencing, 29.88, state 4.8]
Marshall: [118, roger] |
Button 2,
264.000 AM |
| 7 | 5000 ft (platform),
descending |
Pilot notifies Marshall he is passing
5000 ft (platform) |
Pilot: [118, platform] | Button 2,
264.000 AM |
| 8 | 1200 - 5000 ft, descend | Marshall hands pilot off to approach
(can happen before reaching platform!) |
Pilot: [118, checking in, state 4.6]
Marshall: [118, switch button 18] |
Button 2,
264.000 AM |
| 9 | 1200 - 5000 ft, descending | Pilot checks in with approach: pilot may be asked to dirty up earlier / later to |
Pilot: [118, checking in, state 4.5]
Marshall: [118, final bearing 262] |
Button 18,
251.000 AM |
| 10 | 1200 ft,
around 4 -8 nm DME |
When ACLS is acquired, approach asks what ACLS ('needles') is showing. If unsatisfactory, new lock will be tried: |
Approach: [118, say needles] Pilot: [405, fly up, on] OR Approach: [118, fly bullseye] |
Button 18,
251.000 AM |
| 11 | 800 ft,
3/4 mile |
LSO chimes in | LSO: [3/4 mile, Call The Ball] Pilot: [118, tomcat/hornet, ball/clara, state, auto*] |
Button 18, 251.000 AM |
| Case 3 Landing Pattern | ||
|---|---|---|
| Pattern | Step | |
| A | Marshall stack: starting at 6000 ft, with increments of 1000 ftfor each flight / package | |
| B | Platform, passing 5000 ft | |
| C | 10 miles DME, 600 ft, commence landing descent | |
| D | 6 miles DME, maintain 1200 ft ACLS (Automated Carrier Landing System)[1] | |
| E | 1.5 miles DME, 600 ft, commence landing descent | |
| F | 1 mile DME, 400 ft | |
| G | 3/4 mile DME, call the ballside number, tomcat/hornet, ball/clara[2], fuelstate[3], (auto[4]) | |
| H | 1/2 mile DME, 200 ft | |
| I | Wave off on Final Heading, climb to 1200 ft | |
| J | Turn to downwind heading, using 10% speed G-turn | |
| K | Maintain 1200 ft and on speed AOA, flaps/slats/gear/hook down | |
| L | Turn into Final Heading via 18 ~ 22 degree bank turn | |
| Speedbrake / ACLS [1] | As desired | |
| Clara [2] | Ball is obscured, LSO will give instructions | |
| Fuelstate [3] | Remaining fuel in thousands of pounds:5100 pounds -> 5.1 | |
| Auto [4] | Auto throttle is engaged | |
References
US Navy Carrier Case 1/2/3 PDF File
Aircraft Carrier Communications, two hours worth of carrier radio chatter