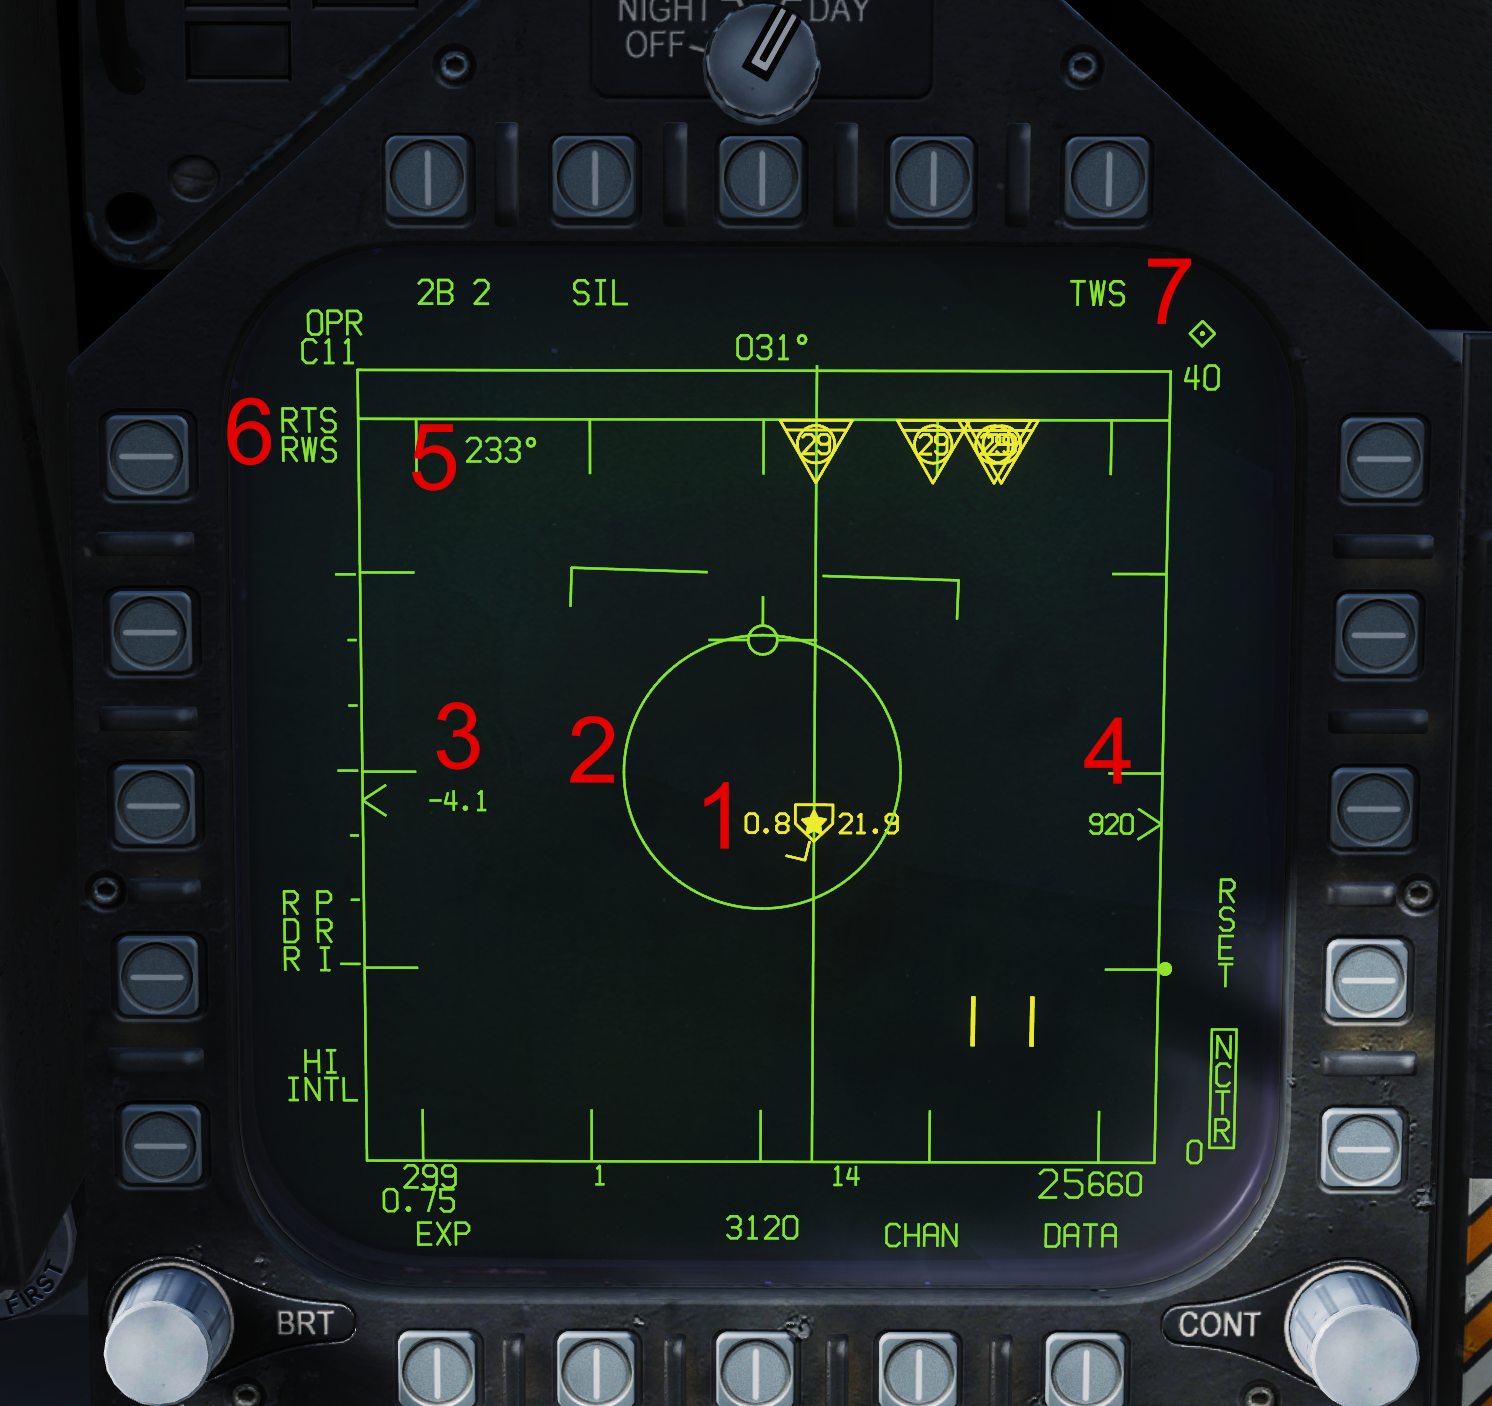
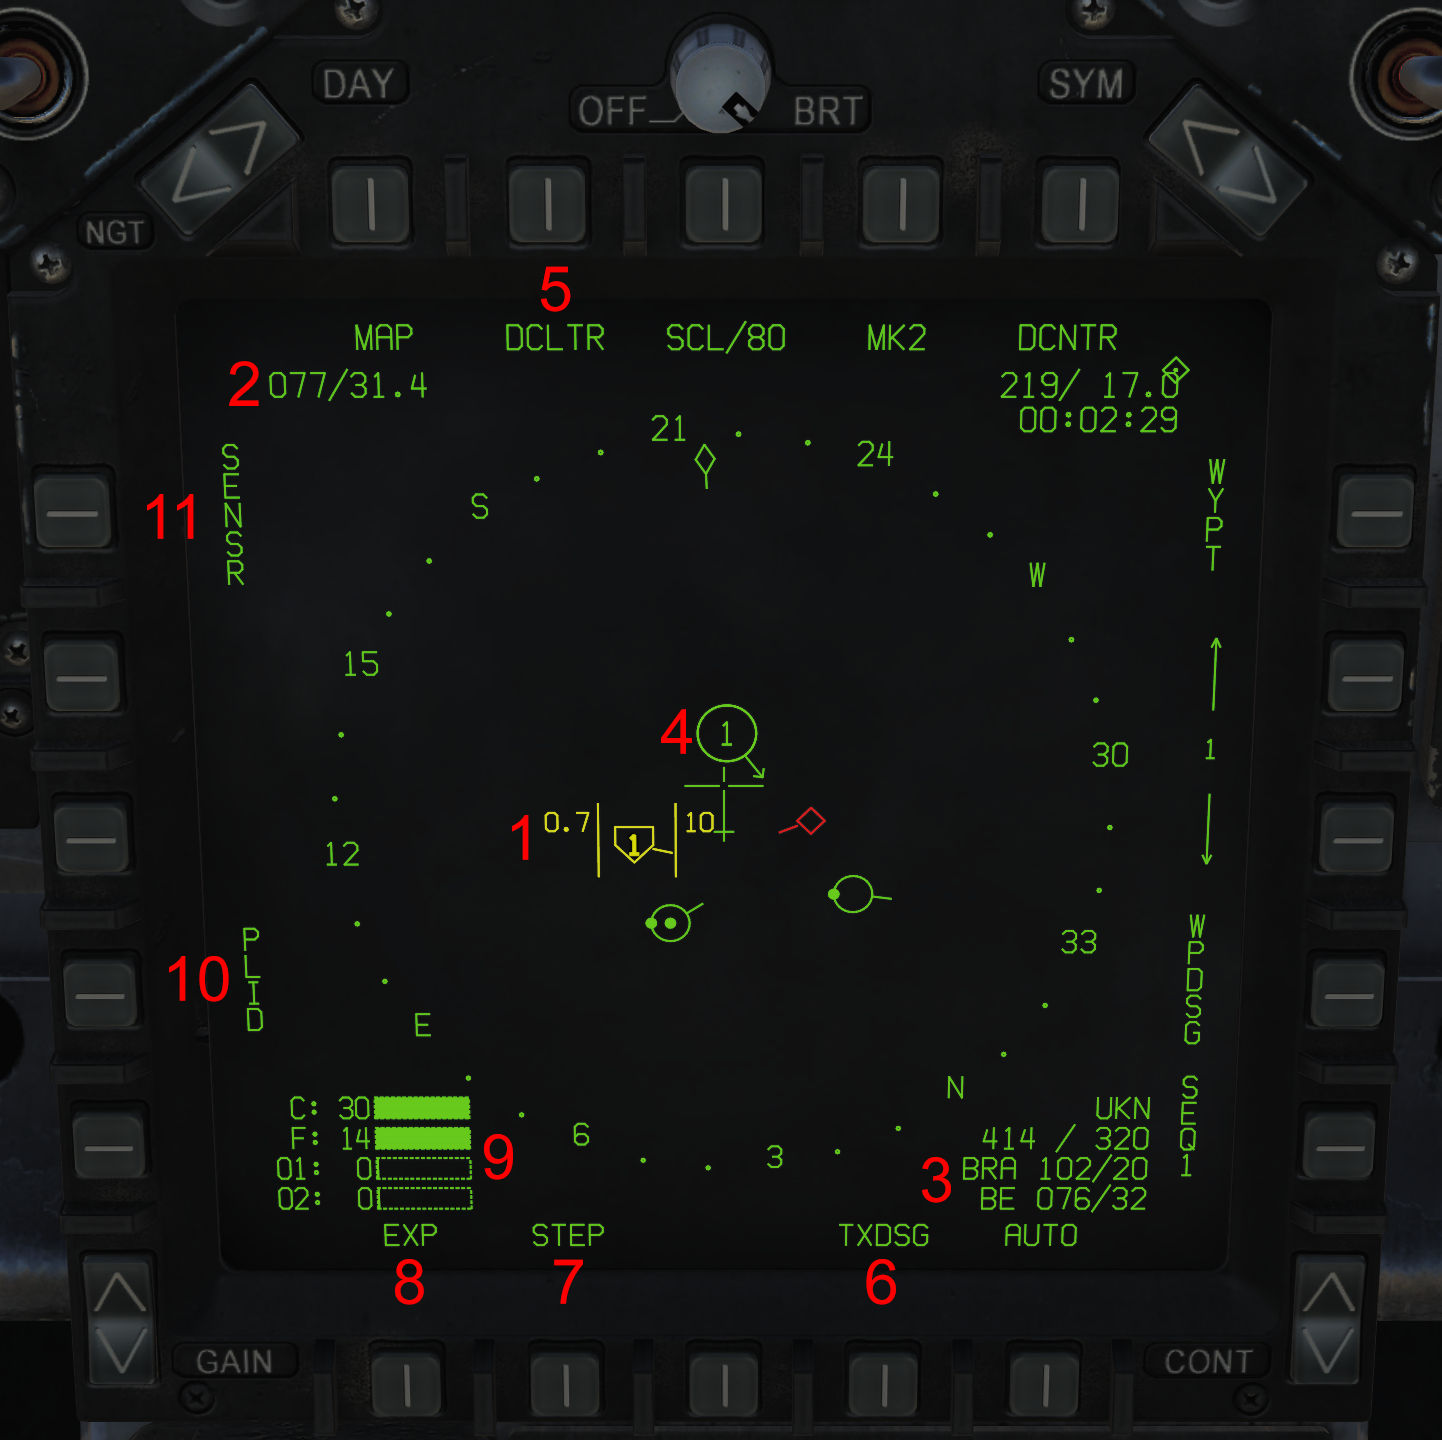
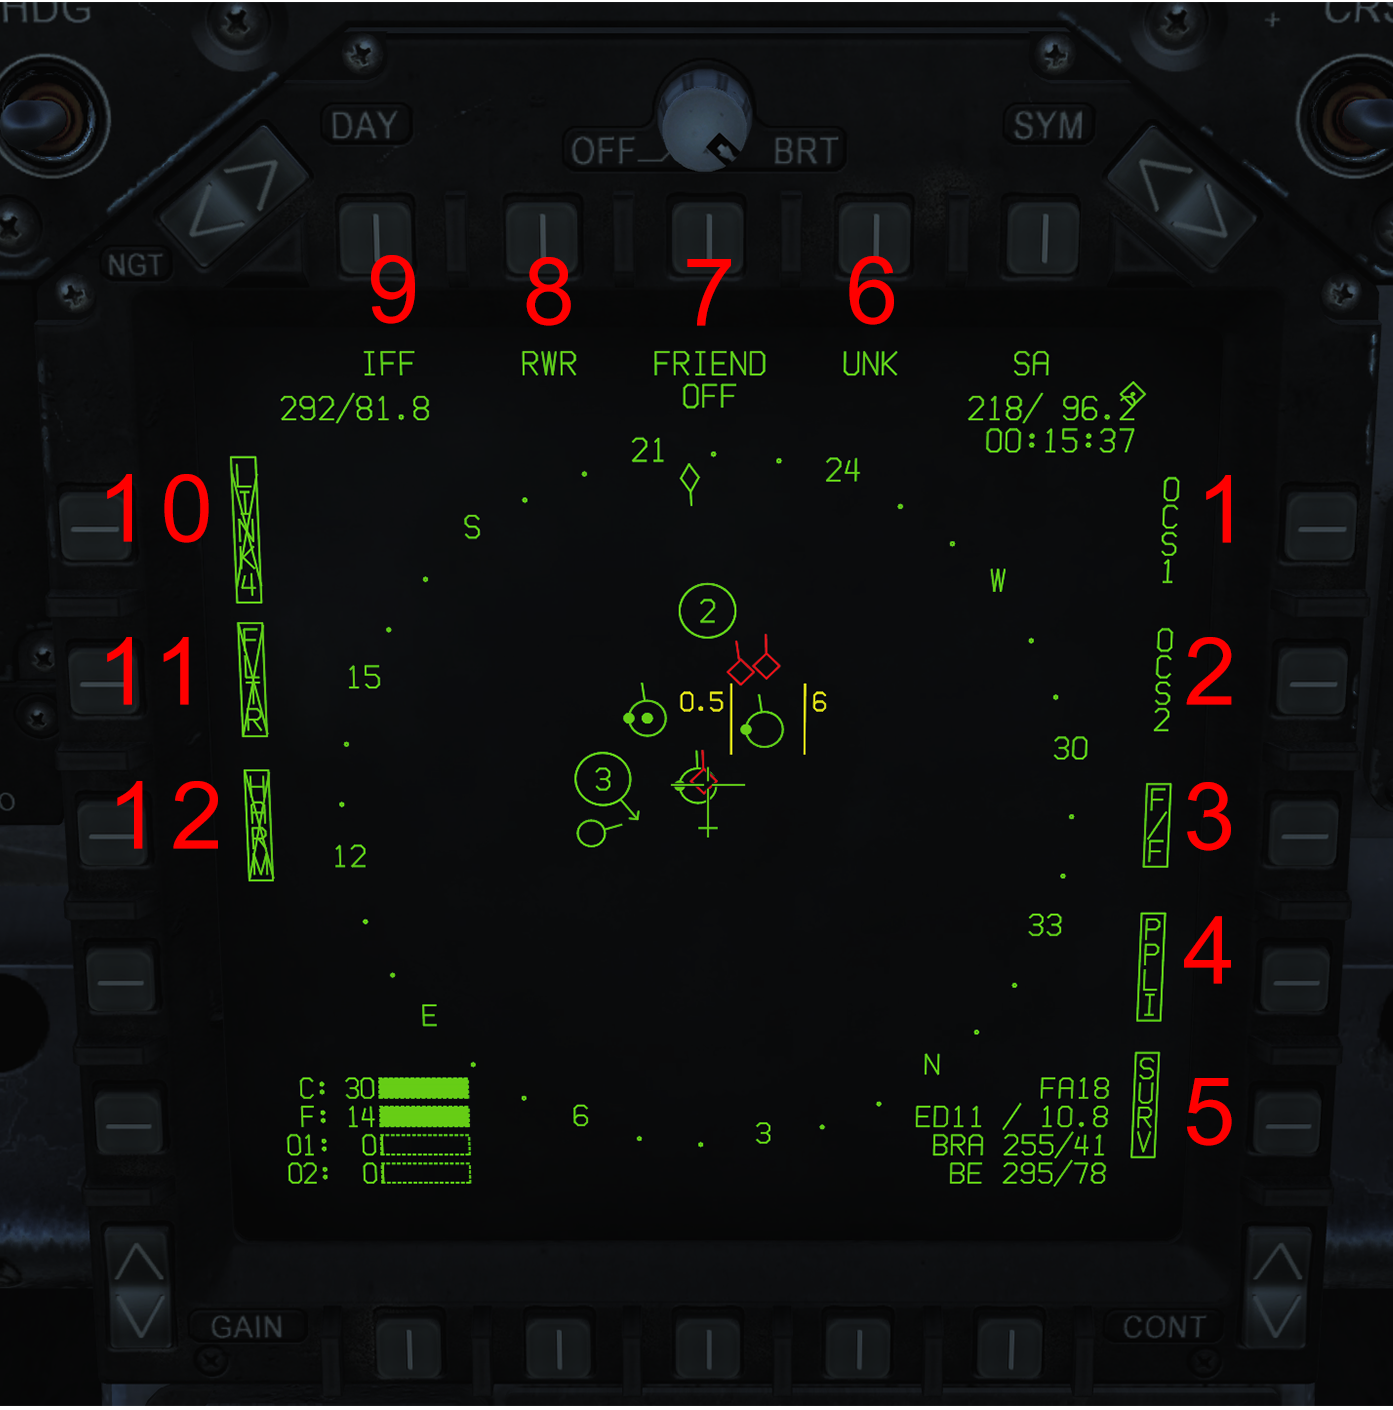
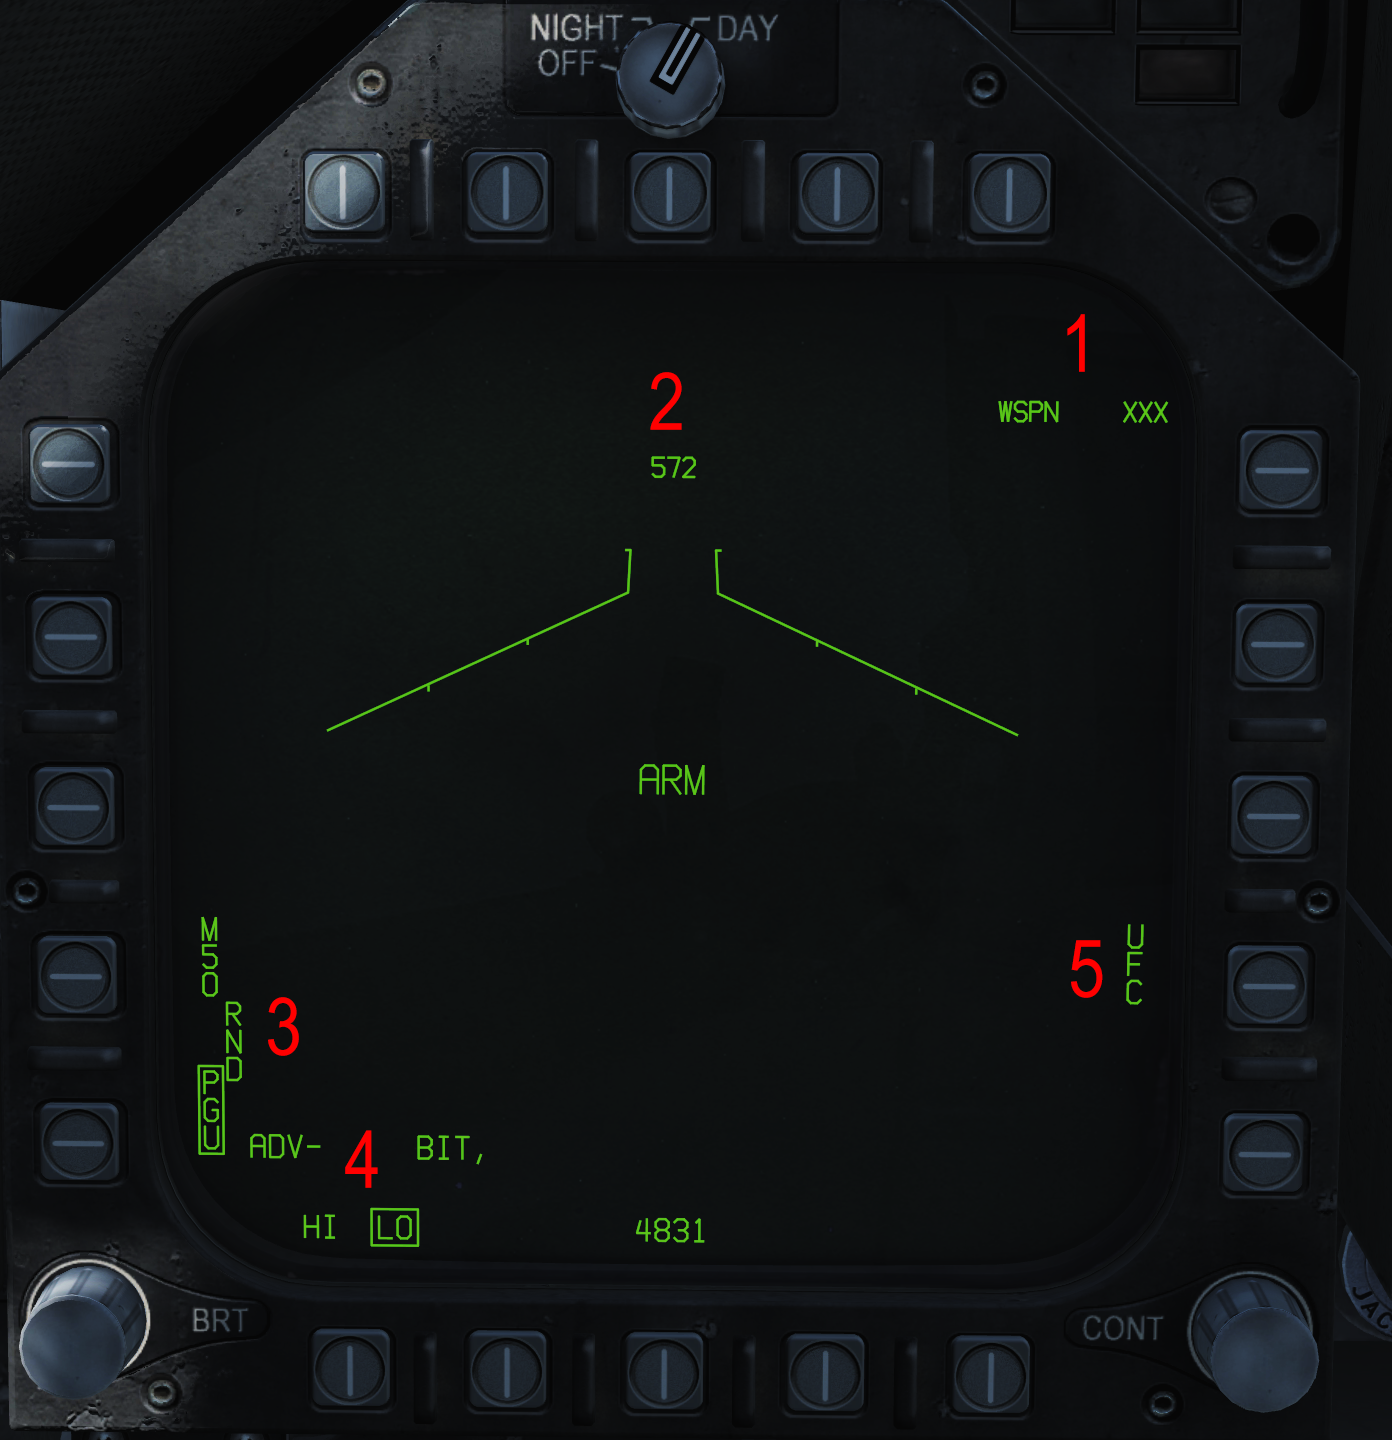
F/A-18C (German version)
Translation in progess! Übersetzung in Arbeit
Page is not linked anywhere, yet.
Kommentare bitte an @Snooker im Hoggit-Discord.
Die F/A-18C Hornet ist ein zweistrahliges, trägerfähiges Mehrzweck-Kampfflugzeug. Sie wurde in den 1970er Jahren von McDonnell Douglas (heute Boeing) und Northrop entworfen und ist der einzige Jet im US-Bestand, der sowohl die Kennung für Luftkampf- als auch für Bodenangriffe ("F/A") im Namen trägt. Die Hornet ist in der Lage, Überschallgeschwindigkeit zu erreichen, bei optimalen Flugbedingungen annähernd Mach 1,8. Die in DCS nachgebildete Hornet ist ein Jet der US-Marine der im Los 20 ca. 2005 vom Band lief und hauptsächlich auf der Softwareversion OFP-13C basiert. Sie ist mit zwei F404-GE-402 Triebwerken ausgestattet (das sind leistungsstärkere Triebwerke als die ursprünglich eingesetzten F404-GE-400). Die F/A-18C/D diente als Grundlage für die Entwicklung der Boeing F/A-18E/F Super Hornet und der EA-18G Growler. Die Hornet ist in der Lage, sowohl eine breite Palette von Präzisions- als auch von freifallenden Bomben zu tragen, sowie Luft-Boden- und Luft-Luft-Lenkflugkörper und ungelenkte Raketen. Ergänzt wird dies durch eine im Bug montierte 20-mm-Kanone.
Die Hornet wurde 1978 in Dienst gestellt und bestritt ihren ersten Kampfeinsatz 1986 über Libyen, als zahlreiche Hornets zur Unterdrückung feindlicher Luftabwehrstellungen (SEAD) und in konventionellen Angriffsmissionen auf Bodenziele eingesetzt wurden. Auch am Golfkrieg 1991 war die Hornet beteiligt. Damals waren 106 Flugzeuge der US Navy im Einsatz, zusammen mit weiteren 84 Flugzeugen des US Marine Corps (USMC), die an Land stationiert waren. Während des Golfkrieges erzielte die Hornet ihre ersten Luft-Luft-Abschüsse (beide Flugzeuge waren MiG-21, die von AIM-9- und AIM-7- Raketen abgeschossen wurden). Bemerkenswert dabei ist, dass die Flugzeuge, denen diese Abschüsse zugeschrieben wurden, ihren Angriffseinsatz danach wieder aufnahmen und 4 Mk-84 (2.000 Pfund schwere, ungelenkte Bomben) abwarfen, womit sie ihrer Mehrzweckrolle eindrücklich gerecht wurden. Die Hornet erlitt auch ihre ersten Gefechtsverluste im Golfkrieg. Insgesamt 10 F/A-18 erlitten Gefechtsschäden, darunter 3 Totalverluste (2 durch Bodenbeschuss und einer sehr wahrscheinlich durch eine irakische MiG-25). Insgesamt flogen die Hornets während des Golfkrieges insgesamt 4.551 Einsätze.
Seit dem Golfkrieg ist die Hornet ein wichtiger Bestandteil des Arsenals der US Navy und des USMC. Sie war seither in jedem Konflikt oder jeder Operation im Einsatz. Während sie immer noch im aktiven Dienst des USMC steht (was bis Anfang der 2030er Jahre so bleiben wird), hat die US Navy die F/A-18C im April 2018 vom aktiven Kampfgeschehen ausgemustert, obwohl das Demonstrationsteam Blue Angels sie noch bis 2021 nutzen wird.
Contents
- 1 Translation in progess! Übersetzung in Arbeit
- 2 Bewaffnungsliste
- 3 HOTAS
- 4 Flugkontrollen & Landefahrwerk
- 5 Autopilot und automatische Schubregelung
- 6 Übersicht über die digitalen Systeme
- 7 Navigation
- 8 Defensive Systems
- 9 Litening II Targeting Pod
- 10 Air-to-Ground Radar
- 11 Air-to-Air Radar
- 11.1 MSI Trackfiles
- 11.2 RDR ATTK Format
- 11.3 AZ/EL Format
- 11.4 L&S/DT2 HUD Indications
- 11.5 SA Format
- 12 Identification, Friend or Foe
- 13 Datalink and MIDS
- 14 Air-to-Air Weapons
- 15 Air-to-Ground Weapons
- 16 Resources
Bewaffnungsliste
Umgesetzt
Teilweise oder komplett umgesetzte Bewaffungen der Hornet in DCS:
- Mk-82 Serie 500 Pfund ungelenkte Bombe
- Mk-83 Serie 1000 Pfund ungelenkte Bombe
- Mk-84 Serie 2000 Pfund ungelenkte Bombe
- CBU-99 und Mk-20 Streubomben
- BDU-33 Trainingsbombe
- BDU-45 Trainingsbombe
- Hydra 70 2,75 Zoll Raketen
- Zuni 5 Zoll Raketen
- 20mm Bordkanone (A/A & A/G)
- AIM-9L/M/X infrarotgelenkte Luft-Luft-Rakete
- CATM Sidewinder infrarotgelenkte Luft-Luft-Trainingsrakete
- AIM-7F/M/MH Sparrow halbaktive radargelenkte Luft-Luft-Rakete
- AIM-120 B/C AMRAAM aktive radargelenkte Luft-Luft-Rakete
- AGM-65E Maverick lasergelenkte Luft-Boden-Rakete
- AGM-65F Maverick infrarotgelenkte Luft-Boden-Rakete
- GBU-10 Paveway II 2000 Pfund lasergelenkte Bombe
- GBU-12 Paveway II 500 Pfund lasergelenkte Bombe
- GBU-16 Paveway II 1000 Pfund lasergelenkte Bombe
- AGM-88C HARM Anti-Radar-Rakete
- GBU-38 JDAM 500 Pfund GPS-gelenkte Bombe
- GBU-31 JDAM 2000 Pfund GPS-gelenkte Bombe
- AGM-154A JSOW GPS-gelenkte Gleitstreubombe
- AGM-154C JSOW GPS-gelenkte Gleitbombe
- AGM-84D Block 1C Harpoon Anti-Schiff-Rakete
- AGM-62 Walleye infrarotgelenkte Bombe
Geplant
Noch nicht umgesetzte Waffensysteme der Hornet:
- AGM-45A/B Shrike Anti-Radar-Rakete
- AGM-84E SLAM Luft-Boden-Rakete
- AGM-84H/K SLAM-ER Luft-Boden-Rakete
- GBU-24B/B Paveway III 2000 Pfund lasergelenkte Bombe
- GBU-32 JDAM 1000 Pfund GPS-gelenkte Bombe
- AIM-7P Sparrow halbaktive radargelenkte Luft-Luft-Rakete
- Mk-40 Destructor Seemine
- Mk-63 Quickstrike Seemine
- Mk-77 Brandbombe
HOTAS
Die F/A-18C Hornet verfügt über einen zweigeteilten Schubhebel zur Steuerung des jeweiligen Triebwerkschubs und über einen Steuerknüppel zur Fluglagensteuerung. Beide verfügen über eine Reihe von Schaltern, die zusammen das HOTAS-System bilden ("hands on throttle and stick", Hände am Schubhebel und Steuerknüppel). Damit können zahlreiche kampfkritische Avionikfunktionen bedient werden, ohne die Hände vom Schubhebel und Steuerknüppel nehmen zu müssen.
Dieser Abschnitt enthält eine Zusammenfassung der HOTAS-Funktionen. Detaillierte Informationen über die HOTAS-Funktionalität einzelner Teilsysteme sind in den entsprechenden Unterabschnitten zu finden.
Schubhebel
Der Schubhebel der Hornet befindet sich auf der linken Konsole und besteht aus zwei separaten Hebeln zur Steuerung des linken und rechten Triebwerks. Eine hintere Raste trennt die Aus-Stellung von der Leerlauf-Stellung. Eine vordere Raste trennt die volle Leistung (Miltary Power) und den Nachbrenner-Bereich. Auch im Nachbrenner-Bereich lässt sich die Leistung über die Schubhebelstellung prportional steuern.
Der Schubhebel hat die folgenden Bedienelemente:
- Schalter für Außenbeleuchtung: 2-Positionen-Schalter. Die hintere Stelllung schaltet die gesamte Außenbeleuchtung mit Ausnahme des Taxi-/Landungslichts aus. In der vorderen Stellung kann die Beleuchtung über die Bedienelemente auf der linken Konsole eingestellt werden.
- RAID/HARM-Sequenz/FLIR FOV-Taste: Eine Multifunktionstaste:
- Aktiviert/deaktiviert die RAID-Funktion in den Radarmodi STT oder TWS.
- Wechselt zwischen den AGM-88C HARM-Modi SP und TOO.
- Wechselt das Sichtfeld (weit/eng) der AGM-65F Maverick.
- Wechselt das Sichtfeld (weit/eng) und den Kameramodus des FLIR.
- ATC-Taste: Schaltet die automatische Schubregelung (Automatic Throttle Control) ein/aus.
- Radar Höhensteuerung: Ein Drehrad, über das die Höhenausrichtung der Radarantenne und der Zoom des FLIR gesteuert wird.
- Throttle Designator Controller (TDC, Schubhebel-Aufwahlschalter): Ein Multifunktions-4-Wege-Hutschalter mit Druckfunktion. Er wird in verschiedenen Ansichten zum "Schwenken" z.B. eines Bildschirm-Cursor oder der FLIR-Kamera verwendet. Die "Zuweisung", d.h. die Festlegung, welche Ansicht damit gesteuert wird, erfolgt über den Sensor-Steuerschalter.
- Kommunikationsschalter: 4-Wege-Schalter, der das Funkgerät auswählt, auf dem gesendet wird. Vorwärts/rückwärts wählt die Sprechfunkgeräte MIDS A / MIDS B aus, während nach oben und unten die regulären Funkgeräte COMM1/COMM2 auswählt.
- Cage/Uncage-Taste: Eine Multifunktionstaste:
- Geschwindigkeitsvektor einschränken/freigeben im NAV-Master-Modus.
- Einschränken/Freigeben des Suchers der AGM-65F/E Maverick.
- Umschalten der Laser-Suchfunktion (LST, Laser spot tracker)
- Umschalten zwischen eingeschränktem und freigegebenem Wide Acquisition-Radar Modus.
- Setzt den AIM-9 Sidewinder-Suchkopf im Standalone-Betrieb in den Modus, der Wärmesignatur zu folgen.
- Schaltet die AIM-120 AMRAAM in den VISUAL Modus um, auch wenn ein radargeführter Start möglich ist.
- Bremsklappen-Schalter: 3-Wege-Schalter zur Steuerung der Bremsklappen. Die hintere Position ist nicht rastend, die mittlere und vordere Position sind rastend. In der hinteren Stellung wird die Bremsklappe ausgefahren und in der vorderen eingefahren.
- Schalter für Gegenmaßnahmen: 3-Wege-Schalter, der abhängig vom gewählten vom CMDS-Modus den Abwurf von Gegenmaßnahmen (Chaff, Flares) steuert. Sowohl die vordere als auch die hintere Position sind nicht rastend.
Steuerknüppel
Der Steuerknüppel ist in der Mitte des Cockpits auf dem Boden montiert. Eine Auslenkung links/rechts kommandiert über das Flugsteuerungssystem (FCS, Flight Control System) eine proportionale Rollrate links/rechts. Nach vorne/hinten kommandiert eine Nickrate.
Der Steuerknüppel hat als Teil des HOTAS-Systems mehrere Schalter :
- Trimmschalter: 4-Wege-Hutschalter zur Trimmung der Nickachse (auf/ab) und der Rollachse (links/rechts).
- Sensor-Steuerschalter (SCS, Sensor Control Switch): 4-Wege-Hutschalter mit Druckfunktion, aufgrund seiner Form auch "Castle Switch" genannt.
- Weist den TDC dem HUD, dem linken/rechten DDI oder dem AMPCD zu.
- Kommandiert eine automatische Radar-Erfassung (Auto Acquisition).
- Wechselt in den Radar-Luftkampf-Modus (ACM-Modus, Air Combat Maneuvering) und wählt einzelne ACM-Modi aus.
- Schaltet den FLIR-Punkt-/ oder Flächenverfolgungsmodus ein.
- Startet IFF-Abfragen auf Trackfiles in den Ansichten SA, RDR ATTK und AZ/EL.
- Waffenfreigabeknopf: Knopf zum Freigeben/Feuern der ausgewählten Luft-Boden-Munition mit Ausnahme der Bordkanone.
- RECCE-Schalter: Blendet die Anzeige des Helmvisiers (HMD, helmet-mounted display) aus/ein. Benannt nach der Aufklärungsausrüstung (RECCE), mit der die in DCS simulierte Hornet nicht ausgerüstet ist.
- Abzug: feuert die ausgewählte Luft/Luft-Waffe und die Bordkanone, falls ausgewählt.
- Waffenauswahlschalter: 3-Wege-Hutschalter mit Druckfunktion, zur Schnellauswahl der Luft-Luft-Waffe.
- NWS/Undesignate-Taste: Eine Multifunktionstaste:
- Aktiviert die Bugradlenkung (NWS, nosewheel steering) und schaltet deren Modus mit erhöhter Maximalauslenkung ein/aus.
- Schaltet durch alle Launch & Steering Trackfiles durch. Trackfiles sind vom Radar verwaltete Zielverfolgungdaten einzelner Kontakte. Wird ein Trackfile zum Launch & Steering Trackfile bestimmt so können darauf Luft-Luft-Raketen abgefeuert werden. Falls auch ein sekundäres Ziel (DT2, Designated Target 2) bestimmt wurde, tauscht die Taste beide.
- Beendet die Radarmodi Single Target Track (STT, Einzelzielaufschaltung), FLOOD, Automatic Acquisition (automatische Aufschaltung), ACM und Spotlight.
- Macht die Auswahl eines Luft-Boden-Zieles rückgängig.
- Paddle Switch: Kleiner Hebel, der den Autopiloten ausschaltet, (wenn gehalten) den G-Kraft-Begrenzer des FCS außer Kraft setzt und am Boden die Bugradlenkung ausschaltet.
Flugkontrollen & Landefahrwerk
Flugsteuerung
Die F/A-18C verfügt über verschiedene Steuerflächen zum Steuern der Fluglage. Sie verfügt über ein "Fly-by-Wire"-System (FBW). Dabei werden im Gegensatz zu einem herkömmlichen mechanischen oder "direkten" Steuerungssystem die von den Steuerungen im Cockpit erzeugten Eingaben von einem Computer verarbeitet. Der Computer entscheidet dann, welche Steuerflächen bewegt werden müssen, um das gewünschte Manöver durchzuführen. Dieses computergestützte System wird als Flugsteuerungssystem (FCS, Flight Control System) bezeichnet. Das FCS bewegt die Steuerflächen auch in Abhängigkeit vom Anstellwinkel (AOA, angle-of-attack), um die besten Flugstabilität zu gewährleisten.
Die primären Steuerflächen der F/A-18 sind:
- Stabilators (STAB, kombinierte Höhen- und Querruder): Zwei "Stabilators", die sich am Heck befinden, bewegen sich unabhängig voneinander auf einer einzigen Achse, um sowohl Nick- als auch Rollbewegung des Flugzeugs zu steuern.
- Querruder (AIL, Ailerons): Zwei normale Querruder, die sich im äußeren Bereich der Flügel befinden und die Rollbewegung des Flugzeugs steuern. Sie lassen sich auch beide nach unten neigen, um den Auftrieb zu erhöhen.
- Seitenruder (RUD, Rudders): Zwei nach innen geneigte Seitenruder, die sich normal links/rechts bewegen, um den Gierwinkel zu steuern, und die auch in Abhängigkeit vom Anstellwinkel beide nach innen klappen ("toe-in").
- Vorflügel (LEF, Leading Edge Flaps): Ausfahrbare Vorflügel an den Flügelvorderkanten um den Auftrieb zu erhöhen.
- Klappen (TEF, Trailing Edge Flaps): Ausfahrbare Klappen an der Hinterkanten der Tragflächen um den Auftrieb zu erhöhen.
Über den Steuerknüppel werden die Stabilators, Querruder und die Seitenruder angesteuert. Die Ruderpedale steuern im Flug auschließlich das Seitenruder.
Vom FCS werden die Beschleunigungskräfte auf das Flugzeug unabhängig von der Steuereingabe auf ein bestimmtes G-Kraft-Limit begrenzt. Die maximale G-Kraft ist abhängig vom Fluggewicht und beträgt maximal 7,5 G. Die G-Kraft-Begrenzung iat teilweise außer Kraft gesetzt, solange der Paddle Switch am Steuerknüppel gedrückt gehalten wird, wodurch sich das Limit auf 133% des aktuell zulässigen Wertes erhöht. Dies ist nur für Notfälle gedacht und kann die strukturelle Integrität der Flugzeugzelle beschädigen und/oder die G-Kraft-Toleranz des Piloten überschreiten.
Klappen und Vorflügel
Die Klappen und Vorflügel des Flugzeugs erzeugen mehr Auftrieb (und als Nebenprodukt auch mehr Luftwiderstand). Der Schalter für die Klappen und Vorflügel hat drei Stellungen:
- AUTO: Ohne Gewicht auf dem Fahrwerk werden die LEFs und TEFs je nach Anstellwinkel bewegt. Mit Gewicht auf dem Fahrwerk werden LEFs, TEFs und Querruderabsenkung auf 0° gesetzt.
- HALF (Halb): Oberhalb 250kt IAS verhalten sich die Klappen und Vorflügel wie bei AUTO. Unterhalb von 250 kt senken sich LEFs und TEFs in Abhängigkeit vom Anstellwinkel ab. TEFs und Querruder werden in Abhängigkeit von der Fluggeschwindigkeit abgesenkt, der maximale Ausschlag beträgt 30°. Mit Gewicht auf dem Fahrwerk werden die LEFs auf 12°, die TEFs und die Querruderabsenkung auf 30° gesetzt. Die Seitenruder stehen bei Gewicht auf dem Fahrwerk auf 30°. Die Querruderneigung beträgt 0°, wenn die Flügel entriegelt sind.
- FULL (Voll): Oberhalb 250kt verhalten sich die Klappen und Vorflügel wie bei AUTO. Unterhalb von 250kt IAS werden die LEFs in Abhängigkeit vom AOA angesteuert. TEFs und Querruderneigung werden in Abhängigkeit von der Fluggeschwindigkeit abgesenkt, das Maximum liegt bei 45° TEF- und 42° Querruderabsenkung. Bei Gewicht auf dem Fahrwerk werden die LEFs auf 12° und die Seitenruder auf 30° gesetzt. Die TEFs sind dann auf 43° bis 45° und die Querruderabsenkung auf 42°. Die Querruderneigung beträgt 0°, wenn die Flügel entriegelt sind.
Im linken Bereich der vorderen Instrumententafel befinden sich drei Klappenkontrollleuchten. Ein grünes HALF-Licht wird angezeigt, wenn die Klappen auf HALF stehen. Ein grünes FULL-Licht zeigt an, dass die Klappen auf FULL stehen. Eine gelbe FLAPS-Leuchte wird angezeigt, wenn die Klappen in Bezug auf die Schalterstellung nicht ordnungsgemäß funktionieren oder der Schalter über 250kt nicht auf AUTO steht.
Bremsklappe (Speedbrake)
Bei der Bremsklappe handelt es sich um eine Klappe an der Oberseite des Flugzeugs, die den Luftwiderstand erhöht, um schneller abzubremsen. Sie wird über den Bremsklappenschalter am Schubhebel betätigt. Die drei Schalterstellungen sind:
- Hinten: Die Bremsklappe wird so lange ausgefahren, wie der Bremsklappenschalter in dieser Stellung gehalten wird.
- Mitte: Die Bremsklappe bleibt in Position, es sei denn, die Klappen stehen auf FULL oder das Flugzeug wird mit mehr als 6,0 G belastet oder der Anstellwinkel beträgt mehr als 28°. Wenn die Bremsklappe eingefahren ist und sich der Schalter in dieser Stellung befindet, kann sich die Bremsklappe bei Geschwindigkeiten über 400 kt IAS unter Umständen von alleine aufrichten.
- Vorne: Die Bremsklappe fährt ein, solange der Schalter sich in dieser Stellung befindet, und wird sich nicht von alleine aufrichten, wenn sie vollständig eingefahren ist.
Über dem linken DDI befindet sich eine "SPD BRK"-Leuchte. Diese Leuchte leuchtet auf, wenn die Bremsklappe nicht vollständig eingefahren ist.
Trimmung
Die Stabilators und die Querruder können getrimmt werden, um Korrekturen an der Quer- und Längsneigung vorzunehmen. Dies geschieht mit dem Trimmschalter am Steuerknüppel. Wenn die Klappen auf AUTO stehen, werden die Stabilators automatisch für eine 1,0 G Fluglage getrimmt, wenn der Steuerknüppel nicht betätigt wird. Eine manuelle Trimmung übersteuert dies und das Flugzeug wird dann so getrimmt, dass die über die Trimmung eingestellte G-Kraft beibehalten wird, wenn der Knüppel nicht bewegt wird. Wenn die Klappen auf HALF oder FULL stehen, behält das Flugzeug den Anstellwinkel bei, auf den es über den Trimmschalter getrimmt wird.
Für einen Start auf dem Flugplatz werden die Stabilators auf +12° getrimmt. Der T/O-Trimmknopf auf der linken Konsole trimmt die Stabilators auf +12° und setzt alle anderen Trimmungen auf 0°.
Die Seitenruder können über einen Drehknopf auf der linken Konsole, der den T/O-Trimmknopf umgibt, ebenfalls getrimmt werden.
FCS
Abschnitt ist in Bearbeitung.
Klappmechanismus der Tragflächen
In erster Linie um beim Einsatz auf Flugzeugträgern Platz zu sparen, können die Flügel der F/A-18 nach oben geklappt werden. Dies geschieht über einen Hebel auf der rechten Seite des Cockpits. Nachdem der Hebel herusgezogen wurde, was den Verriegelungsmechanismus der Tragflächen löst, können drei Stellungen ausgewählt werden.
- FOLD: Die Flügel klappen hoch.
- HOLD: Die Flügel verharren in der gegenwärtigen Position.
- SPREAD: Die Flügel werden ausgeklappt.
Die Flügel lassen sich ohne Gewicht auf dem Fahrwerk nicht hoch klappen.
Fahrwerk
Die F/A-18 hat ein einfahrbares Fahrwerk das aus dem Bugfahrwerk und dem linken und rechten Hauptfahrwerk besteht. Das linke und das rechte Fahrwerk haben eine verstärkte Aufhängung. Sie sind so konstruiert, dass sie die schweren Stöße bei mehr als 600 ft/min Sinkgeschwindigkeit verkraften, wie sie bei der Landung auf einem Flugzeugträger auftreten. Das Fahrwerk wird über den Schalthebel auf der linken Seite des Cockpits bedient. In der oberen Position wird das Fahrwerk eingefahren. In der unteren Position fährt das Fahrwerk aus. Der Hebel kann mit Gewicht auf den Fahrwerk nicht betätigt werden. Bei ausgefahrenem Fanghaken oder ausgefahrener Einhängevorrichtung für den Katapultstart (launch bar) lässt sich das Fahrwerk nicht einfahren.
Um den Fahrwerkshebel zu betätigen selbst wenn Gewicht auf dem Fahrwerk lastet, kann die Taste DOWN LOCK ORIDE in der Nähe des Hebels gedrückt werden, was die Sicherung außer Kraft setzt. Der Hebel kann gedreht werden, um ein Notausfahren zu bewirken, wobei die Hydraulik des Fahrwerks drucklos geschaltet wird und es somit allein durch die Schwerkraft ausfahren kann.
Das linke und rechte Fahrwerk verfügt über voneinander unabhängige Bremsen. Sie werden mit den Fußspitzen über die Seitenruderpedale betätigt. Am Bugfahrwerk befindet sich ein Leuchtstrahler, der beim Rollen auf dem Boden, beim Start und bei der Landung verwendet wird, die so genannte TAXI/LDG-Leuchte. Sie wird über einen Schalter auf der linken Seite des Cockpits ein- und ausgeschaltet.
Bugradlenkung
Das Bugfahrwerk verfügt über eine Bugradlenkung (NWS, nosewheel steering), die über die Ruderpedale gesteuert wird. Im Standardmodus NWS LO (niedrige Verstärkung) kann das Bugrad um 16° nach links/rechts gedreht werden. Im Modus NWS HI (hohe Verstärkung) beträgt die maximale Auslenkung 75° nach links/rechts. NWS oder NWS HI wird auf dem HUD entsprechend angezeigt. Wenn die Bugradlenkung deaktiviert ist, wird nichts angezeigt.
Ohne Last auf dem Fahrwerk (also in der Luft) ist die Bugradlenkung deaktiviert. Sie wird automatisch aktiviert, sobald Gewicht auf dem Fahrwerk lastet. Die Bugradlenkung kann mit dem Paddle Switch am Steuerknüppel manuell ausgeschaltet werden. Der Modus NWS LO wird manuell durch kurzes Drücken der NWS-Taste am Steuerknüppel aktiviert. Befindet sich der Hebel für den Klappmechanismus der Flügel in den Positionen FOLD oder HOLD, dann wird durch Drücken der NWS-Taste in den Modus NWS HI umgeschaltet. Befindet sich der Hebel in der Position SPREAD, so ist NWS HI aktiviert, solange die NWS-Taste gedrückt gehalten wird. Bei ausgefahrener Launch bar ist die Bugradlenkung deaktiviert, NWS LO kann aber durch gedrückt halten der NWS-Taste aktivert werden. NWS HI ist in diesem Fall nicht verfügbar.
Launch Bar (Einhängevorrichtung für den Katapultstart)
Am Bugfahrwerk befindet sich eine Stange, mit der das Flugzeug beim Start von einem Flugzeugträger am Katapultschlitten eingehängt wird. Diese wird als Launch Bar bezeichnet. Sie kann vom Piloten hoch- und runtergeklappt werden.
Die Launch Bar wird über einen Schalter an der linken oberen Cockpit-Konsole gesteuert. Wenn sich der Schalter in der Position RETRACT befindet, wird die Launch Bar eingefahren, außer sie ist bereits am Katapultschlitten eingehängt. Der Schalter bewegt sich automatisch in die Position RETRACT, wenn das Fahrwerk nicht mehr belastet wird. In der Position EXTEND klappt die Launch Bar nach unten, sofern Gewicht auf dem Fahrwerk erkannt wurde.
Über dem linken DDI befindet sich eine grüne "L BAR"-Anzeige, die immer dann aufleuchtet, wenn die Launch Bar bei Gewicht auf dem Fahrwerk unten ist. Daneben befindet sich eine rote "L BAR"-Anzeige, die immer dann aufleuchtet, wenn die Launchbar unten ist, obwohl keine Gewicht auf dem Fahrwerk lastet. Die rote Anzeige ist ein Anzeichen für eine Fehlfunktion der Launch Bar, sofern sie nicht kurz nach dem Abheben des Flugzeugs erlischt.
Autopilot und automatische Schubregelung
Die F/A-18 ist in der Lage, bestimmte Fluglagen mit Hilfe ihres automatischen Flugsteuerungssystems (AFCS, Automatic Flight Control System) und der automatischen Schubregelung (ATC, Automatic Throttle Control) automatisch beizubehalten. Das AFCS, oder einfach nur der Autopilot, übernimmt die Regelung der Steuerflächen und das ATC die Regelung der Drosselklappe.
AFCS
Der Autopilot/AFCS übernimmt die Steuerung des Flugzeugs, um verschiedene Fluglagen automatisch beizubehalten. Er wird über die A/P-Taste auf dem UFC aufgerufen.
Der grundlegendste Modus des AFCS heißt Control Stick Steering (CSS, in etwa "Steuerknüppel-Steuerung"). CSS versucht, die aktuelle Fluglage (Nick- und Rollwinkel) des Flugzeugs beizubehalten, wenn keine Eingaben über den Steuerknüppel erfolgen. Eine über den Steuerknüppel kommandierte Rollbewegung wird gedämpft und eine kommandierte Nickbewegung wird stark gedämpft. Bei einer Auslenkung des Steuerknüppels nach vorn oder hinten über einen bestimmten Punkt hinaus wird CSS deaktiviert. CSS wird manuell über das UFC aktiviert, indem man nach der A/P-Taste die ON/OFF-Taste drückt. CSS wird auch in allen anderen Autopilot-Modi automatisch mit aktiviert.
Im A/P-Menü des UFC gibt es fünf Autopilot-Hauptmodi, die durch Drücken der Optionswahltaste neben dem jeweiligen Anzeigetext eingeschaltet werden.
- Attitude Hold (ATTH): hält den aktuellen Nickwinkel (wenn zwischen +-45°) und den aktuellen Rollwinkel (wenn zwischen +-70°).
- Heading Select (HSEL): steuert automatisch auf den Steuerkurs, der über den Kurswahlschalter eingestellt wurde. Der aktuell gewählte Kurs kann auf der Horizontaler Lageindikator abgelesen werden.
- Barometric Altitude Hold (BALT): hält die aktuelle barometrische Höhe (wenn zwischen 0 und 70.000 Fuß).
- Radar Altitude Hold (RALT): behält die aktuelle Höhe nach Radarhöhenmesser bei (wenn zwischen 0 und 5.000 Fuß).
- Coupled Steering (CPL): Noch nicht implementiert.
Das AFCS wird durch Drücken des Paddle Switch am Steuerknüppel vollständig deaktiviert.
ATC
Die automatische Schubregelung (ATC), oder einfach "Autothrottle", steuert die Drosselklappen und automatisiert damit die Schubsteuerung. Sie funkioniert nicht im Nachbrennerbereich. ATC wird über den ATC-Knopf Schubhebel aktiviert. "ATC" erscheint auf dem HUD, wenn es eingeschaltet ist. Die automatische Schubsteuerung kann auch durch manuelles Bewegen der Schubhebel deaktiviert werden. Sie schaltet sich ebenfalls aus, falls die gewünschte Geschwindigkeit nicht beibehalten werden kann. Beim Deaktivieren blinkt "ATC" auf dem HUD und verschwindet dann. ATC hat zwei Modi:
- Reiseflug: Wenn die Klappen auf AUTO stehen, wird durch die Aktivierung des ATC die aktuell angezeigte Fluggeschwindigkeit beibehalten.
- Anflug: Noch nicht implementiert.
Übersicht über die digitalen Systeme
Die F/A-18C Hornet ist mit einer umfangreichen Software-Suite ausgestattet, die mit Hilfe verschiedene Bildschirmansichten Informationen anzeigt und damit die Bedienung der zahlreichen Systeme und Waffen ermöglicht - von der Wegpunktnavigation über gelenkte Bomben bis hin zu Luft-Luft-Raketen.
Der Pilot interagiert mit diesen Systemen über die beiden RGB-Displays (DDIs) links und rechts im Cockpit und über das Farbdisplay in der Mitte unten (AMPCD, Advanced Multipurpose Color Display). Alle drei verfügen über jeweils 5 Mehrzwecktasten auf allen 4 Seiten. Alle Ansichten können auf allen Displays angezeigt werden, mit der Ausnahme, dass die Ansichten ATTK RDR und FLIR auf dem AMPCD nicht angezeigt werden können. Eine bestimmte Ansicht kann immer nur auf einem Display gleichzeitig angezeigt werden. Eine Ausnahme ist die HSI-Ansicht, die auf dem AMPCD und simultan auf dem linken oder rechten DDI angezeigt werden kann.
Alle Ansichten der digitalen Systeme sind über zwei Menüs erreichbar, auf die immer über die dritte Taste in der unteren Reihe der Drucktasten zugegriffen werden kann. Auch das Wechseln zwischen diesen beiden Menü-Ansichten erfolgt mit dieser Taste. Das taktische oder "TAC"-Menü zeigt waffenbezogene Systeme wie das Bewaffnungs-Inventar und das Radar an, während die Unterstützungs- oder "SUPT"-Seite die nicht kampfbezogenen Elemente wie Informationen über die Flugsteuerung und die Triebwerke anzeigt. Befindet man sich in einem der Menü-Ansichten, dann wird jeweils "[TAC]" oder "[SUPT]" über der besagten Taste angezeigt. Ist man in der Luft und hat man bereits eine Unter-Ansicht geöffnet, so wird stattdessen über der Menü-Taste ein Timer angezeigt, der die Zeit seit Start des Flugzeugs im Format MM:SS aufwärts zählt. Bei Gewicht auf dem Fahrwerk steht darüber einfach "MENU".
Auf dem linken DDI werden in der linken unteren Ecke ggf. Hinweise und Warnmeldungen angezeigt. In der Zeile "ADV-" werden Hinweise angzeigt. Warnungen erscheinen in größerer Schrift. Wenn das linke DDI ausgeschaltet ist, werden die Meldungen stattdessen auf dem AMPCD dargestellt. Wenn das AMPCD ebenfalls ausgeschaltet ist, werden sie auf dem rechten DDI angezeigt.
TDC-Zuweisung
Der Ziel-Aufwahlschalter (TDC) am Schubhebel dient bei verschiendenen Systemansichten zum Schwenken innerhalb der Ansicht. Oft wird z. B. ein Cursor mit Hilfe der TDC-Taste bewegt.
Dazu muss der TDC mit dem Sensor-Steuerschalter dem entsprechenden Display zugewiesen werden. Die Befehle sind:
- Nach oben: TDC wird dem HUD zugewiesen (nicht verfügbar im A/A-Master-Modus)
- Nach unten: TDC wird dem AMPCD zugewiesen
- Nach links: TDC wird dem linken DDI zugewiesen
- Nach rechts: TDC wird dem rechten DDI zugewiesen
Um den TDC zuweisen zu können, muss die auf dem Display dargestellte System-Ansicht auch eine TDC-Steuerung unterstützen. Auf den DDIs oder dem AMPCD wird oben rechts eine Raute mit einem Punkt in der Mitte angezeigt, wenn der TDC diesem Display zugewiesen wurde. Wenn er dem HUD zugewiesen ist, erscheint dort ein Punkt in der Mitte des Geschwindigkeitsvektors.
Master-Modi (Haupt-Modi)
Das Avioniksystem der F/A-18 befindet sich immer in einem von drei Haupt-Modi: Navigation (NAV), Luft-Boden (A/G) oder Luft-Luft (A/A). Diese Master-Modi werden über zwei Tasten links neben dem linken DDI ausgewählt. In jedem Master-Modus werden die Flugzeugsystem für die entsprechende Funktion automatisch angepasst.
Der Master-Modus wird über die beiden erwähnten A/A- und A/G-Tasten ausgewählt. Diese kommandieren den A/A- bzw. A/G-Modus. Der A/A-Modus wird auch bei der Auswahl einer Luft-Luft-Waffe über den Waffenauswahlschalter aufgerufen. Wenn weder der A/G- noch der A/A-Modus aktiv ist, dann ist NAV der aktuelle Master-Modus. Beide Tasten sind beleuchtet und zeigen entweder den A/A- oder den A/G-Master-Modus an. NAV wird implizit angezeigt, wenn keiner der beiden Tasten leuchtet. Bei ausgefahrenem Fahrwerk ist nur der NAV-Modus verfügbar.
- Navigation (NAV) - Im NAV-Modus wird keine waffenbezogene Symbolik auf dem HUD angezeigt. Luft-Boden-Bewaffnung kann aber ausgewählt und konfiguriert werden. Das Auslösen von Waffen ist unterbunden. NAV ist der einzige Master-Modus, bei dem die vertikalen Geschwindigkeits- und Neigungswinkelanzeigen auf dem HUD anzeigt werden. Nur in diesem Modus ist es möglich, den auf dem HUD angezeigten Geschwindigkeitsvektor freizugeben oder einzuschränken.
- Air-to-ground (A/G) - Der A/G-Modus ermöglicht den Einsatz von Luft-Boden-Waffen. Die entsprechende Symbolik für die gewählte Luft-Boden-Waffe wird auf dem HUD angezeigt. Der Geschwindigkeitsvektor ist in A/G-Modus immer freigegeben. Mit der Auswahl des A/G-Modus, wird automatisch die STORES-Ansicht (Inventar/Bewaffnung) auf dem linken DDI angezeigt.
- Air-to-Air (A/A) - Der A/A-Modus ermöglicht die Auswahl und den Einsatz von Luft-Luft-Waffen und zeigt die entsprechende HUD-Symbolik für die aktuelle Luft-Luft-Waffe an. Der HUD-Geschwindigkeitsvektor ist in diesem Modus immer eingeschränkt. Mit der Auwahl des A/A-Modus wird automatisch die STORES-Ansicht auf dem linken DDI und die Radar-Ansicht (RDR ATTK) auf dem rechten DDI angezeigt.
UFC
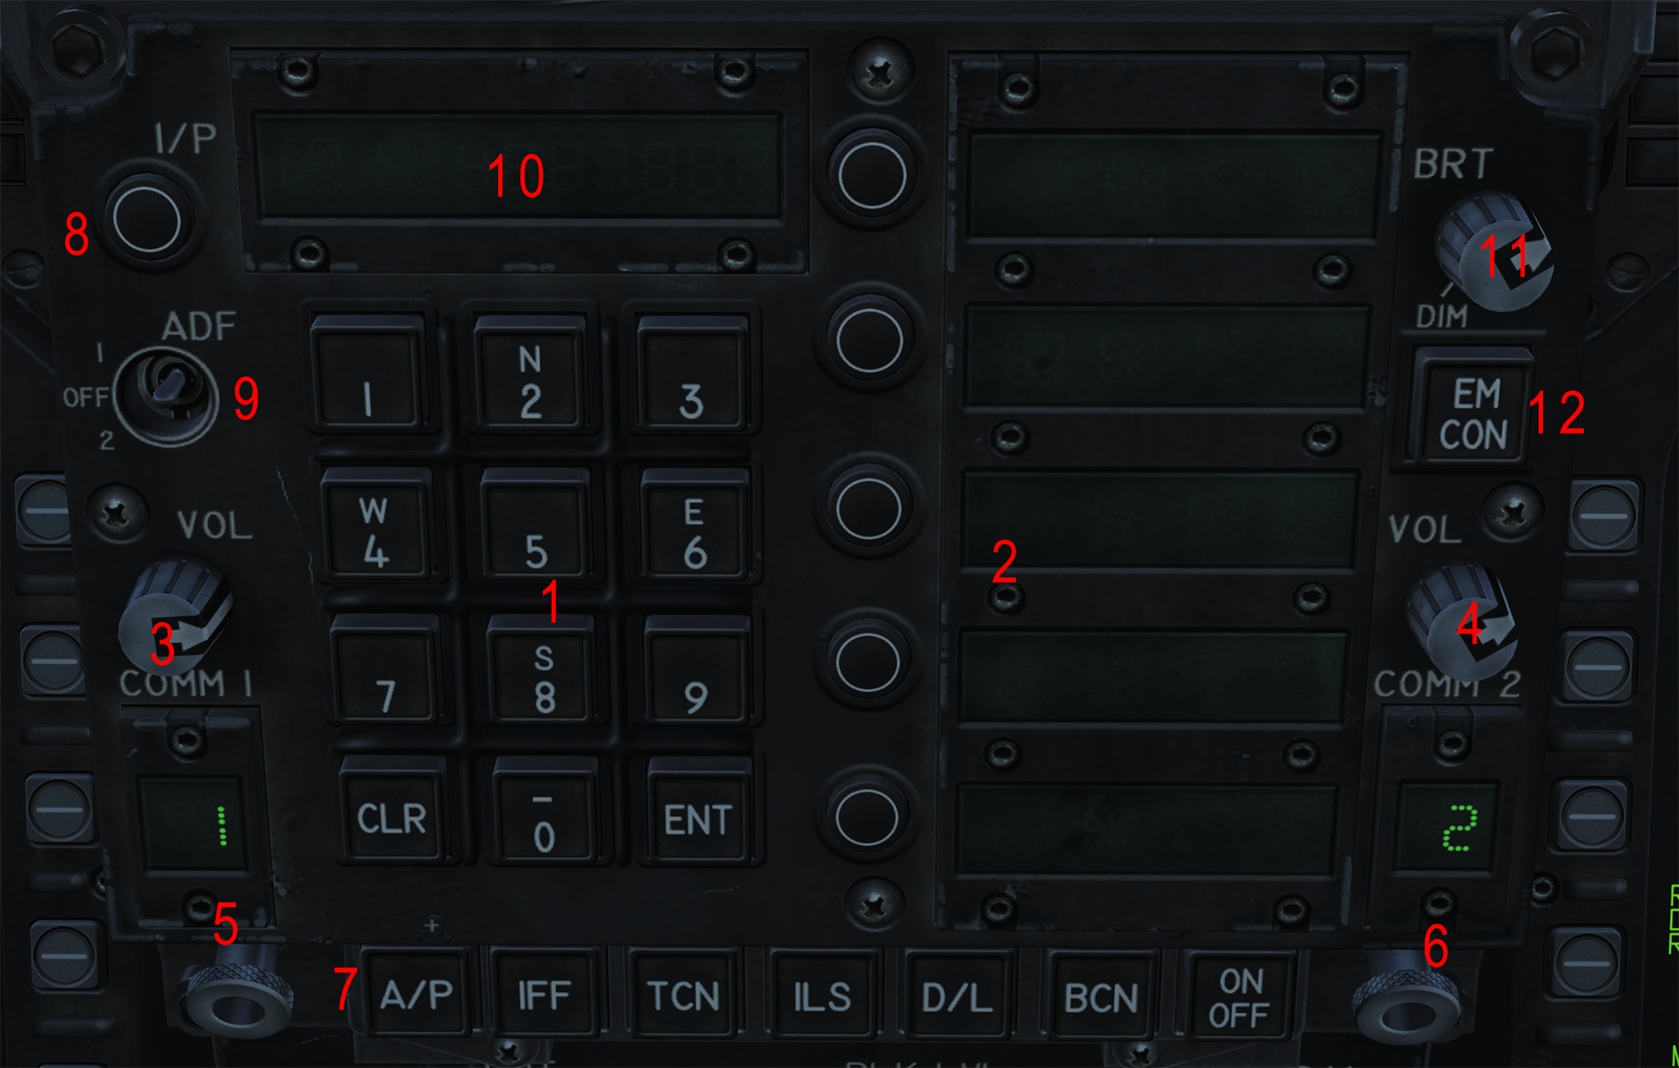
Der Up-Front Controller (UFC, Vordere Bedieneinheit) ist eine Bedieneinheit mit Tastenfeld und Miniatur-Displays unterhalb des HUD. Sie wird bei verschiedenen Avioniksystemen für Benutzereingaben verwendet. Diese reichen z.B. von der Eingabe von Koordinaten für eine GPS-gelenkte Bombe bis zur Auswahl einer TACAN-Stationsfrequenz.
Dieser Abschnitt gibt einen allgemeinen Überblick über die Bedienung des UFC sowie über die Funkkommunikation. Die spezifischen UFC-Optionen für die verschiedenen Systeme werden in den entsprechenden Abschnitten detailliert beschrieben.
- Tastenfeld - Ein Tastenfeld mit den Ziffern 0-9, sowie Lösch- und Eingabetaste. Die Zahlen 2, 4, 6 und 8 dienen zur Eingabe der vier Himmelsrichtungen bei geografischen Koordinateneingaben. Die Zahl 0 dient auch zur Eingabe des Minuszeichens (-).
- Miniatur-Displays und Drucktasten - Die kleinen, schmalen 7-Segment-Displays zeigen in der Regel an, welche Art von Werten eingegeben oder welche Optionen ausgewählt werden können. Über die jeweils links daneben liegenden Drucktasten wird das entsprechende Feld ausgewählt. Anschließend erfolgt die Dateneingabe für diesen Wert oder die Auswahl der Option mit dem Tastenfeld. Der aktuell ausgewählten Option wird im Display ein Doppelpunkt vorangestellt.
- COMM1 Lautstärke
- COMM2 Lautstärke
- COMM1 Bedienknopf
- COMM2 Bedienknopf
- UFC-Menü - AFCS/Autopilot (A/P), Identifikation, Freund oder Feind (IFF), TACAN (TCN), Instrumenten-Landesystem] (ILS), Datalink (D/L), Transponder-Beacon (BCN; noch nicht implementiert) und eine EIN/AUS-Taste (Funktion je nach gewähltem UFC-Menü).
- Transponder-Ident-Taste (keine Verwendung in DCS).
- ADF Quellenauswahl - Wählt entweder das Funkgerät COMM1 oder COMM2 als Quelle für den Peilsender-Empfang (ADF, automatic direction finder) des Flugzeugs.
- Eingabefeld - Diese Anzeige zeigt die aktuell über das Tastenfeld eingegebenen Werte an.
- UFC-Helligkeit - Regelt die Anzeigehelligkeit. Ganz nach links schaltet das UFC aus.
- Noch nicht implementiert.
Funkgeräte
Die F/A-18 verfügt über zwei Standard-Funkgeräte, die als COMM1 (PRI, primary) und COMM2 (AUX, auxiliary) bezeichnet werden. Die Bedienung dieser Funkgeräte ist in das UFC integriert.
Die Funkgeräte werden jeweils über die Lautstärkeregler COMM1 und COMM2 am UFC eingeschaltet, indem die Regler aus der ganz linken Stellung nach rechts gedreht werden. Die Knöpfe regeln auch die Lautstärke des jeweiligen Funkgerätes. Es wird immer auf beiden Funkgeräten empfangen, sofern sie eingeschaltet sind, aber der Kommunikationsschalter auf dem Schubhebel bestimmt, auf welchem der beiden Funkgeräte gesendet wird.
Das Menü für COMM1 oder COMM2 wird durch Ziehen am jeweiligen Bedienknopf des Funkgerätes aufgerufen. Dadurch werden der aktuell gewählte Kanal und dessen Frequenz auf dem UFC-Eingabefeld angezeigt. Eine neue Frequenz kann über das Tastenfeld eingegeben werden. Im Anzeigefenster über den Knöpfen wird der aktuelle Kanal angezeigt, der durch Drehen der Knöpfe gewechselt werden kann. Jedes Funkgerät verfügt über einen separaten Satz von 20 durchnummerierten Kanälen. Dazu kommen ein allgmeiner Guard-Kanal von 243.000, der militärische Standard-Überwachungsfrequenz für Notfälle (G), die manuelle Frequenz (M), die Seefrequenz (S) und die Cue-Frequenz für das einkanalige Boden- und -Flugfunksystem (C).
Bei Betätigung der Bedienknöpfe werden in den Miniatur-Displays des UFC verschiedene Optionen angezeigt:
- GRCV (Guard Receive): Schaltet den Empfang auf der Überwachungsfrequenz ein/aus.
- SQCH (Squelch): Schaltet die Rauschsperre ein und aus (Rauschen wird ausgefiltert).
- AM/FM: Schaltet zwischen der AM- und FM-Modulation um. Option ist nur vorhanden, wenn die eingegebene Frequenz entweder AM oder FM sein kann.
- Cypher (CPHR): Noch nicht implementiert.
Head-up Display
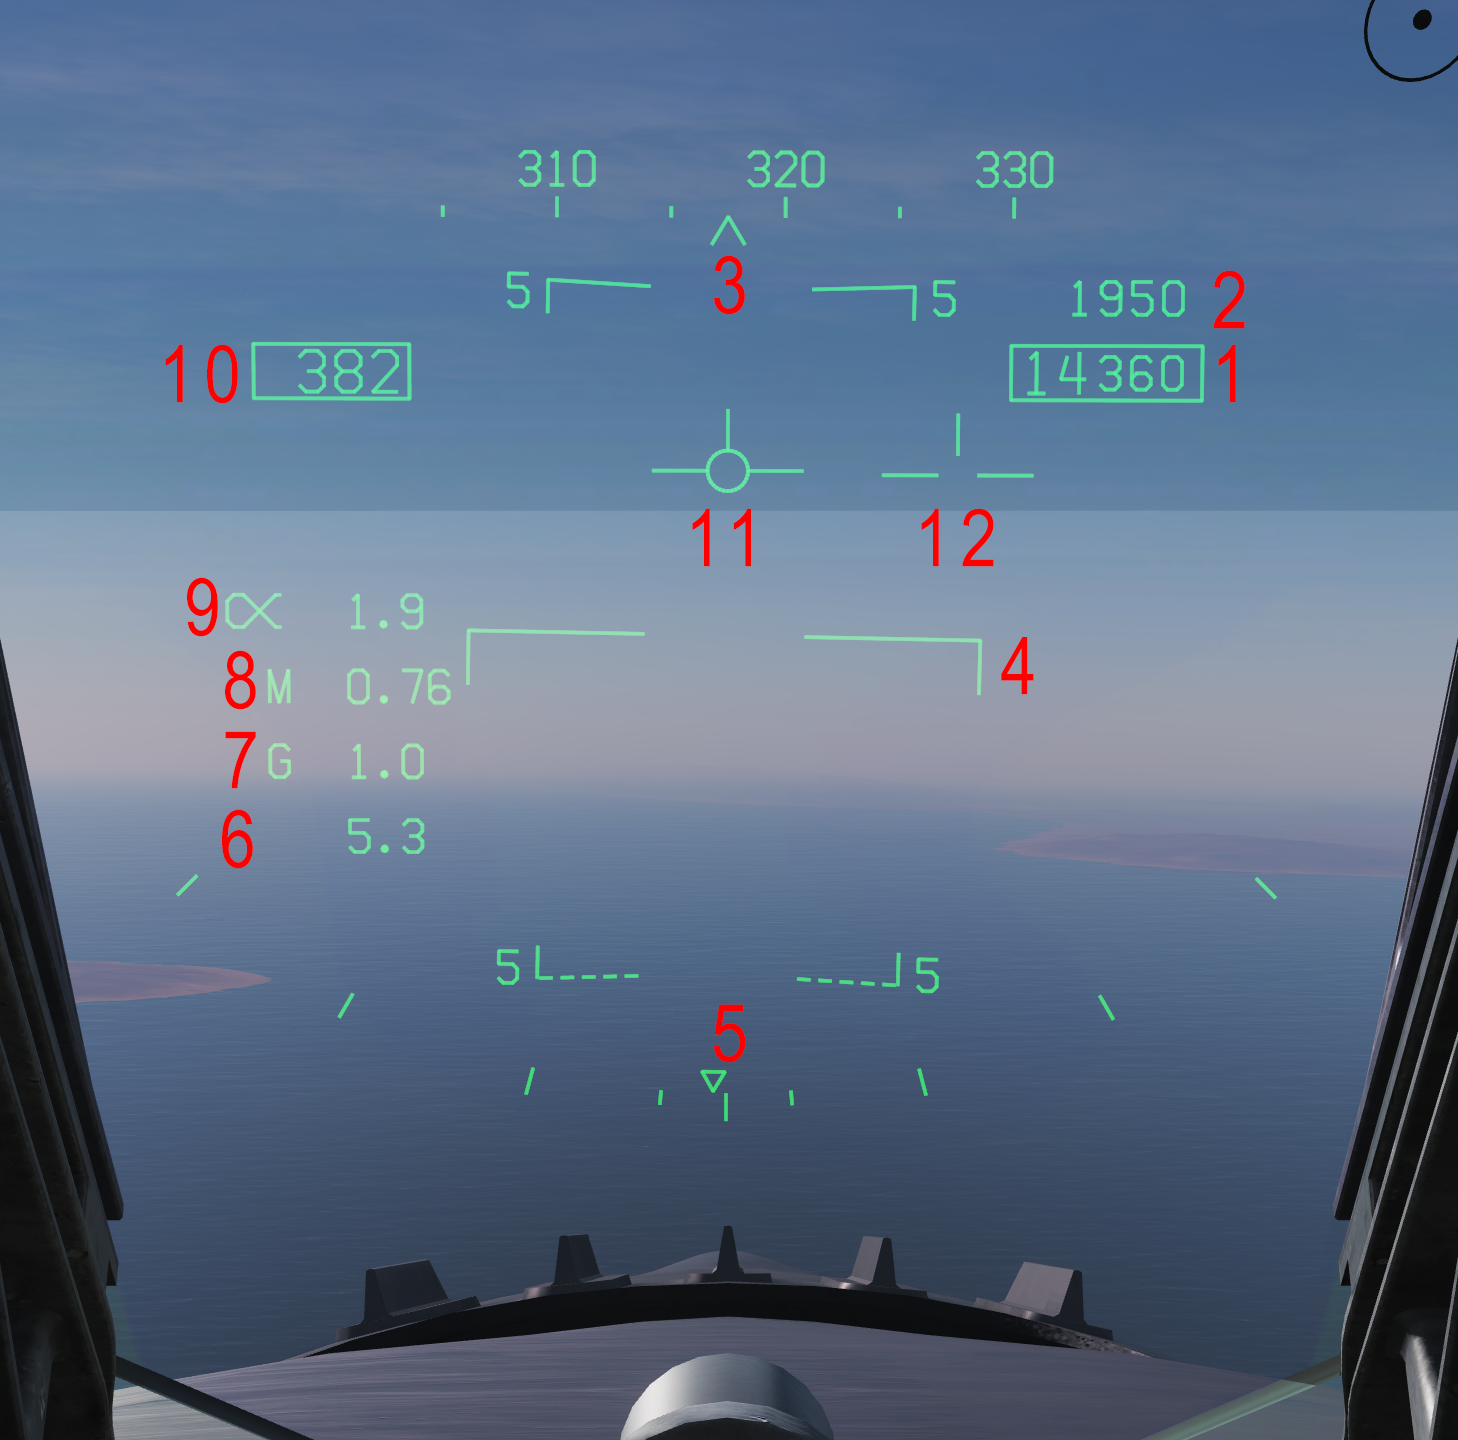
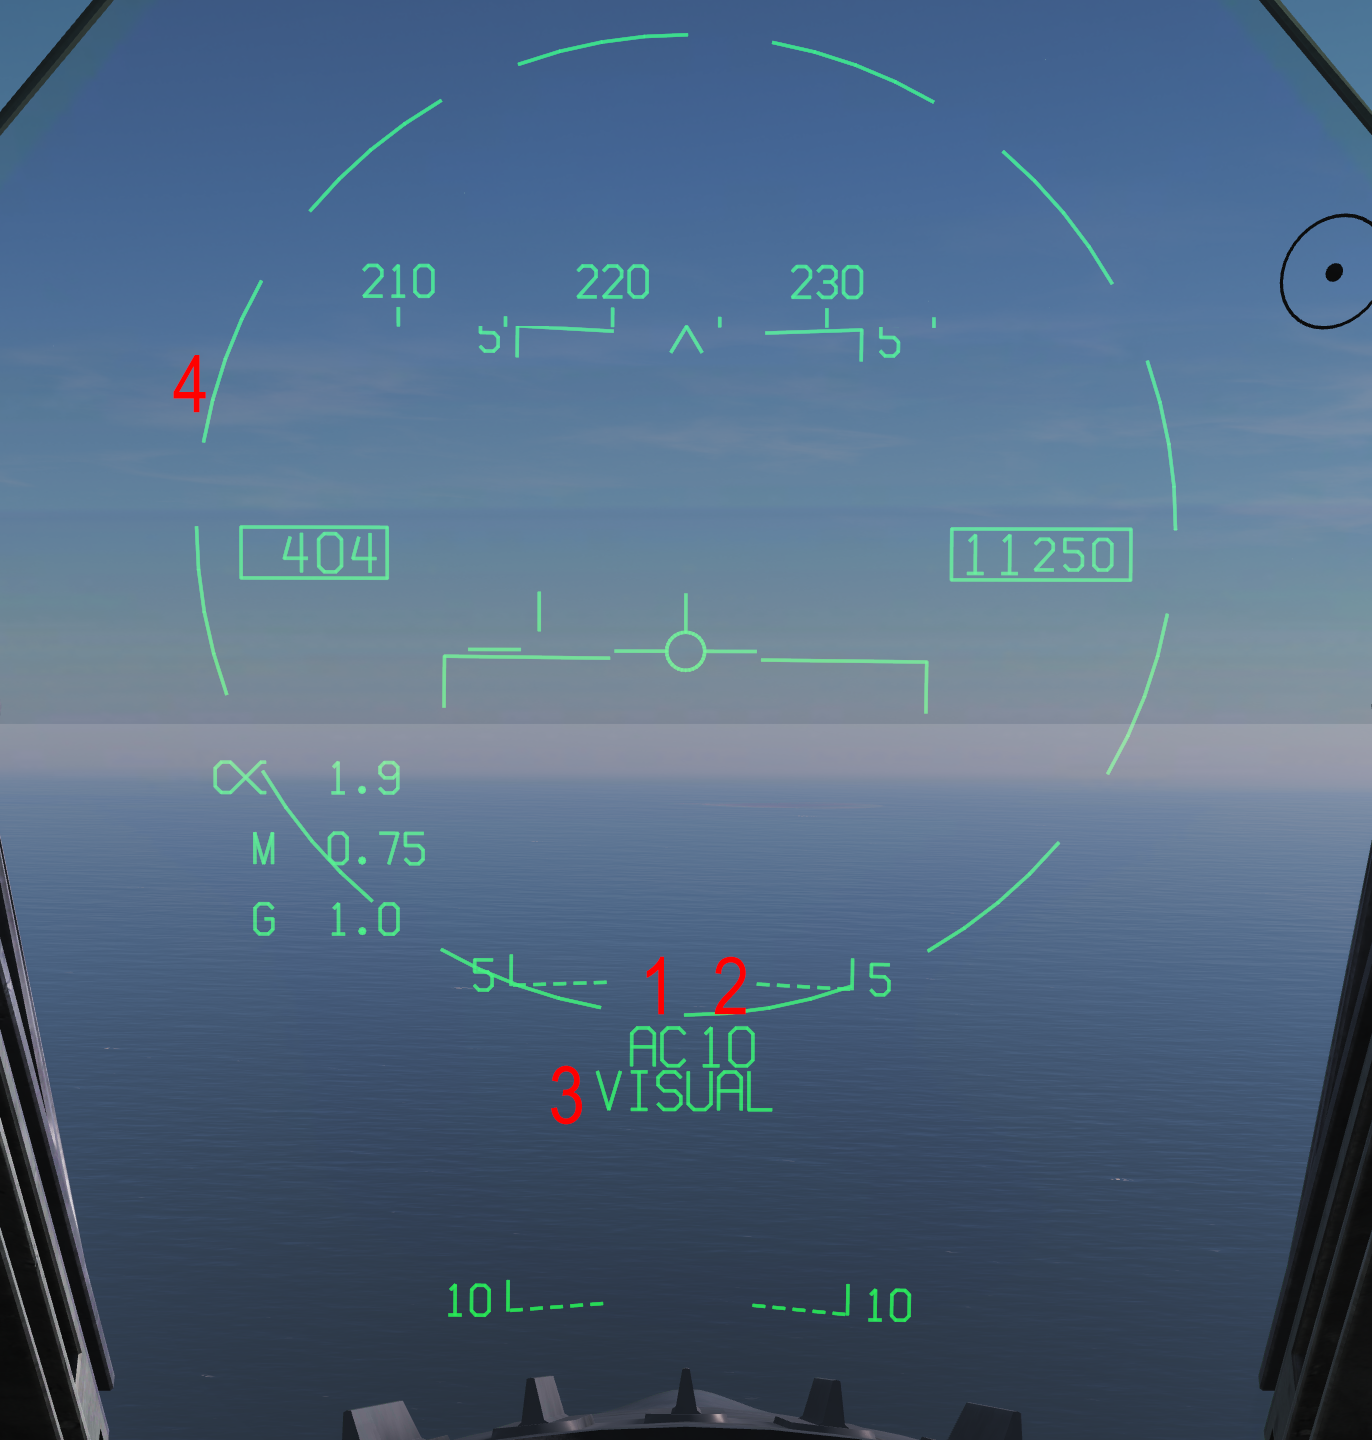
The head-up display (HUD) is a projected display at the front of the cockpit that serves as the primary flight instrument. It also provides various indications for weapon delivery; this section will cover the HUD's indications in NAV master mode. Master mode/weapon specific indications on the HUD will be covered in the relevant section.
- Altitude - This is the aircraft altitude displayed in feet above sea level when the altitude source switch below the UFC is set to barometric or when it is set to radar and the airplane is unable to read the radar altitude. When the switch is set to radar, it displays radar altimeter altitude above the ground and an "R" is indicated after the value. When the switch is set to radar altitude but it is displaying barometric altitude, a "B" will flash after the number. Below the altitude indication, whenever the barometric pressure is changed via the knob on the standby altimeter or the aircraft is below 10,000 feet, at an airspeed less than 300 knots, and was previously above both values, the currently set barometric pressure (in inHg) is flashed for five seconds.
- Vertical Speed Indicator - Current vertical speed in feet per minute.
- Heading Tape - This indicates the current magnetic or true heading, based on the option in the HSI format. The arrow (magnetic heading) or "T" symbol (true heading) indicates the aircraft's heading. The heading tape is raised +1.2° from its position in NAV master mode when in A/G or A/A.
- Pitch Ladder - The solid line indicates the horizon. Dashed/numbered lines are degrees below the horizon and solid/numbered lines are degrees above the horizon. The lines curve in the direction of the horizon, and the curve becomes sharper as the degree steepens.
- Bank Angle - The triangle indicates current bank angle. The marks indicate in either direction 5°, 15°, 30°, and 45° angles of bank.
- Peak G This is the highest G-force the aircraft has achieved when the peak is at least 4.0G. Peak G is reset when the reject mode is set to REJ 1/2 and back to NORM.
- G Indicator
- Mach Number
- Angle of Attack - The current angle of attack in degrees.
- Indicated Airspeed - The current indicated airspeed in knots.
- Vertical Velocity Vector - This indicates the vertical velocity of the aircraft when the velocity vector is caged.
- Ghost / True Velocity Vector - This indicates the horizontal and vertical velocity of the aircraft.
Not shown is the "watermark" indicating the position of the nose, which is a "W" symbol shown whenever the velocity vector goes off the view of the HUD or the landing gear is down.
Additionally, when the gear is down, an "E" symbol (called the "E-bracket") is displayed as an indication of angle-of-attack when the velocity vector lines up with it. The top part of the E indicates 9.3° AOA; the middle indicates 8.1°, which is optimal for landing; and the bottom indicates 6.9°. When the AOA is between 9.3° and 6.9°, the normal HUD AOA indication disappears. Also, when the gear is down, the Mach, G-force, and peak G-force is removed.
Reject Modes
Via the HUD reject switch below the UFC, information may be 'rejected' (removed) from the HUD.
- NORM: Nothing is rejected.
- REJ 1: Removes outline around airspeed and altitude, Mach number, current G, peak G, and bank angle indication.
- REJ 2: Removes heading tape.
Velocity Vector Caging
The velocity vector can either be "caged" or "uncaged", toggled in NAV via the Cage/Uncage button on the throttle. In A/A, it is always caged, and in A/G, it is always uncaged.
In caged operation, two velocity vectors are shown: the vertical velocity vector, which is "caged" to the HUD center and only indicates the vertical velocity of the airplane, and the ghost velocity vector, which displays both the horizontal and vertical velocity. The ghost velocity vector is displayed as a segmented version of the vertical one.
In uncaged operation, a single true velocity vector is shown. This indicates the horizontal and vertical velocity of the aircraft (functioning identically to the ghost velocity vector when caged). The true velocity vector appears the same as the vertical velocity vector does in caged operation.
HUD Format
The HUD may be mirrored on any of the displays via the HUD format on the TAC menu.
Helmet Mounted Display
The F/A-18C Hornet is equipped with the Joint Helmet Mounted Cuing System (JHMCS) as its helmet mounted display (HMD). It allows for HUD indications to be shown no matter where the head is looking and to perform some special functions, like pointing the AIM-9 missile off-boresight. It features the same symbology as the HUD, minus the velocity vector, pitch ladder, and bank angle indications. Additionally, replacing the heading arrow is a number indicating the heading of the aircraft, when the HMD is not pointed at the HUD. The heading tape itself shows the heading the HMD is looking at. A number above the heading tape shows the elevation in degrees above the horizon where the HMD is looking. Reject modes for the HUD do not mirror on the HMD.
The HMD is turned on by rotating the HMD knob to the right of the right DDI rightward. This knob also controls its brightness. The HMD can be blanked/unblanked by pressing the RECCE Event Marker button on the stick.
HMD Format
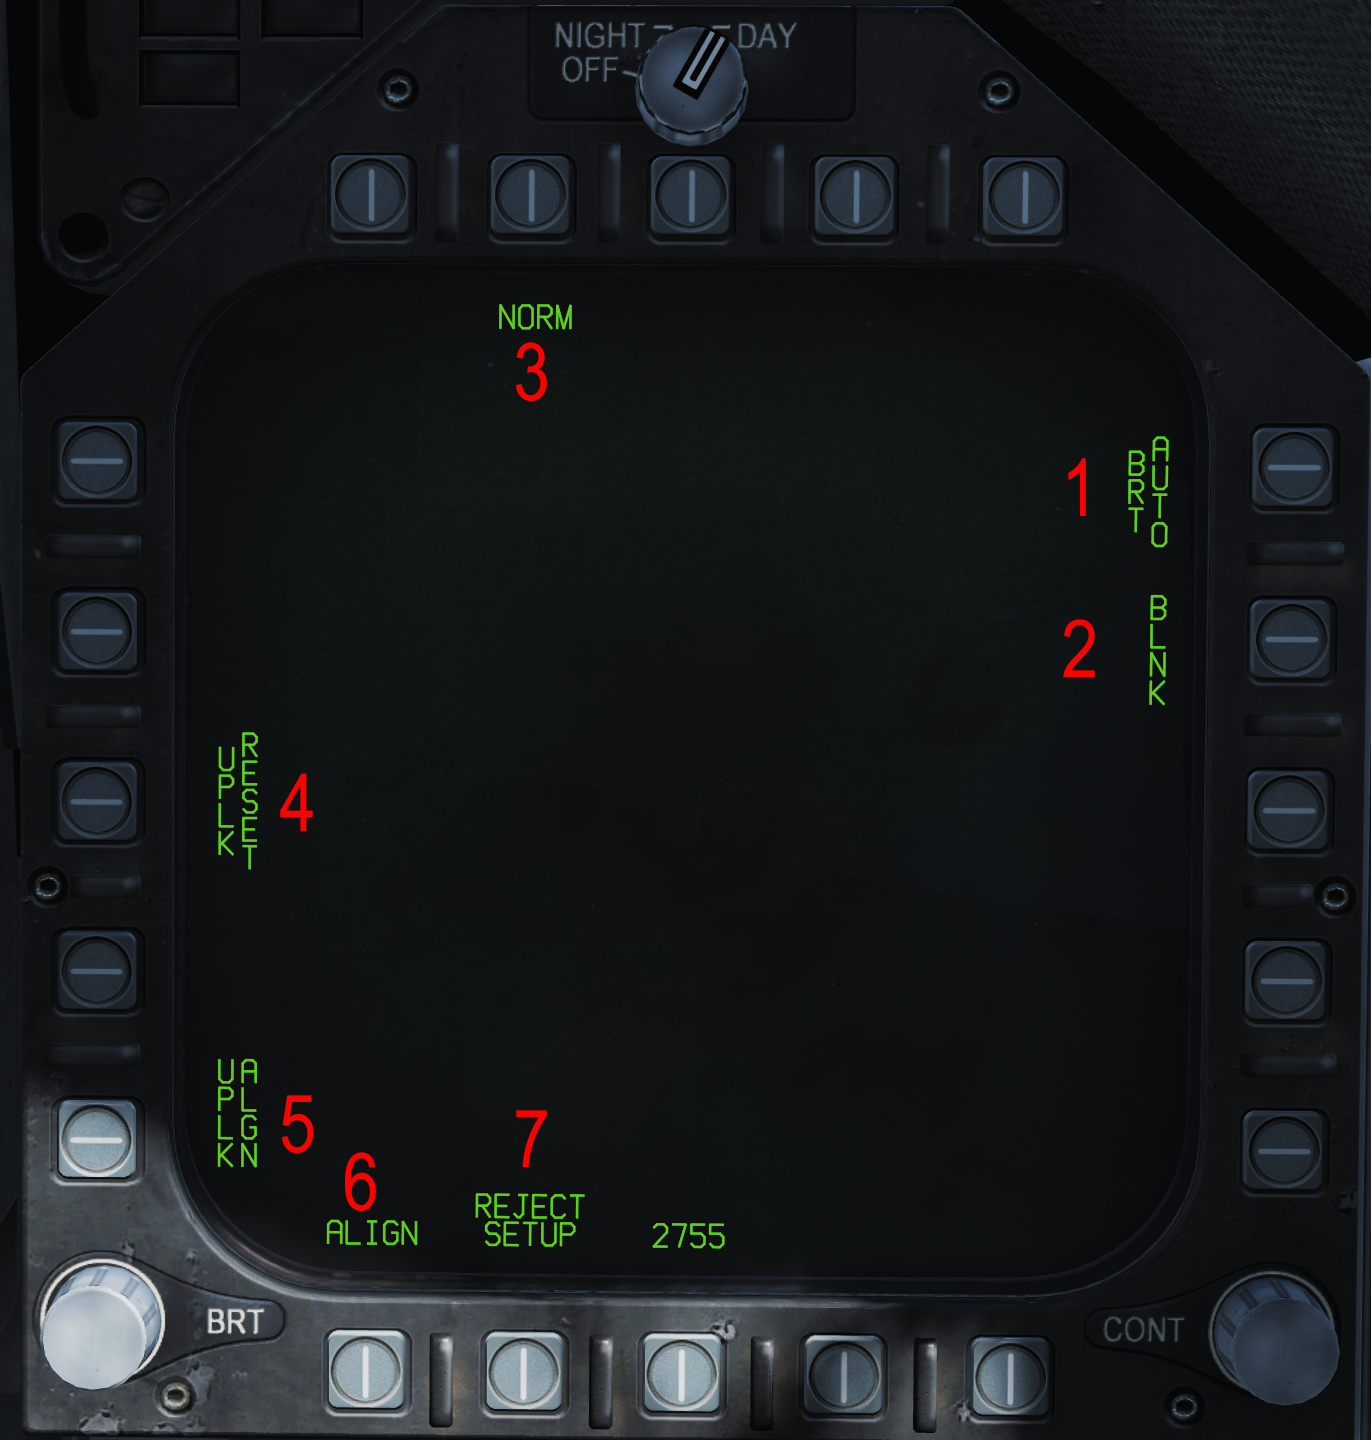
When the HMD is on, the HMD format can be accessed on the SUPT menu. This allows for control of some HMD settings.
- Brightness - Sets HMD brightness, cycling between AUTO, DAY, and NIGHT. In AUTO, brightness will automatically be set for best visibility. In DAY, full brightness as selected by the HMD brightness knob is allowed. In NIGHT, half the brightness that would be set for DAY is set with the HMD brightness knob.
- Automatic Blanking - When this option is boxed, the HMD will automatically blank everything except the aiming cross when looking inside the cockpit or at the HUD.
- HMD Reject Modes - This cycles between NORM, REJ 1, and REJ 2 HMD reject modes. These are independent of the HUD reject settings.
- Not yet implemented.
- Not yet implemented.
- Not yet implemented.
- Reject Setup Sublevel - Invokes the reject setup sublevel to allow for customization of the symbology displayed in each reject mode.
The F/A-18C has an inertial navigation system (INS), assisted by the Global Positioning System (GPS), capable of storing arbitrary digital, GPS-coordinate based series of waypoints, navigating to both ground- and air-based tactical air navigation (TACAN) stations and non-directional beacons (NDB), using the instrument carrier landing system (ICLS), and the automatic carrier landing system (ACLS) (not yet implemented). Navigation is primarily done with the Horizontal Situation Indicator (HSI) format and the HUD.
HSI Format
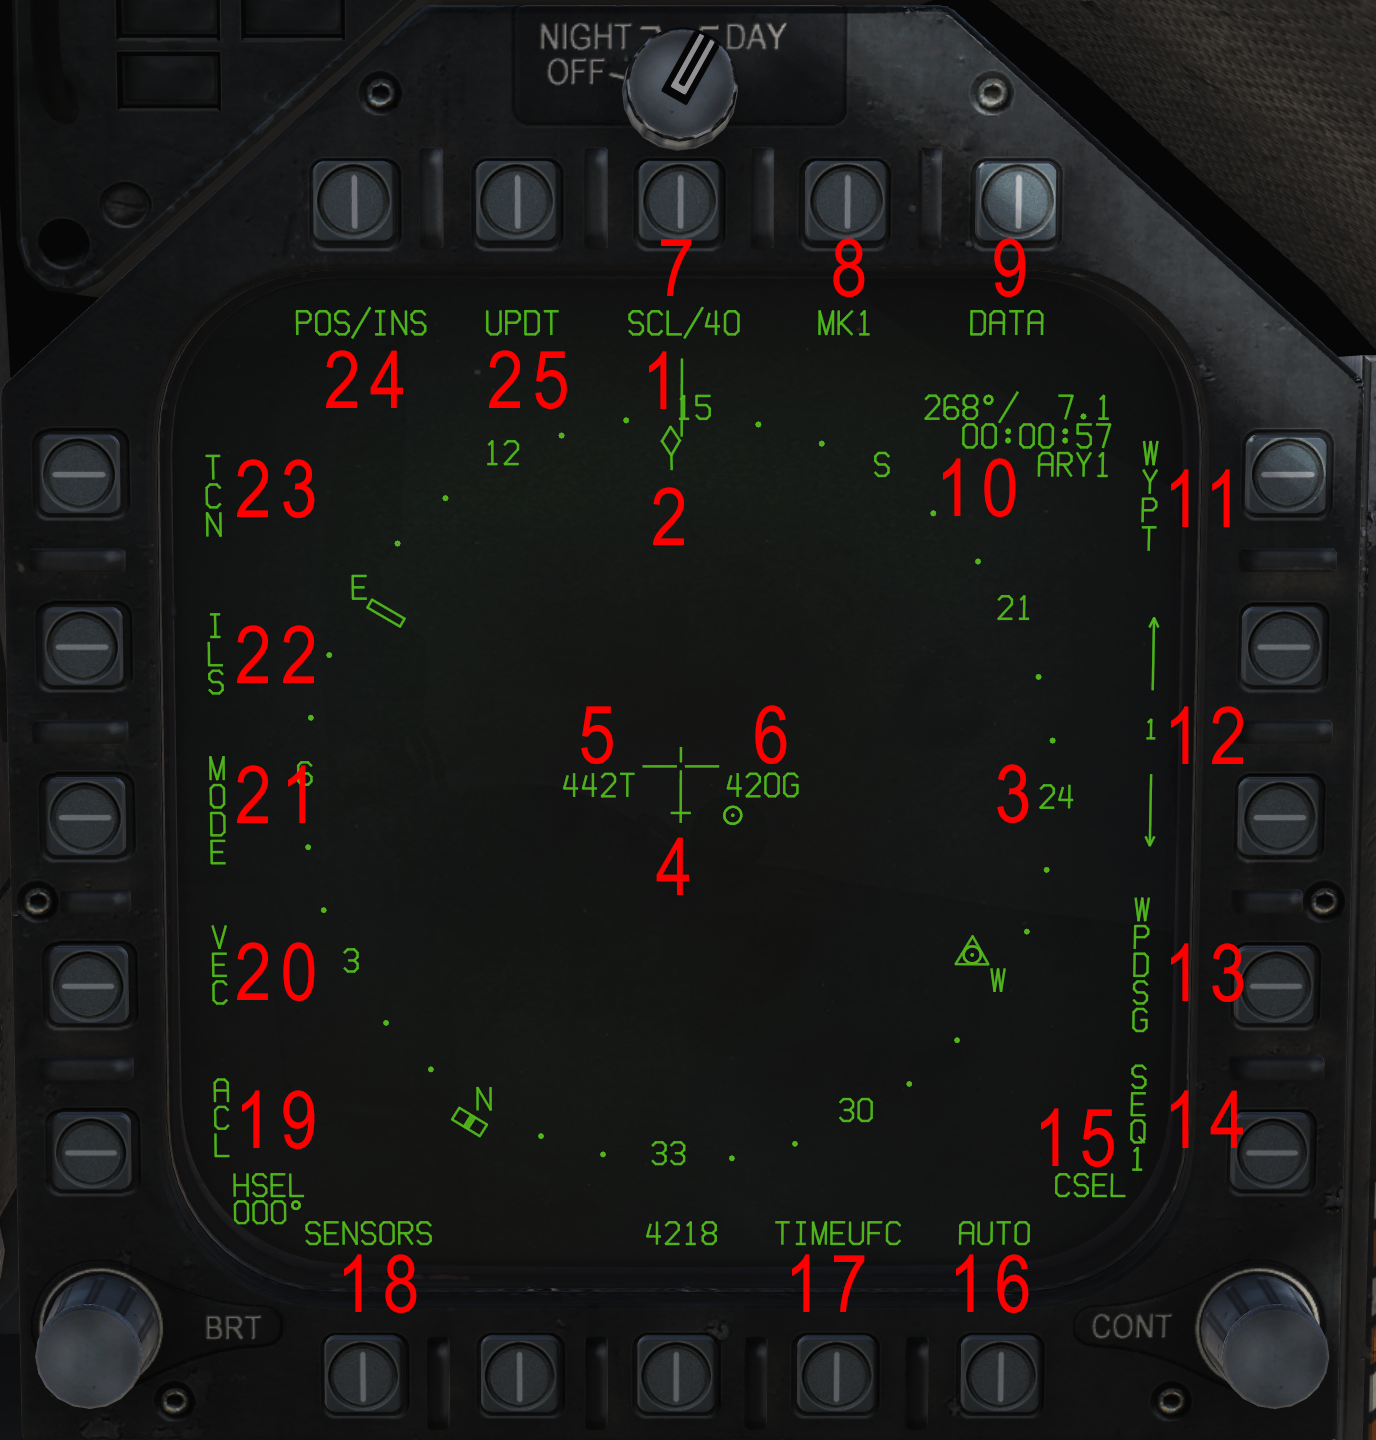
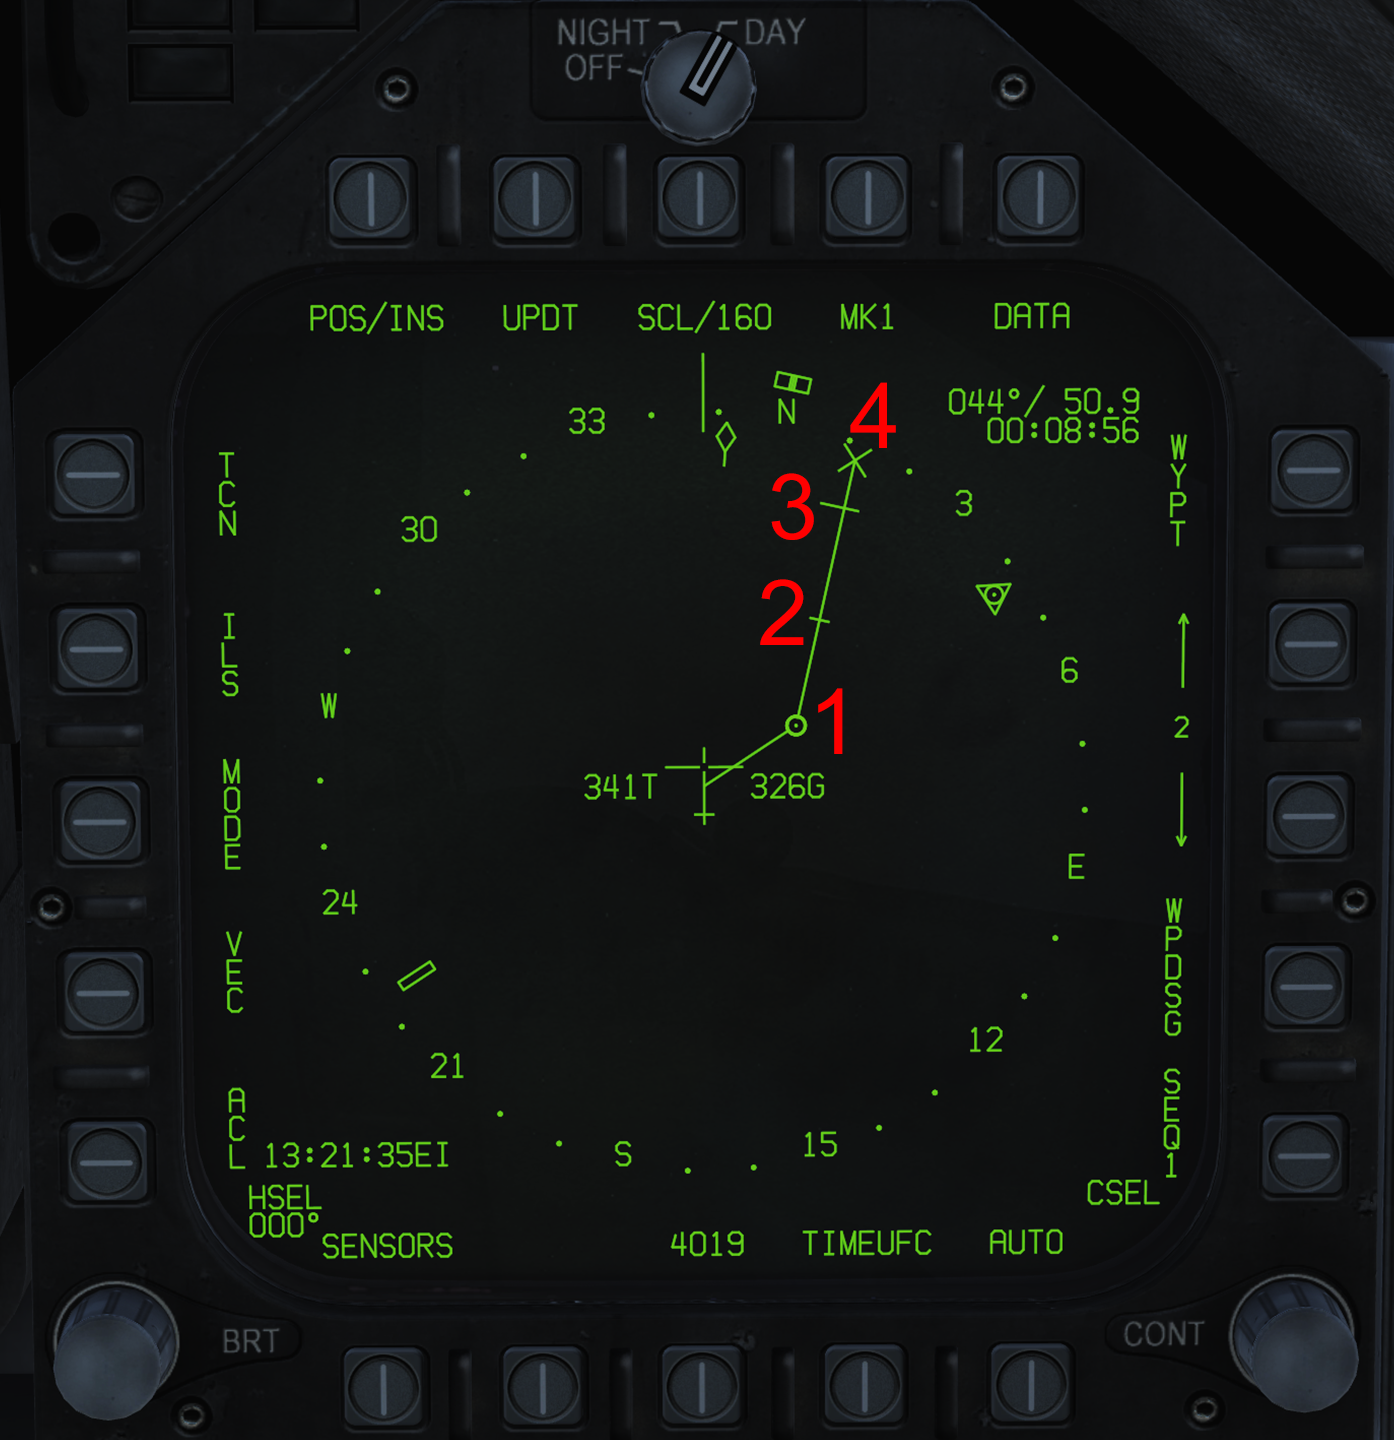
The Horizontal Situation Indicator (HSI) format is the primary interface with the airplane's navigation systems. The HSI can be accessed from the SUPT menu. The basic function of the HSI is a moving map of the world with the airplane's position in a top-down display.
- Aircraft Heading Line
- Aircraft Ground Track Line
- Compass Rose - The compass rose is comprised of headings in tens of degrees (24=240°) and dots indicating tens of degrees in between said numbers. Along the compass is a triangle indicating the bearing to the selected waypoint/tuned TACAN: the waypoint triangle has a circle inside and the TACAN triangle has a "T" inside. A line (waypoint) and oval (TACAN) indicates the reciprocal bearings.
- Aircraft Symbol - This indicates the position of the aircraft itself.
- Aircraft True Airspeed
- Aircraft Ground Speed
- Range Scale - This is the radius of the display in nautical miles, except in DCTR mode, when it is the distance from the bottom to the top of the display. The options are 5, 10, 20, 40, 80, and 160nm; in DCTR mode, these values are doubled.
- Not yet implemented.
- DATA Sublevel
- Waypoint / TACAN Data Block - This Block of information displays in the upper right corner for the selected waypoint and in the upper left for the third TACAN. From top to bottom, it shows:
- bearing to and distance in nautical miles from the waypoint or TACAN. For a waypoint, this is horizontal range; for a TACAN, slant range (horizontal and vertical)
- present ETA to said waypoint going in a straight line in the format HH:MM:SS
- name of the waypoint/TACAN identifier
- when steered to, the calculated fuel remaining when arriving at the waypoint/TACAN
- distance in nautical miles left to begin a descent to the waypoint/TACAN, based on a 4° glideslope
- Waypoint Steering This option displays navigational cues for the presently selected waypoint on the HUD. It cannot be selected simultaneously with the TACAN steering option.
- Waypoint Selection - This is the currently selected waypoint with an arrow above and below to cycle through the waypoints in the selected sequence.
- Designates the currently selected waypoint as the Air-to-Ground Target (TGT)) point. It can be undesignated by pressing the "TGT" button on the HSI or the Undesignate button on the stick.
- Waypoint Sequence - Cycles the aircraft's three sequences of waypoints and toggles drawing a dashed courseline in-between them.
- Course and Heading Select - The selected course, in degrees, via the course select switch. A courseline will then be drawn through the current waypoint or TACAN the airplane is steering to (TCN/WYPT boxed); when this is done, a distance in nautical miles and "C" is displayed as a direct distance from the courseline. On the opposite side is the selected heading via the heading select switch, for use with the autopilot; the selected heading is displayed along the compass via two boxes. Holding either switch will allow the course/heading value to be entered via the UFC instead.
- Automatic Waypoint Sequencing - Toggles the auto waypoint function, which changes the current waypoint as the previous one is physically passed to the next one. Selecting this also activates the waypoint steering option.
- TIMEUFC - Brings up options on the UFC for time indications to display on the HUD and HSI. Selecting an option on the UFC will toggle its display. The last selection will display on the HUD, while on the HSI both ET or CD and ZTOD will display.
- SET: Allows for the IFEI date to be set via the UFC keypad.
- ET: Begins a count-up in MM:SS up to 59:59. Paused/unpaused via the ENT button on the UFC keypad.
- CD: Begins a countdown in MM:SS starting at 06:00 by default. Paused/unpaused via the ENT button on the UFC keypad. The default starting value of the countdown can be changed by selecting the CD option and then entering it via the keypad. The value cannot exceed 59:59.
- ZTOD: Displays the current zulu time (Universal Coordinated Time).
- LTOD: Sets the IFEI local time. Select "LTOD" and then enter the desired local time in 24 hour time in the format HH:MM:SS. This will change the minute and seconds for the zulu time as well. The LTOD cannot be displayed on the HUD and HSI like the ZTOD can.
- Not yet implemented.
- Not yet implemented.
- Not yet implemented.
- Mode
- MAP: toggles the chart overlay. This is only visible on the AMPCD.
- T UP: track up. The HSI will be oriented so that the aircraft's track (horizontal velocity across the ground) is always pointed up. However, technically the aircraft heading is always pointed directly up.
- N UP: north up. The HSI swill be oriented so that north is always up.
- DCTR: decenter. Places aircraft at the bottom of the HSI instead of the center and places the track up.
- SLEW: not yet implemented.
- Instrument Carrier Landing System - Displays localizer and glideslope indications for the instrument carrier landing system on the HUD.
- TACAN Steering - Displays navigational cues for the tuned TACAN on the HUD. It cannot be selected simultaneously with the waypoint steering option.
- Position Reference - Selects aircraft position reference: inertial navigation system (INS), relative to the selected TACAN (TCN), the air data computer (ADC), or Global Positioning System (GPS).
- Not yet implemented.
DATA Sublevel
The DATA sublevel of the HSI provides numerous navigation-related options. It is split into multiple tabs, selectable at the top. Selecting "HSI" will return to the main format.
A/C
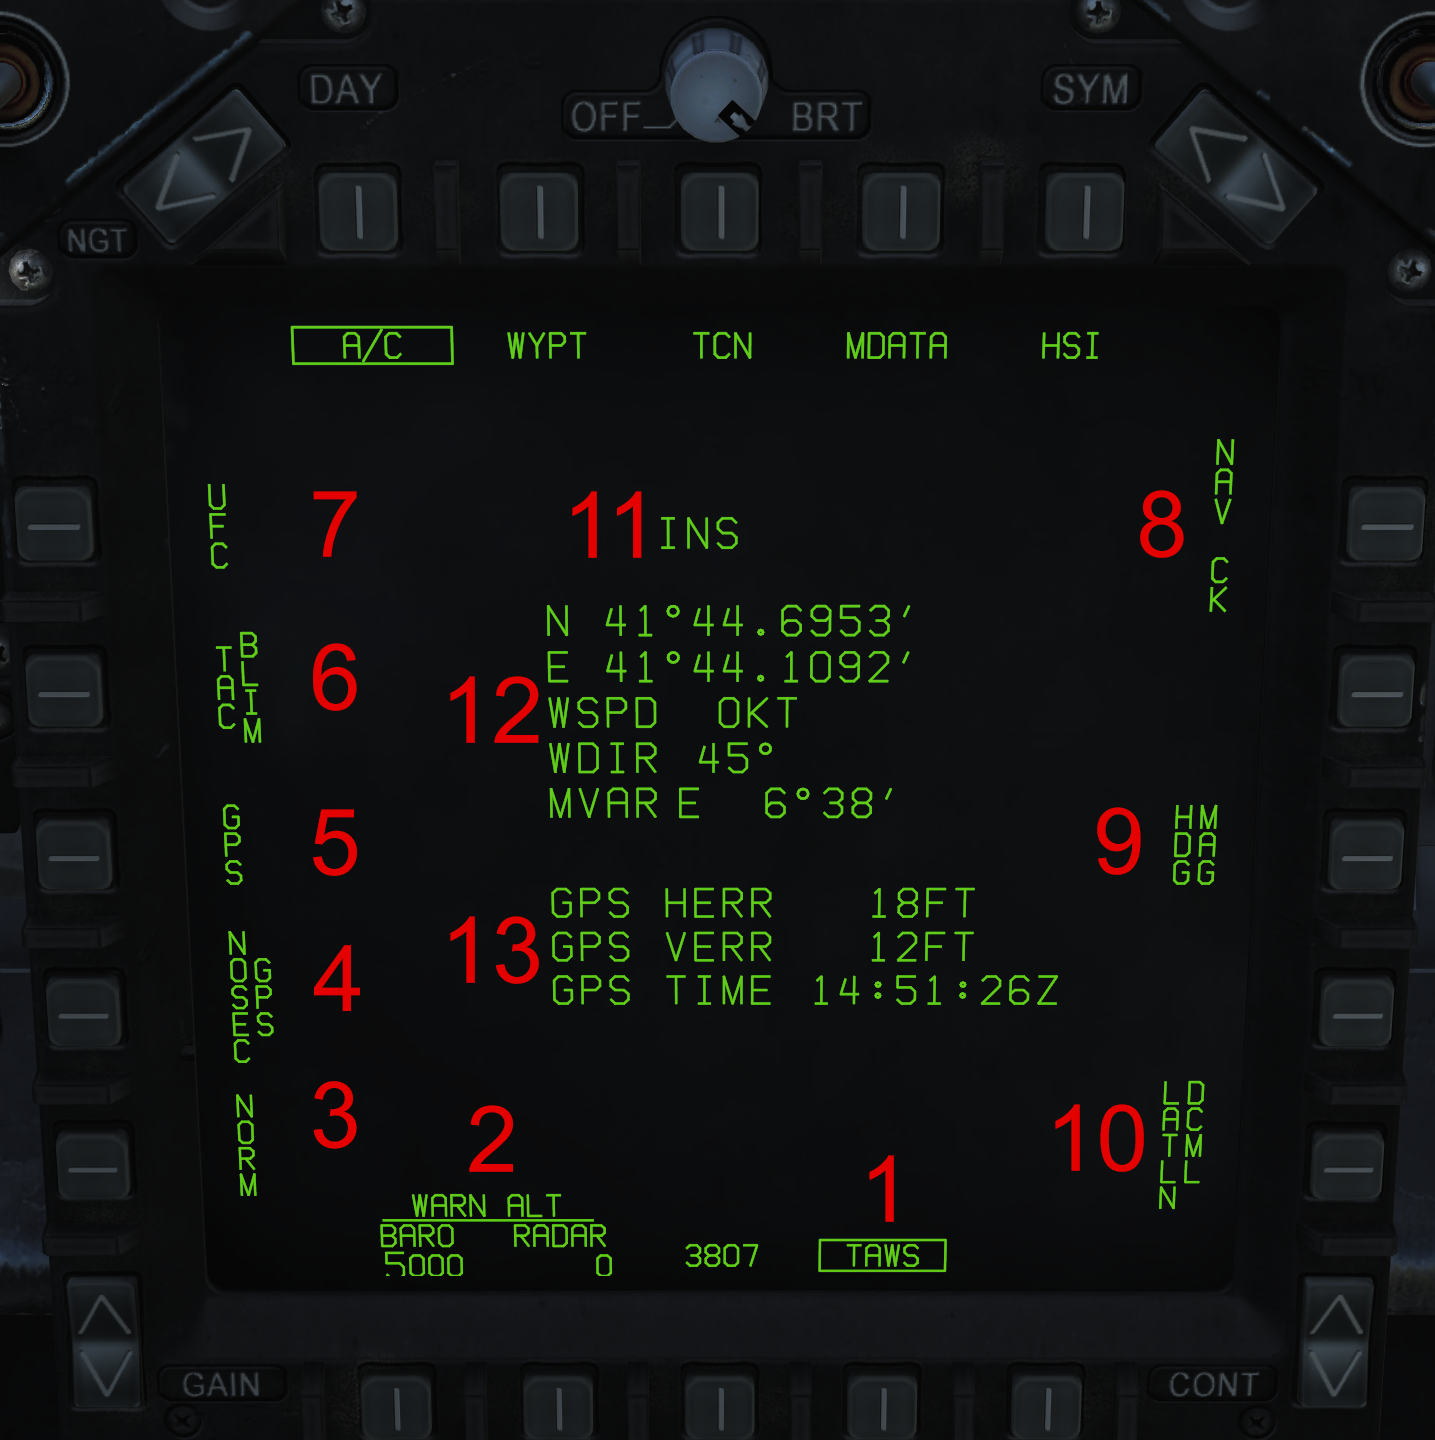
The A/C tab on the DATA sublevel displays information regarding the aircraft itself and the inertial navigation system.
- Terrain Awareness System - This toggles TAWS verbal annunciations.
- Warning Altitudes - Selects radar and barometric warning, or "soft," altitudes. Selecting either will allow for a value to be entered on the UFC. When either altitude is reached in a descent, "altitude, altitude" will sound.
- Not yet implemented.
- Not yet implemented.
- Not yet implemented.
- Not yet implemented.
- Not yet implemented.
- Not yet implemented.
- Magnetic / True North Selection - Selects between magnetic north and true north as the heading source for the aircraft.
- Coordinates Formatting - Changes latitude/longitude coordinate presentation throughout the HSI format: DCML will display it as degrees/minutes and SEC will display it as degrees/minutes/seconds.
- Selected Position Source
- Aircraft Positional Information - Current aircraft latitude and longitude and the wind speed, wind direction direction, and magnetic variation where the aircraft is.
- GPS Information - GPS horizontal and vertical error and the Zulu time according to the GPS.
WYPT
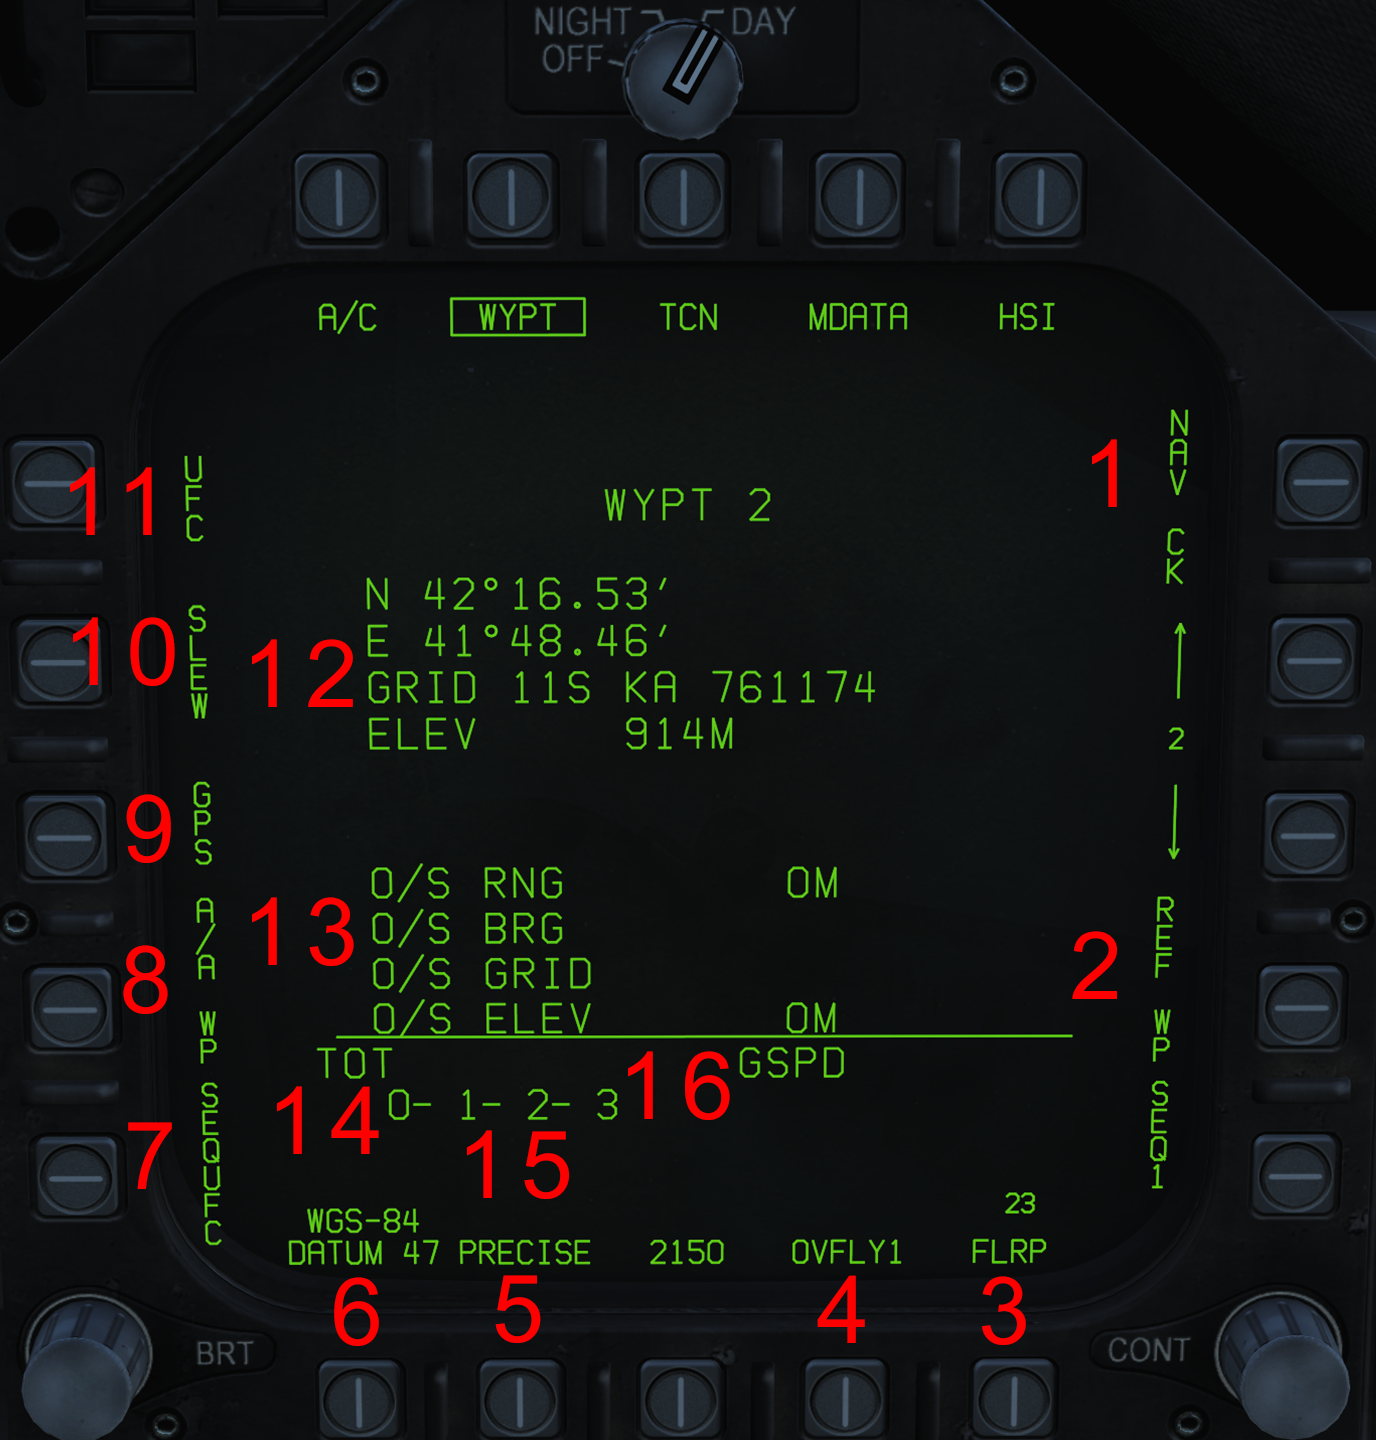
The WYPT tab allows for detailed information about waypoints to be viewed and edited.
- Not yet implemented.
- Not yet implemented.
- Not yet implemented.
- Not yet implemented.
- Precise Coordinates - Toggles precise coordinate mode. When PRECISE is boxed, coordinates in the HSI format will show as 8 digits; otherwise, they will show as 6.
- Not yet implemented.
- SEQUFC - Brings up UFC options for the currently selected sequence:
- GSPD: enter the desired groundspeed in knots to be en route to the designated target waypoint (not to be confused with the waypoint designate/TGT function). This is used in conjunction with TOT. For waypoints in the sequence before it, the required ground speed will allow for the plane to be at this groundspeed en route to the target waypoint.
- TGT: Designate a waypoint number to be the target waypoint for the TOT function. It is important to note this operates entirely independently of the A/G Target.
- TOT: Designate a desired time on target in zulu time in the format HH:MM:SS. The HSI will then display a required groundspeed to reach the target at that time.
- INS: Insert waypoints to the currently selected sequence. To add one in between two current ones, enter the preceding waypoint and then the inbetween waypoint.
- DEL: Select a waypoint to delete from the sequence.
- A/A Waypoint - Designates the currently selected waypoint as the air-to-air waypoint or "bullseye". This is for communicating target locations and is used in other formats.
- Not yet implemented.
- Not yet implemented.
- UFC - Brings up UFC options for the currently selected waypoint:
- POSN: Enter desired waypoint location, first the latitude and then the longitude. This is entered in degrees/minutes/seconds or degrees/minutes, depending on the display setting in the A/C tab. Without precise coordinate mode, they are entered with all six digits at once. In the precise coordinate mode, the first four are entered, "ENTER" is pressed, and then the next four are entered.
- ELEV: Enter waypoint elevation. Option is given to enter in feet or meters.
- GRID: Not yet implemented.
- O/S: Not yet implemented.
- Waypoint position: north/east coordinates, Military Grid Reference System (MGRS) coordinates (not yet implemented), and the elevation in meters or feet (depending which it was entered as).
- Not yet implemented.
- Entered Time on Target (TOT)
- Entered Groundspeed to Target (GSPD)
- Waypoints in Sequence - The waypoints in the sequence, in order. A waypoint will be boxed if it is designated as the target for the TOT feature.
TCN
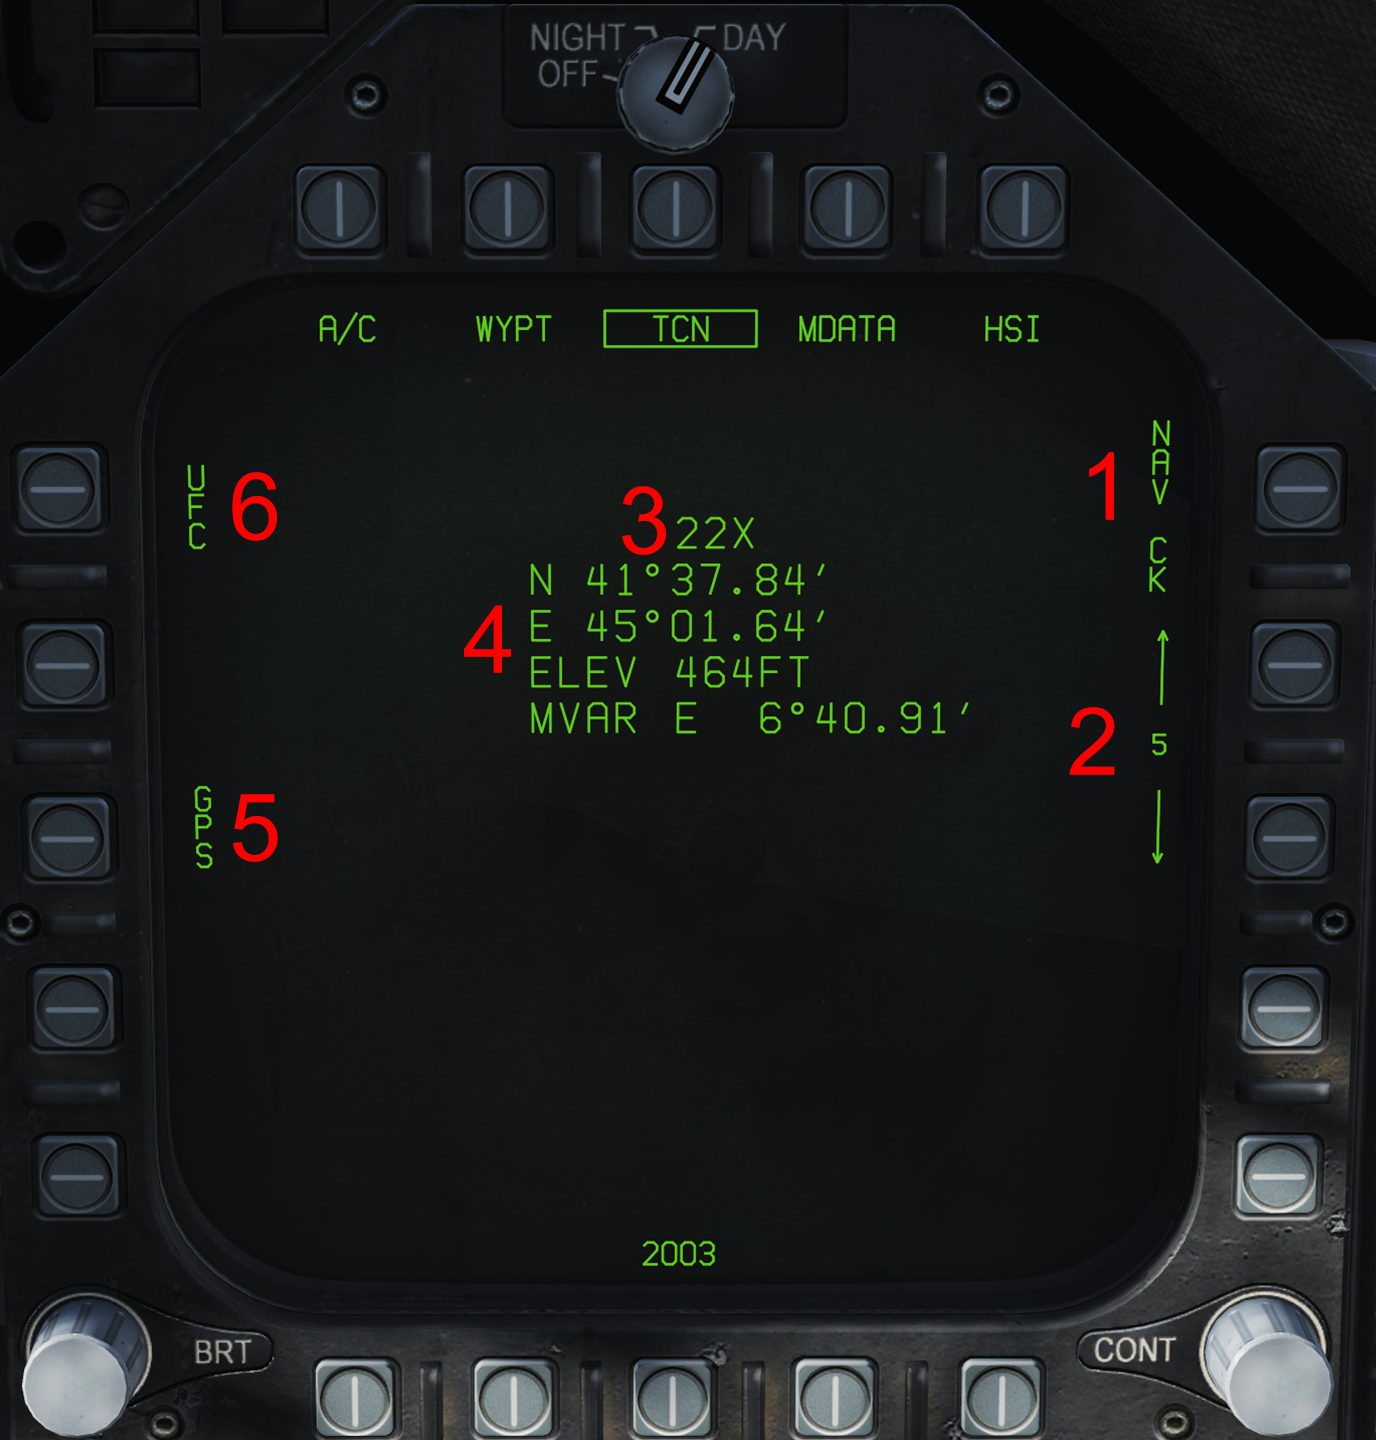
The TCN tab allows for information to be viewed about TACAN stations in the aircraft database.
- Not yet implemented.
- TACAN Database - Cycles TACANs in the database.
- TACAN Frequency - Frequency of the TACAN being viewed.
- TACAN Information - Latitude, longitude, and elevation of the TACAN, and magnetic variation at it.
- Not yet implemented.
- UFC - Allows for the coordinates/elevation/magvar to be manually edited on the UFC.
MDATA
Not yet implemented.
HUD Steering Indications
When TCN or WYPT is boxed on the HSI, the range in nautical miles to and waypoint name/TACAN identifier will be displayed on the HUD. For a waypoint, horizontal range is displayed, while slant (horizontal and vertical) range is displayed for a TACAN. Additionally, if no course is designated, a green bar is displayed on the heading tape, indicating the direct bearing to the waypoint or TACAN. When a course is designated, a visualization on the HUD of the course relative to the airplane is displayed, with an arrow indicating the present bearing from the course and two dots on either side of the velocity vector: the inner dot indicates 4° and the outer dot indicates 8°. The airplane is on course when the arrow is aligned with the center of the velocity vector.
Waypoints
The F/A-18C can store up to 59 arbitrarily defined, INS-based waypoints in up to 3 "sequences", which are essentially sets of waypoints that allow the waypoints to actually be seen. Waypoints are defined by a set of GPS coordinates and an elevation above (or below) sea level.
Waypoints are indicated by a circle with a dot in the middle.
Waypoints can be given their own 5-character name pre-flight (in the DCS mission editor), but cannot named in the aircraft. They are numbered sequentially from 0–59.
TACAN
Tactical Air Navigation (TACAN) is a military radio navigation system. A TACAN beacon allows for an aircraft to determine its bearing and range from it, and using this information can navigate. TACANs may be ground-based or be broadcasted by an airplane. TACAN channels have two bands, X and Y, and range from 1-126. It should be noted the frequencies 68X/Y and 69X/Y interfere with the Link-16 data network the Hornet uses.
The F/A-18C has a TACAN transmitter and receiver. The TACAN antenna itself is powered on the UFC via the TCN option. The ON/OFF button will toggle the TACAN power and an "ON" will be indicated in the scratchpad. In the scratchpad is the current TACAN frequency tuned to, which can be inputted via the keypad.
The UFC also provides the following options:
- T/R: Transmit and receive. Gets bearing and range from the TACAN.
- RCV: Receive. Gets bearing from the TACAN.
- A/A: Air-to-air TACAN mode.
- X: Tunes the selected frequency on the X band.
- Y: Tunes the selected frequency on the Y band.
On the HSI, the TACAN station appears as a triangle, with a dot in the middle when it is being steered to.
ADF
Very high omnidirectional range (VOR) stations send out radio emissions which can be used to determine bearing to said VOR. While the Hornet does not have VOR-capable navigation radios, it can determine bearing to a VOR (or TACAN) via its automatic direction finder (ADF).
In the F/A-18, they can be tuned on the COMM1 or COMM2 radios. To do so, the frequency of the station is simply tuned to that radio and then the ADF switch on the UFC is set from OFF to COMM1/2. This will then display a circle on the HSI format's compass, indicating bearing to the station.
ICLS
For night and low visibility operations, aircraft carriers have an instrument carrier landing system (ICLS) to allow for instrument approaches to the carrier. ICLS provides horizontal and vertical guidance. The F/A-18 is equipped with ICLS.
To activate the airplane's ICLS antenna, the ILS button is selected on the UFC and then ON/OFF is used to toggle power to the system. "ON" is displayed on the scratchpad when it is on. Also on the scratchpad is the current ICLS frequency, which can be inputted via the keypad.
When ILS is selected on the HSI, two bars, one horizontal and one vertical, appear near the velocity vector on the HUD. These indicate vertical and horizontal deviation from the optimal glideslope (3°) and course to the deck. When they are both aligned with the velocity vector (making a "+"), the aircraft is on course.
ACLS
Not yet implemented.
FPAS Format
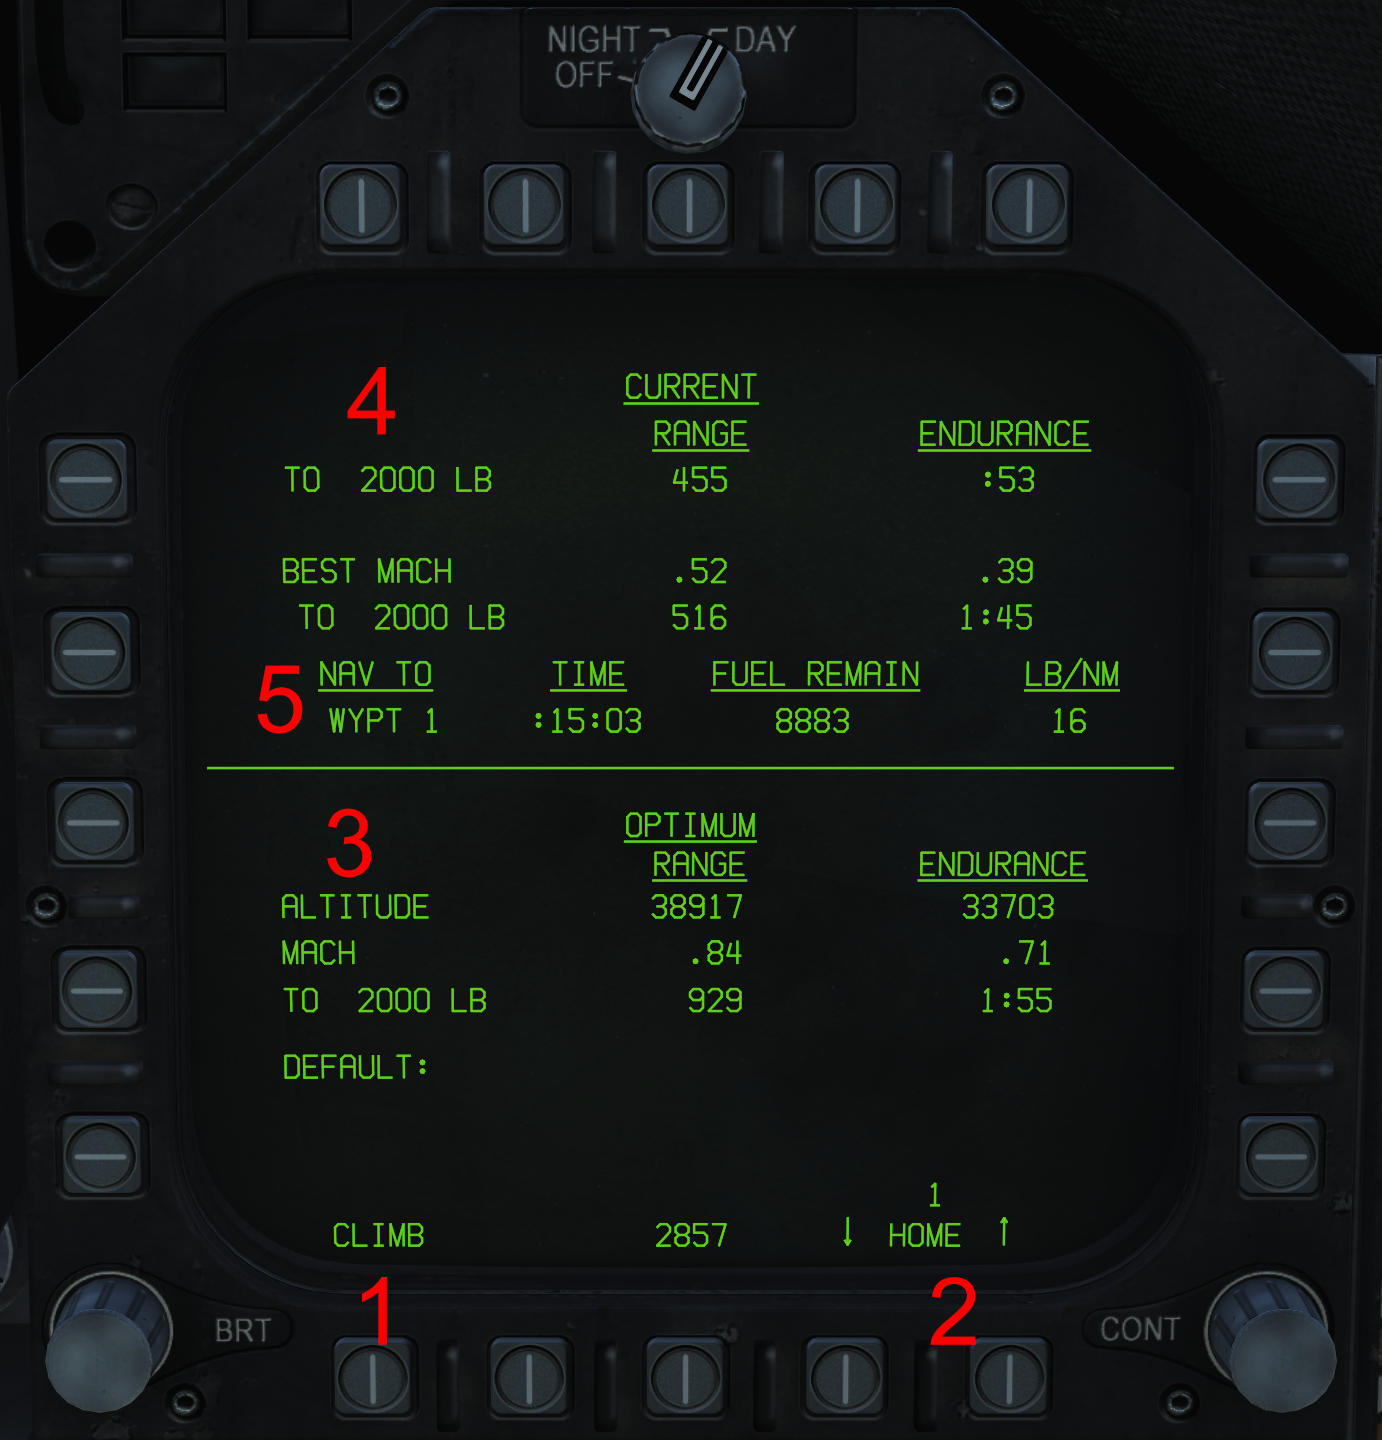
The F/A-18C has the capability to calculate flight performance to advise the pilot of optimal speeds, altitudes, and other information. This information is accessed by the FPAS format on the SUPT menu.
- Climb Mode - When this option is selected, above the HUD airspeed indication will display the optimal speed in indicated knots to climb at.
- Home Waypoint - A waypoint can be selected as the "home" waypoint. When the FPAS calculates there will be 2,000lbs of fuel left when reaching the home waypoint if the plane were to turn toward it at that moment, then the "HOME FUEL" caution will display.
- Optimum Range and Endurance - This is the optimum barometric altitude and Mach number at said altitude to fly to travel as far as possible (range) or as long as possible (endurance). "TO 2,000LBS" displays the range in nautical miles left (range) and the time in HH:MM (endurance) until the aircraft will reach 2,000lbs of fuel. When below 2,500lbs, it will become "TO 0LBS".
- Current Range and Endurance The upper "TO 2,000LBS", at the current flight parameters, displays the range in nautical miles (range) and time in HH:MM (endurance) until the fuel reaches 2,000lbs. Below 2,500lbs, this becomes "TO 0LBS". Below is the "BEST MACH" and lower "TO 2,000LBS/0LBS" indications. This shows the best Mach number to fly at the current altitude to obtain the best range or endurance. The lower "TO 2,000/0LBS" indication displays the range/endurance information if the airplane flew at the "BEST MACH" speeds.
- WYPT/TCN Information "NAV TO" displays the TACAN station or waypoint being steered to. "TIME" is the time remaining to reach the waypoint when heading straight at it, in the format HH:MM:SS. "FUEL REMAIN" is the calculated fuel that will remain when reaching that waypoint. "LB/NM" is the current amount of pounds of fuel being burned per nautical mile (this is always showed).
Defensive Systems
The F/A-18C is equipped with various defensive systems: the ALE-47 Countermeasure Dispensing System (CMDS), for the release of chaff, flares, and decoys (the latter not yet implemented), the AN/ALQ-165 Airborne Self Protection Jammer (ASPJ), for jamming enemy radar (not yet implemented), and the AN/ALR-67 Radar Warning Reciever (RWR), for detection of enemy radar emitters and missile launches.
AN/ALR-67 RWR
The AN/ALR-67 Radar Warning Receiver (RWR) provides the Hornet the ability to detect radars via the radio/microwave radiation they emit.
Cockpit Systems
Behind the control stick is a row of five pushbuttons to control the RWR. From right to left, the options are:
- Toggles power to the RWR.
- Limits the display to the 6 highest priority emitters.
- Not yet implemented.
- Offsets RWR emitters so the bearing is no longer accurate but they are spaced out so they can be read easier.
- Runs the RWR's built in test (BIT). In the event of a failure, it will display a red "FAIL".
There are also three knobs around these buttons. "AUDIO" is intentionally not functional. "DMR" controls the brightness of the pushbutton backlights. DIS TYPE sets the display priority for certain emitter types: airborne intercept (I), anti aircraft artillery (A), unknown (U), and friendly (F).
EW Format
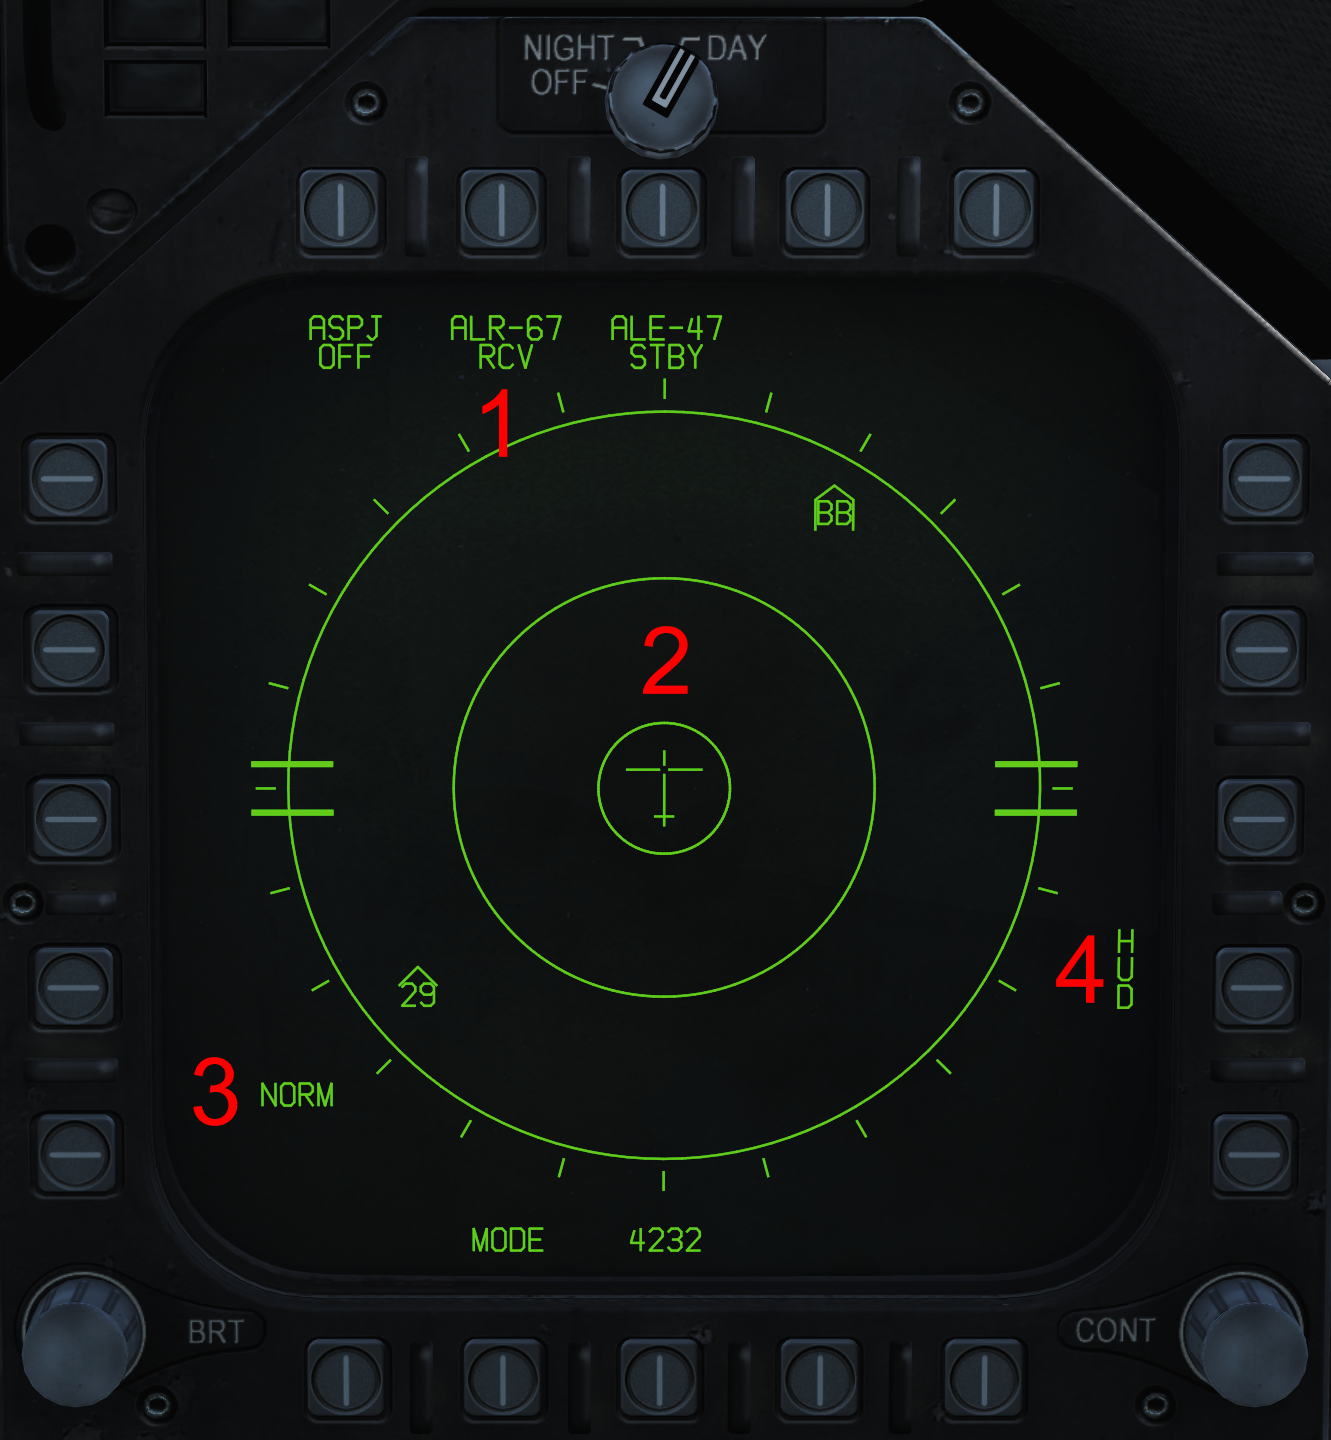
The electronic warfare (EW) format is the primary way of seeing the output of the RWR.
- AN/ALR-67 Status - "OFF" indicates no power and "RCV" means it is on and receiving.
- RWR Display - The EW format provides a top-down display with ticks around it in half-hour clock directions (the top tick is always 12 o'clock). A representation of the aircraft is placed in the center. Emitters are displayed as NATO standard alphabetical and/or numerical identifiers for various emitter types. There are three 'bands' of the display:
- Along the outermost ring is the "non-lethal" band, which is emitters determined not to be lethal or critical.
- Along the outside of the next ring is the "lethal" band, which is emitters determined to be likely lethal threats.
- Along the inside of the next ring is the "critical" band, which is emitters determined to be likely critical threats.
- Display Settings - Displays the DIS TYPE knob setting and pushbutton display settings.
- HUD Emitters - Toggles HUD emitter indications.
Emitters will additionally have special symbology indicating their type:
- Half-circle below: emitter is tracking
- Triangle above: hostile aircraft
- Half-circle above: friendly aircraft
- Staple above: unknown aircraft
- Triangle and rectangle without a bottom: surface to air missile (SAM)
- Line above with two small lines pointing up: anti aircraft artillery (AAA)
- Line below: sea-based
If an emitter is guiding a missile at the aircraft, they will flash. If they are also in the critical band, a line will stem out of them to their bearing.
HUD EW Indications
When selected on the EW format, a maximum of 6 emitters (the most prioritized) and their bearing will be displayed on the HUD in the same top-down format.
- Non-lethal: Solid line
- Lethal: Dashed line
- Critical: Solid line
The lethal line is longer than the non-critical line and the critical line is longer than the lethal line. The HUD does not show emitter classification symbology except the half-circle underneath to indicate tracking and the line underneath to indicate a sea-based emitter.
The maximum number of emitters is reduced further when a certain A/A weapon is selected and the radar is in Single Target Track:
- AIM-7: 2 emitters
- AIM-9: 1 emitter
- Gun: 3 emitters (when in GACQ or STT)
When in HUD REJ 1, an additional 2 emitters will be added (but still to a maximum of 6). In REJ 2, 6 emitters will always be shown.
Standby RWR Indicator
A standby RWR indicator in the standby instrument cluster under the right DDI is an analog RWR display. It displays the same as the EW format, except additional indications will show as a single letter for the DIS KNOB and pushbutton display settings. A "B" is displayed in the case of a failure and a "T" is displayed in the case of a thermal overheat of the RWR or countermeasures computer. Emitter category symbols are also not shown on this display.
RWR Annunciator Panel
Above the right DDI is a set of lights indicating what type of emitters is in the lethal or critical band: surface to air missile (SAM), anti aircraft artillery (AAA), airborne intercept (AI), and continuous wave radar (CW).
Audio Tones
Accompanying the RWR are various audio feedback tones:
- Single Beep: A new ground- or sea-based emitter has been detected.
- Double Beep: A new airborne emitter has been detected.
- Repeating Beep: An emitter is tracking.
- Faster Repeating Beep: An emitter is guiding a missile or is a missile.
On the left console audio panel, the RWR knob will control the volume of the RWR tones.
Emitter Identifiers
| Type | RWR ID | Type | RWR ID | Type | RWR ID |
|---|---|---|---|---|---|
| U | Unknown | M | Active radar-homing missile | S | Search radar |
| T | Air traffic control radar | 3 | SA-3 "Goa" | 6 | SA-6 "Gainful" |
| 8 | SA-8 "Gecko" | 10 | SA-10 "Grumble" | 11 | SA-11 "Gadfly" |
| 11 | F-111 Aardvark | 12 | SA-12 "Gladiator" | 13 | SA-13 "Gopher" |
| 13 | C-130 Hercules | 14 | F-14 Tomcat | 15 | F-15 Eagle |
| 15 | SA-15 "Gauntlet" | 16 | F-16 Fighting Falcon | 17 | C-17 Globemaster III |
| 18 | F/A-18 Hornet | 19 | MiG-19 "Farmer" | 21 | MiG-21 "Fishbed" |
| 22 | Tu-22 "Blinder" | 23 | MiG-23 "Flogger" | 24 | Su-24 "Fencer" |
| 25 | MiG-25 "Foxbat" | 29 | MiG-29 "Fulcrum" | 29 | Su-27 "Flanker" |
| 29 | Su-33 "Flanker-D" | 30 | Su-30 "Flanker-C" | 31 | MiG-31 "Foxhound" |
| 34 | Su-34 "Fullback" | 39 | Su-25M "Frogfoot" | 40 | Spruance-class destroyer |
| 48 | Nimitz-class carrier | 49 | Oliver Hazard Perry-class frigate | 52 | B-52 Stratofortress |
| 76 | IL-76 "Candid" | 78 | IL-78 "Midas" | AN | AN-26B "Curl" |
| AN | AN-30M "Clank" | B1 | B-1 Lancer | BE | Tu-95 "Bear" |
| BE | Tu-142 "Bear F/J" | BF | Tu-22 "Backfire" | BJ | Tu-160 "Blackjack" |
| E2 | E-2 Hawkeye | E3 | E-3 Sentry | F4 | F-4 Phantom |
| F-5 | F-5 Tiger | HX | Ka-27 "Helix" | KC | KC-135 Stratotanker |
| KJ | KJ-2000 "Mainring" | M2 | Mirage 2000 | S3 | S-3 Viking |
| SH | SH-60 Seahawk | HK | MIM-23 Hawk | PT | MIM-104 Patriot |
ALE-47 CMDS
The ALE-47 Countermeasure Dispense System (CMDS) controls the release of the F/A-18's chaff, flares, and decoys. It is configured via the Electronic Warfare (EW) format. For the ALE-47 to release any countermeasures, the master arm must be set to ARM.
Cockpit Controls
Located below the AMPCD is the dispenser switch, which controls power to the ALE-47. It has three positions:
- OFF: The ALE-47 is off.
- ON: The ALE-47 is powered on. It runs a built in test (BIT) before going to standby mode.
- BYPASS: The ALE-47 is powered on and put into bypass mode, allowing for direct countermeasure control. In bypass mode, the dispense switch on the throttle will release a single chaff when pushed forward and a single flare when pushed aft.
Additionally there is the "ECM JETT" button, which will dispense all flares as quickly as possible in an emergency. This is not intended for actual use as a countermeasure dispense option, but to reduce the risk of fire when the aircraft is damaged.
On the left wall there is a red "DISP" button, which will release all countermeasures over time. It is slower than the ECM JETT button and can be effective as a countermeasure option.
ALE-47 EW Format Options
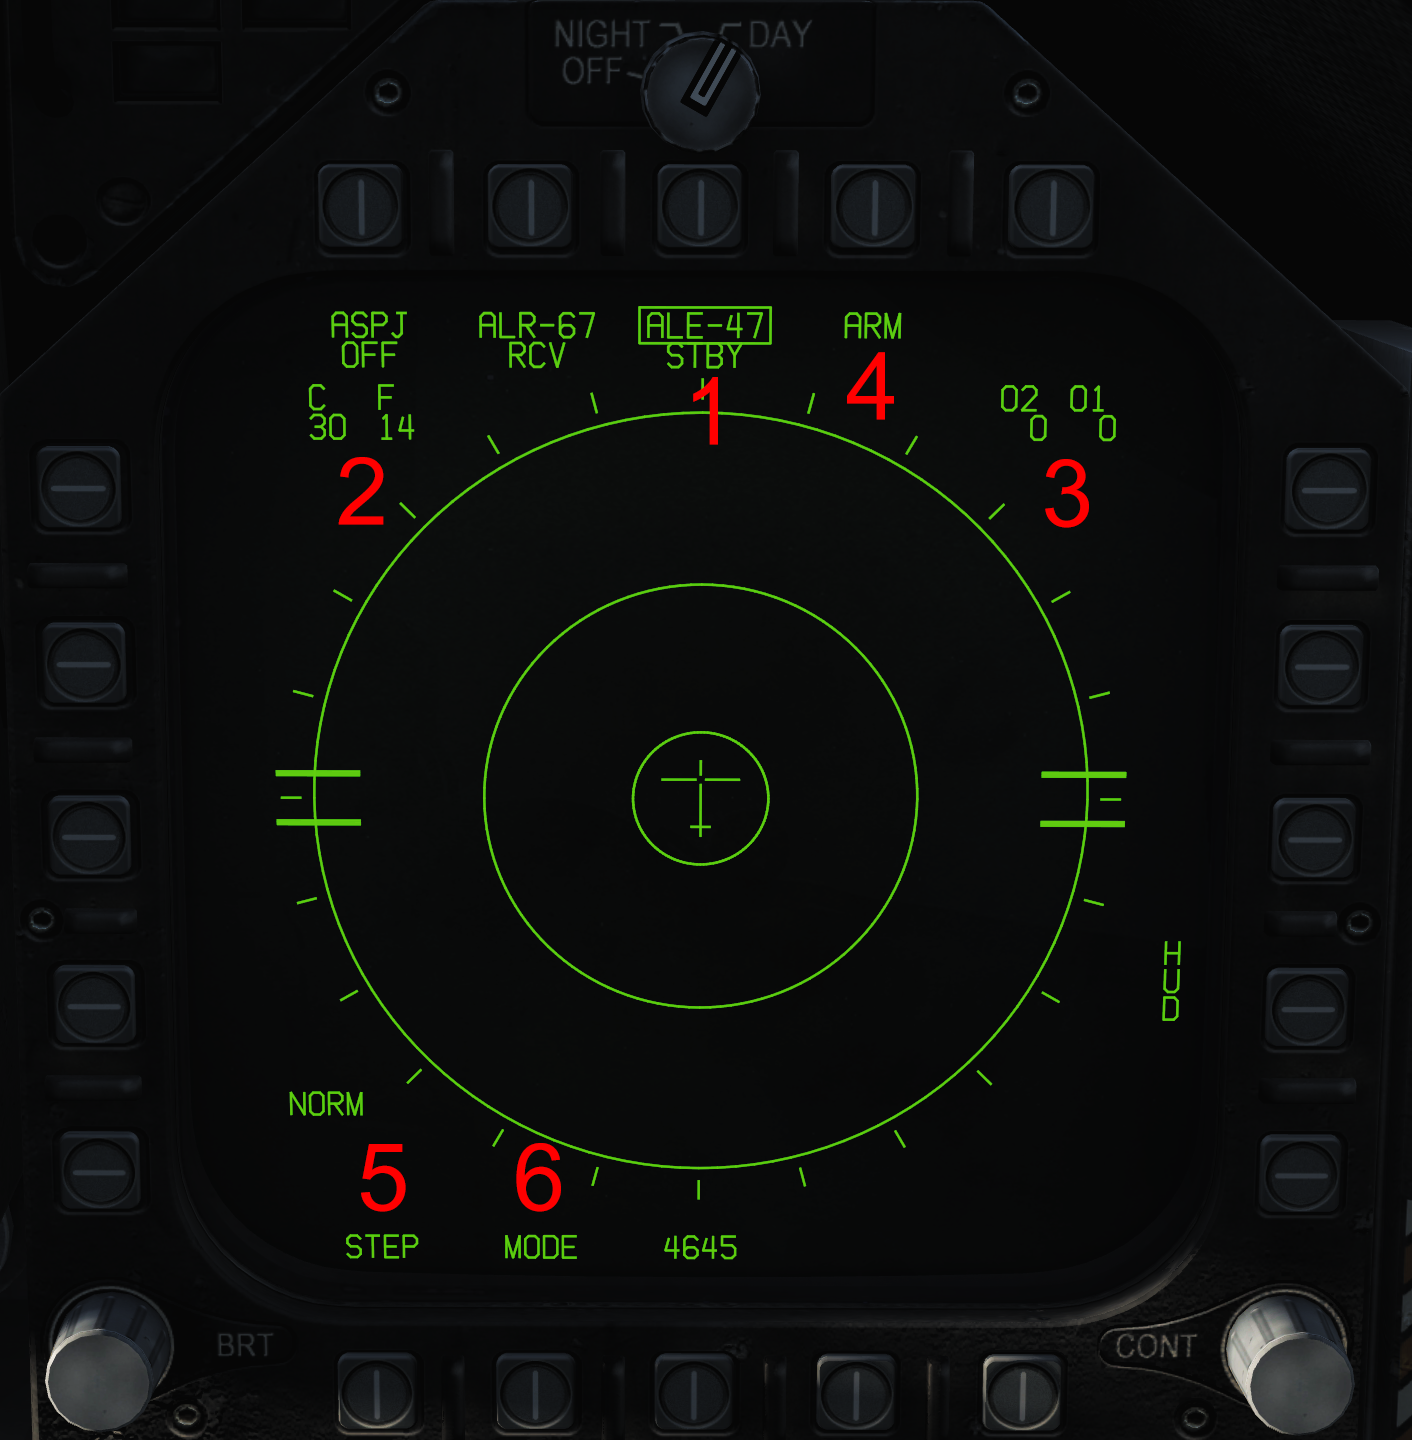
The ALE-47 is primarily manipulated via the Electronic Warfare (EW) format. These options are only displayed when the ALE-47 option is boxed, except the mode option.
- ALE-47 Status - When the ALE-47 is off, this is crossed out and displays "OFF" below. When it is running its BIT, it will display "SF TEST" and then "PBIT GO" or "NO GO" depending on the result. When it is on and not running its BIT, it will display its mode: STBY, MAN and the current profile, S/A, or AUTO. When the ALE-47 is in bypass mode, a single line will run through the ALE-47 option. Boxing the ALE-47 option brings up all related options on the format.
- Chaff and Flare Count - Only displayed when the dispense switch is ON.
- Decoy Count - Only displayed when the dispense switch is ON.
- ARM Sublevel - Displays the ARM sublevel, allowing for the customization of the five countermeasure profiles. Allows for flare, chaff, O1, and O2 count, and number of times to repeat and interval in seconds to do so. Pressing the "SAVE" option is required.
- Step - Cycles the selected manual mode profile.
- Mode - Cycles the ALE-47 mode.
Modes
The ALE-47 has multiple modes of countermeasure dispensing:
- STBY: Standby mode. The system is powered on but will dispense no countermeasures.
- MAN: Manual profile mode. Dispenser switch on the throttle aft will activate the selected profile. Forward will activate profile 5.
- S/A: Not yet implemented.
- AUTO: Not yet implemented.
Saving ALE-47 Profiles
Countermeasure profiles can be configured and then saved so that they are default whenever starting the DCS F/A-18.
Editing Default Profiles
Please note that you can also edit your countermeasures outside of the game; normally if you close the game down you lose the editing to your countermeasure profiles that you have done in game. If you find you have a particular setup that you would like to keep (forever), rather than the default setup that comes in the F18, you can edit the .lua file and change the defaults to suit your preference. For example, we can tone down the amount of countermeasures used, so that we have more time we can use the countermeasure profile before you run out of flares / chaff (but it could make the profile overall less useful).
To edit a .lua file we are first going to need an adequate text editor; although you may be familiar with using notepad, I would instead recommend installing and using notepad++. The reason for using notepad++ is that the normal notepad does not respect the original file structure (so basically, newlines / enters as well as spacing) in some cases, and as such the file may become unusable if you try to edit and save the file this way. Notepad++ instead keeps the original file structure intact.
The file we wish to edit is the CMDS_ALE47.lua file; but before you start editing it please make a backup of it first. This file can be found in the path
(\Eagle Dynamics\DCS World OpenBeta ) \Mods\aircraft\FA-18C\Cockpit\Scripts\TEWS\device
Once you have made a backup file of the original .lua file, we can start editing it as we see fit. Please note that we do not want to edit anything besides the numbers, as editing anything else the file unusable. Technically, you should be able to rename the comments (ie the text following the double hyphens -- Default manual presets), but I would simply refrain from doing so and only edit the actual profile.
The profiles we are interested in (potentially) editing are manual profiles 1 through 6 (you could edit the auto presets as well, but I find it less useful). Please note that the following profiles can be accessed directly in the cockpit correspond to the following:
(manual) Program 1 is CMS aft (Countermeasures aft).
(manual) Program 5 is CMS forward (Countermeasures forward).
(manual) Program 6 is DISP button (Big Friendly Dispenser button on the left side of the cockpit).
Now onto the actual formatting of a countermeasure profile; note that they all function the same, but they all work for different profile. Let's take manual profile 1 as an example:
-- MAN 1
programs[ProgramNames.MAN_1] = {}
programs[ProgramNames.MAN_1]["chaff"] = 1
programs[ProgramNames.MAN_1]["flare"] = 1
programs[ProgramNames.MAN_1]["intv"]  = 1.0
programs[ProgramNames.MAN_1]["cycle"] = 10
The ProgramNames.MAN_1 refers to the fact this is the first manual profile (ProgramNames.MAN_2 being the second manual profile, and ProgramNames.AUTO_1 being the first auto profile; though again we probably do not want to edit those).
The chaff and flare values refer to how much flare and chaff is dispensed, but this is the amount dispensed per cycle and not the total amount dispensed. For our example (manual profile 1) we have 1 flare and 1 chaff dispensed per cycle, but we have a total of 10 cycles (cycle = 10). This means that the profile runs for 10 cycles total, during each cycle dispensing 1 chaff and 1 flare (thus expending a grand total of 10 chaff and 10 flares). The interval (intv) value is the time delay in seconds between each cycle; as in our example profile it is set to 1 (1.0), we have a profile that runs for 10 seconds, each second expending a chaff and a flare.
Overall that seems rather wasteful to me, so lets come up with a more sensible and conservative profile (but perhaps less effective) so that we can enjoy our countermeasures a bit longer:
-- MAN 1
programs[ProgramNames.MAN_1] = {}
programs[ProgramNames.MAN_1]["chaff"] = 0
programs[ProgramNames.MAN_1]["flare"] = 1
programs[ProgramNames.MAN_1]["intv"]  = 0.8
programs[ProgramNames.MAN_1]["cycle"] = 5
As you may have noticed nearly all manual profiles expend both chaff and flare at the same time, which I absolutely hate: you are almost never in the situation where you are being engaged by both radar-guided missiles and infrared seeking missiles, so I prefer to split my countermeasure profiles accordingly. In my revised profile I run the profile for 4 seconds total: each cycle lasts 0.8 seconds, and during a cycle I only dispense a singular flare.
Saving Edited Profiles
Now, our last thing we have to realise is that although this profile is saved from deletion if we open and close our game (or hop into a brand new F-18), it will be deleted once DCS updates. However, we can save it from being deleted, by making it into a mod (modification)! To do this we will need yet another tool, called OVGME: this is a tool that many people who wish to mod their game use to, well, mod their game.
The installation of OVGME is largely self-guiding (but there will be tutorials for it), but the gist is that we end up with a profile folder and a mod folder for DCS. The profile tells OVGME which game we wish to mod, where to find this game and where the folder is that we are going to store our mods in. The mod folder is where we store our mods that we wish to use.
So if we wish to save our edited countermeasures profile, all we have to do is make a new mod for it! In the OVGME DCS mods folder you have made, we wish to recreate the folder structure pointing to our CMDS_ALE47.lua file. This has to be done with the DCS World (Openbeta) folder as our begin folder (or root); all these folders will be empty, except for the last folder, as in there we will place our edited CMDS_ALE47.lua file.
The first folder we will make in the DCS mod folder is the mod folder itself, so I recommend naming it something like "Nanne118's totally awesome countermeasure mod for the F18" or something equally easy to remember. Now all we do is replicate the folder structure until we get to the CMDS_ALE47.lua file location: we do not have to copy in every file, as OVGME is smart enough to only replace the actual files in the mod. Equally you do not want to just copy over the existing folder structure from the DCS World install location, as you will be copying over all the files as well. You could delete all the files, but that would be a whole lot more work.
The folder structure we want to make, with all empty folders, is:
\Mods\aircraft\FA-18C\Cockpit\Scripts\TEWS\device
In the device folder we then paste our modified CMDS_ALE47.lua folder, so that we can get OVGME to overwrite it. The only thing we then have to change is that we have to enable our mod within OVGME itself, so start up the OVMGE.EXE, click the mod, and enable the selected mod.
AN/ALQ-165 ASPJ
Not yet implemented.
Litening II Targeting Pod
The F/A-18 can carry the AN/AAQ-28 Litening II targeting pod. This pod consists of a Forward-Looking Infrared (FLIR) camera (which also includes a digital charged coupled device camera) for target locating and observing, a Laser Target Designator/Ranger for firing a laser that both designates targets for laser-homing weapons and gathers ranging information for designating whatever the FLIR is pointed at as an air-to-ground TGT, and a Laser Spot Tracker (LST) which can search for and track a laser, allowing for the FLIR to be cued onto an offboard (ground or air-designated) laser from another unit and then designate a Target off said point; this allows for most effective buddy-lasing. The targeting pod can be used in both air-to-ground and air-to-air functions, but the LTD/R and LST are only used for A/G operation.
The targeting pod can be mounted on station 5 and is indicated in the Stores Management System as "FLIR". The targeting pod is interfaced with via the FLIR format, available on the TAC menu whenever the FLIR is powered. From the right console, the targeting pod components are controlled by three switches:
- FLIR
- ON: FLIR is powered and operating.
- STBY: FLIR is powered but in standby. It cannot be used and video is not supplied to the FLIR format. On initial power up (when placed in STBY or ON), the FLIR format will read "NOT TIMED OUT" while the FLIR is initializing.
- OFF: FLIR is off.
- LTD/R
- ARM: LTD/R is powered and armed (laser can be fired). The LTD/R cannot be set to ARM outside of the A/G master mode. When set to ARM, the LTD/R can be used and the appropriate options are displayed on the FLIR format.
- SAFE: LTD/R is powered but cannot be fired. No options are presented on the FLIR format.
- AFT: LTD/R is off.
- LST/NFLIR
- ON: LST is powered. This switch is so-named because of the additional functionality with the Navigation FLIR when instead using the ATFLIR targeting pod.
- OFF: LST is off.
A/G FLIR Format
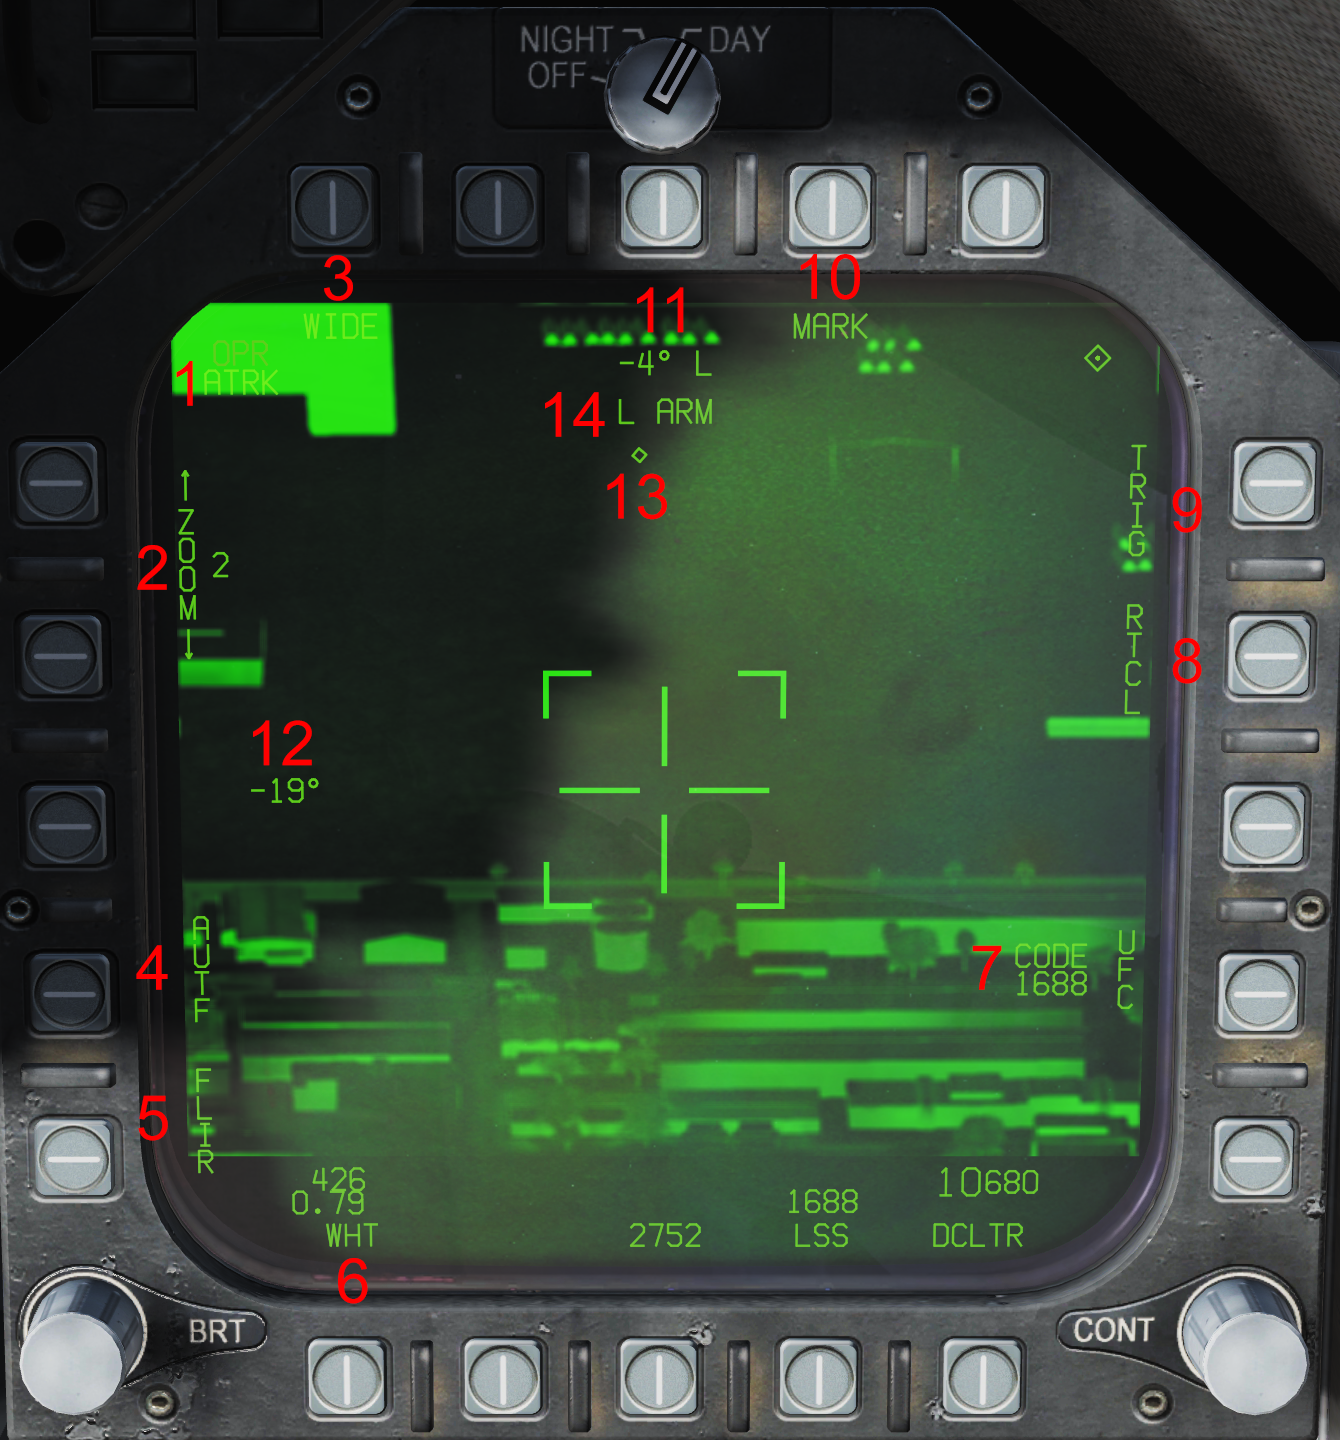
The A/G Forward-Looking Infrared Format is available on the TAC menu whenever the FLIR is powered and the aircraft is in the NAV or A/G master mode. It provides interfacing with all Litening II components for air-to-ground employment.
Universally this format consists of the following:
- Ready or not ready status in the upper-left (crossed "RDY" or "RDY")
- Indicated airspeed in the bottom left, with knots above and the Mach number below
- Altitude (the same as displayed on the HUD) in feet in the bottom right
- A declutter (DCLTR) option in the bottom right to hide the speed and altitude indications
FLIR and LTD/R
The FLIR is in its boresight position at 0° left/right and -5° down. At any time the FLIR can be reset to its boresight via the Cage/Uncage button.
The camera is pointed via the Throttle Designator Controller. The FLIR has two pointing modes: "Area Track" (ATRK) and "Point Track" (PTRK). These are toggled between via 'bumping' the Sensor Control Switch toward the FLIR format (left/right/down) with the TDC already assigned. In ATRK, the FLIR is space-stabilized to the coordinates the reticle was last placed on. In PTRK, the FLIR is space-stabilized to whatever physical thing the reticle was last placed on. In practical terms, this means PTRK will follow a moving target while ATRK will not.
The LTD/R is operated with the trigger. It can only be fired with the TRIG option selected. The LTD/R fires at wherever the FLIR reticle is pointed for as long as the trigger is depressed. The LTD/R also has a night vision infrared marker function, fired whenever the option is selected and the laser is.
Wherever the FLIR reticle is pointed, an A/G TGT can be designated at that location via TDC depress. The designation remains in place if the FLIR is pointed elsewhere. As with any TGT, the Undesignate button will remove this designation with TDC assigned to the FLIR, HUD, or any other designating format.
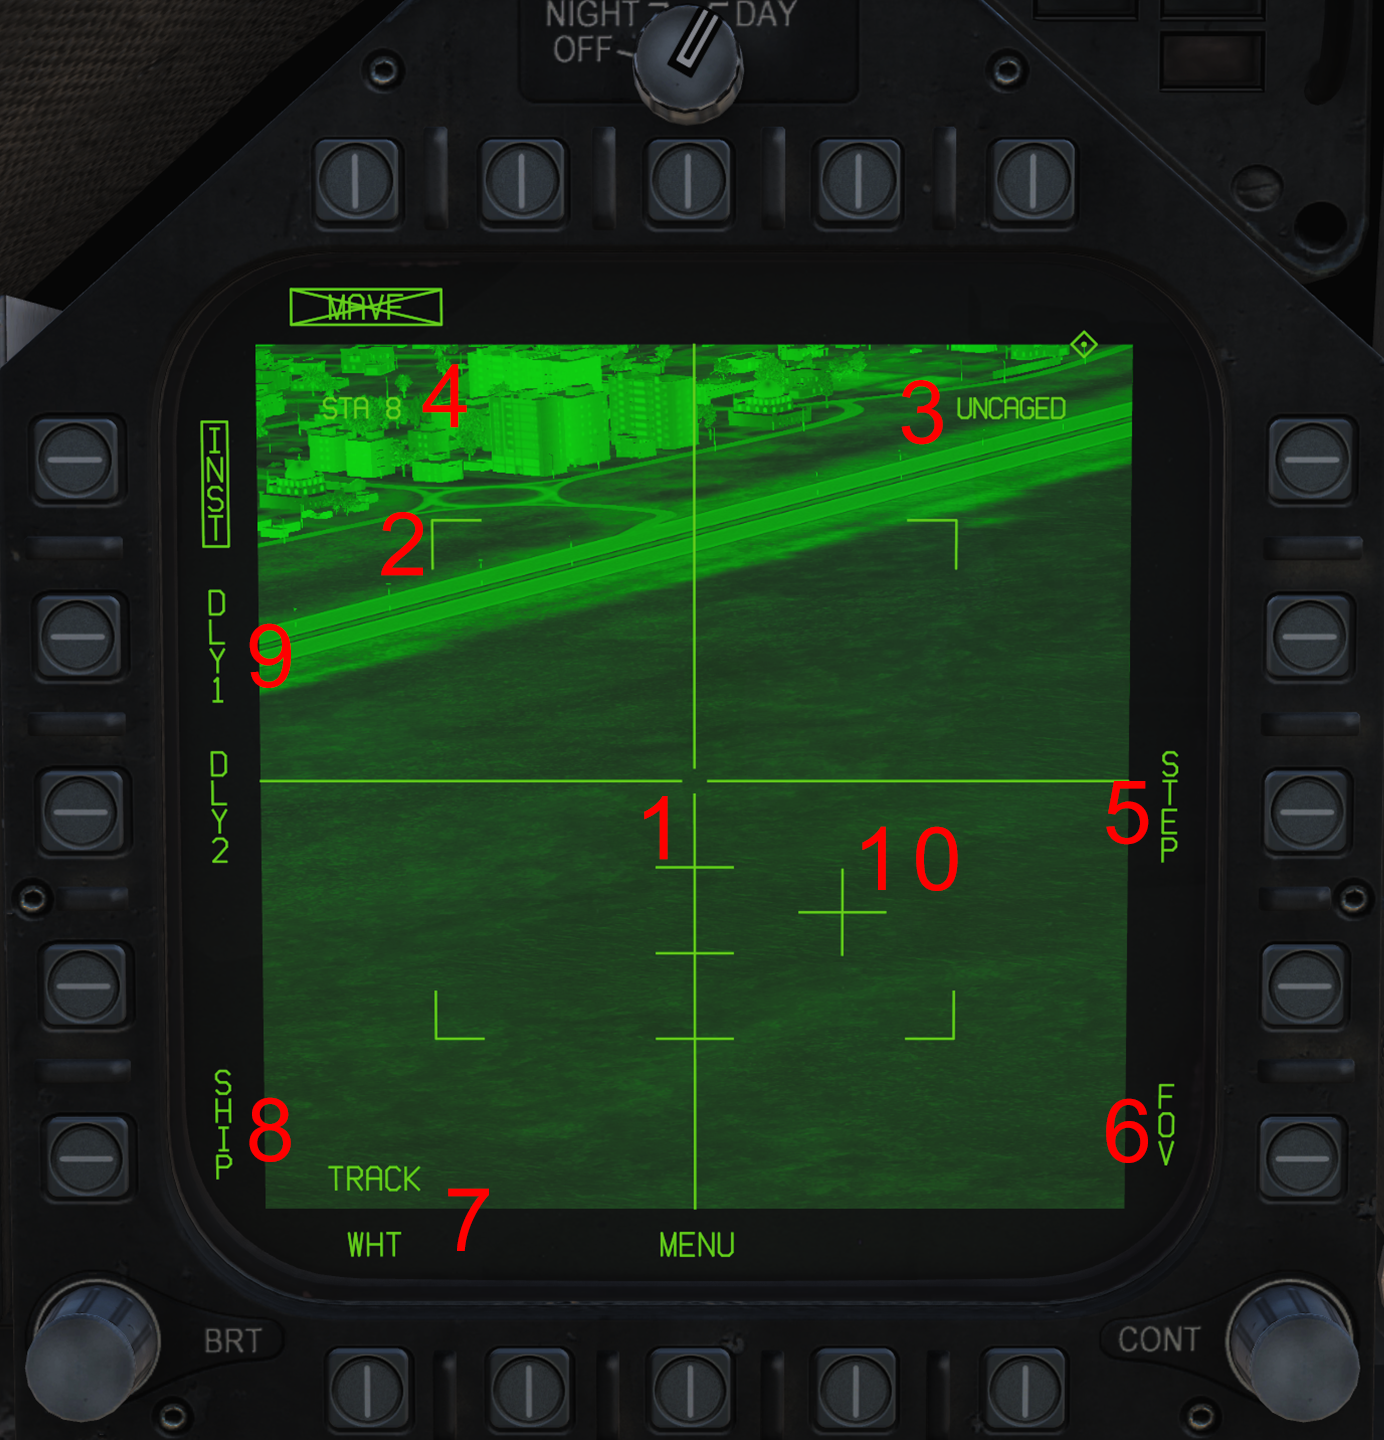
- Pointing Mode
- Zoom - FLIR zoom with level from 1 to 9 and arrows to decrease/increase it. With TDC assigned to the FLIR format, the Radar Elevation Control wheel can be used to control the zoom.
- Field of View - WIDE and NARROW FLIR field of view (FOV) options. The option displayed is the current one. This can also be switched by pressing the FLIR FOV button for less than 0.8 seconds when the MAV, MAVF, or HARM is not selected.
- Not yet implemented.
- Video Mode - Toggles the FLIR between FLIR and digital charge coupled device (CCD) video. This option displays the currently selected mode. FLIR/CCD can be switched by pressing the FLIR FOV button for more than 0.8 seconds when the MAV, MAVF, or HARM is not selected.
- FLIR Polarity - In WHT hot, white (on the DDIs, green) objects are higher temperature objects. In BLK hot, black objects are higher temperature objects. This displays the current selected option and is only available in FLIR video mode.
- LTD/R Code and UFC - Current LTD/R laser code and UFC option. The UFC option will present the LTDC (LTD/R code) option and allow for the desired laser code to be entered that the LTD/R will fire.
- Not yet implemented.
- Manual Lasing - When the trigger (TRIG) option is boxed, the LTD/R can be fired manually via the trigger. Whenever this is boxed, the A/G gun cannot be selected and its option is removed from the STORES format.
- Infrared Marker - This also boxes the TRIG option. When the MARK option is boxed, an infrared marker (visible with night vision goggles) is fired in tandem with the laser. This allows for a visualization of the laser.
- FLIR Azimuth - Left/right position of the FLIR relative to the aircraft boresight in degrees.
- FLIR Elevation - Up/down position of the FLIR relative to the aircraft boresight in degrees, where a negative number is below the boresight.
- FLIR Reticle - The corners are removed in narrow FOV as an indication. The corners are removed and the four lines are lengthened when the FLIR is slaved to boresight via the Cage/Uncage button. When in PTRK, a square is added in the center.
- FLIR Position - A diamond indicating the FLIR position relative to the FLIR body. In this indication, when the diamond is over the FLIR reticle, it is pointed directly down relative to the physical targeting pod.
- LTD/R Status
- LTD/R: Laser is firing.
- L ARM: LTD/R is armed and can be fired.
LST
The Laser Spot Tracker (LST) is operated via the FLIR format's "LSS" (Laser Spot Search) option. When pressed, the FLIR image freezes and the LST searches for a laser source of the code set via the "UFC" option (and within, LST code [LSTC]); the laser code set is displayed above the LSS option. LSS is boxed during this process and can be cancelled by pressing it again. If/when the LST finds a laser, it slaves the FLIR to said laser and the LSS option becomes "LST". The FLIR reticle is drastically lengthened. The FLIR can be moved by unboxing "LST", which is also accomplished by returning the FLIR to boresight with the Cage/Uncage button.
A/A FLIR Format
Not yet implemented.
Air-to-Ground Radar
Not yet implemented.
Air-to-Air Radar
The F/A-18C Hornet is equipped with the AN/APG-73 Doppler radar. This section will cover its air-to-air capabilities. The Hornet's air-to-air radar can be interfaced via the Attack Radar (RDR ATTK) format and the Azimuth/Elevation (AZ/EL) format (the latter is not implemented at this time). Trackfiles can also be shown on the Situational Awareness (SA) format.
The radar itself is controlled by a knob on the right console. It has 4 positions:
- OFF: The radar is powered off.
- STBY: The radar is powered on but not scanning.
- OPR: The radar is powered on and scanning, and will power off in the event of a failsafe being triggered.
- PULL EMERG: The radar is powered on and scanning, and will not power off for any reason except physical failure.
When there is weight on wheels (WoW), the radar will not scan, regardless of knob position.
The AN/APG-73 is physically mounted in the nose of the aircraft. It is on an all-direction gimbal, meaning it can rotate left, right, up, and down. Whenever in a normal search mode, the radar stabilizes itself in pitch relative to the horizon; however, this is augmented based on the antenna elevation setting.
MSI Trackfiles
Multi-Sensor Integration (MSI) trackfiles, or just "trackfiles" or "tracks", are single aircraft with information assigned by the computer (such as speed, position, velocity, aircraft identification, and threat ranking). Trackfiles are presented across the avionics as HAFU symbols.
Trackfiles can be contributed to by the ownship radar, termed onboard tracks, or from datalink, termed offboard tracks. A trackfile may be only one or the other, or both. Onboard/offboard trackfiles are correlated and displayed as one, hence "Multi-Sensor Integration" (MSI).
Whenever the radar is operating in RWS, TWS, or STT, it creates a trackfile for each raw hit detected. A maximum of 10 onboard trackfiles be maintained at one time: this will be the top 8 tracks, plus the Launch & Steering and Secondary Designated Target, if any.
Based on last-scanned velocity and speed parameters, the radar continuously extrapolates the trackfile's current position. A trackfile will dim when its last associated has not been re-detected and the trackfile will be dropped when the hit is removed in accordance with the aging setting. When a trackfile is dropped, its contribution to datalink is as well.
Over datalink, the aircraft may receive offboard trackfile information over the Link-16 network - either via the Fighter-to-Fighter (F/F), Surveillance (SURV), or Precise Participant Location and Identification (PPLI) groups. F/F and SURV provides tracks generated from the radars of fighter and airborne warning and control system (AWACS) aircraft, while PPLI provides trackfile information on the friendly aircraft itself that is broadcasting.
L&S/DT2 Designation
Onboard trackfiles can be designated by the pilot to receive steering and weapons employment cues.
The Launch & Steering trackfile, or L&S, is the trackfile which weapons will be guided against. The line of sight to the L&S is superimposed on the HUD/HMD, termed the target designator (TD) box, so as to visualize its position in space. With an A/A weapon selected, launch range parameters are displayed on the Attack Radar format and on the HUD/HMD. See the relevant section on A/A weapons for detailed weapon employment information. The L&S is indicated by a star HAFU symbol.
Another trackfile can also be designated, called the Secondary Designated Target (DT2). This trackfile has a target designator 'X' on the HUD. On the Attack Radar format, launch range parameters are shown for the DT2, although weapons are only guided onto the current L&S. A diamond on the HAFU symbol indicates the DT2.
For a Launch & Steering or Secondary Designated Target trackfile to be designated, the TDC cursor or the Undesignate button is used.
- Designation via TDC - To designate via the TDC, the desired contact is placed under the cursor and the TDC is depressed.
- no L&S/DT2 exists: a trackfile will be made the L&S
- only L&S exists: a trackfile other than the L&S will be made the DT2
- L&S/DT2 both exist: a trackfile other than the L&S or DT2 will be made the DT2 and replace the old one
- L&S/DT2 both exist: the DT2 will be made the L&S and the old L&S will be made the DT2
- Note that TDC depress on the L&S will initiate Single Target Track.
- Designation via Undesignate Button - Designation can be accomplished by pressing the Undesignate button (the Undesignate button is indeed performing a designate function).
- no L&S/DT2 exist: the highest-ranked trackfile will be made the L&S
- only L&S exists: the L&S designation will be cycled through each trackfile by rank if the button is pressed in less than 4 second intervals, otherwise the highest-ranked trackfile is designated the L&S
- L&S/DT2 both exist: the L&S/DT2 designations will be swapped
Whenever the L&S trackfile is lost, the DT2 becomes the L&S. Additionally, the highest ranked trackfile is made the L&S whenever TWS is entered and no L&S exists at all.
The RSET option on the RDR ATTK format will remove the L&S and DT2 designations (except not the L&S in STT or TWS).
HAFU
Hostile, Ambiguous, Friendly or Unknown (HAFU) is a symbology system used by the F/A-18 to represent trackfiles; specifically, to show its status as a friendly or hostile. It is usually what trackfiles are displayed as across the software.
There are four HAFU symbols:
- Triangle: Hostile (red when colored)
- Thick Staple: Ambiguous (yellow when colored)
- Half-Circle: Friendly (green when colored)
- Thin Staple: Unknown (yellow when colored)
All types except ambiguous can be manually assigned via the Situational Awareness format. Tracks will also be automatically identified as explained below.
A hostile HAFU will be assigned whenever:
- A negative IFF response is returned, and
- An NCTR print returns with an aircraft type that is on the hostile coalition; or
- A SURV (surveillance, like an AWACS) source over datalink also marks it hostile; or
- A F/F (fighter-fighter, like another F/A-18) source over datalink also marks it hostile.
An ambiguous HAFU will be assigned when the aircraft and a donor have conflicting identifications (friendly and hostile).
A friendly HAFU will be assigned whenever an IFF interrogation returns as friendly or the track itself is contributed to by the Precise Participant Location and Identification (PPLI) system.
An unknown HAFU will be assigned by default until it is updated by meeting one of the requirements above.
Other symbols may also appear, normally in the center of HAFU symbols. In order of priority, these are:
- L&S Star - Indicates the track is the current Launch & Steering (L&S) target.
- DT2 Diamond - Indicates the track is the current Secondary Designated Target (DT2).
- Rank - The trackfile's 'numerical rank' with respect to its ability to pose a threat (1 is most threatening), based off numerous factors regarding their position relative to the aircraft.
- SURV Donor Dot - A large dot indicates a surveillance (SURV) donor; note that this dot is technically received from PPLI rather than SURV, but indicates one is a SURV donor.
- F/F Dot - A small dot indicates that a fighter-fighter (F/F) donor's radar is contributing to the trackfile. This is not shown for PPLI tracks.
- F/F Donor Dot - A large dot on the left side indicates an F/F donor (i.e. an aircraft contributing to F/F, not one detected by an F/F donor).
On the Attack Radar and Situational Awareness formats, which are displayed in a top-down manner, HAFU symbols feature a line indicating the trackfile's horizontal velocity.
HAFU symbols have two halves: the top, which regards the onboard identification/contribution, and the bottom, which regards the offboard (datalink) identification/contribution. The top of the HAFU will be as illustrated while the bottom portion will be upside-down; the symbols may differ, but the color will be based on the top portion except if it is an offboard-only track.
- A track will have the top half occupied if contributed to by the onboard radar or manually assigned identification with the SA format.
- A track will have the bottom half occupied if contributed to only or in part by an F/F source or if in part by SURV.
- A track will have both the top and bottom half occupied and be smaller in size if contributed to only by SURV or in any way by PPLI. When a SURV-only trackfile is lost, it flashes for 6 seconds before disappearing.
The F/F-only symbology will be prioritized over the SURV-only symbology.
RDR ATTK Format
The Attack Radar (RDR ATTK) format is the primary way of manipulating the A/A radar. It can be accessed from the TAC menu but not on the AMPCD. It is also brought up automatically on the right DDI whenever the A/A master mode is engaged.
The format provides a top-down view of the radar scope, termed the "tactical region" and indicated by the green outline around the format. The airplane itself is at the very bottom center in a "B-scope projection;" this means the radar's cone-shaped view is morphed into the rectangular display of the Attack Radar format.
While the scan azimuth may be less, the tactical region itself displays 70° left and right of the aircraft. A separated part at the top displays hits/tracks for which the aircraft has no range information, termed "dugout" zone. Depending on the mode and setting, the Attack Radar will display either raw hits and/or trackfiles.
The tactical region is comprised of tick marks along the sides; the top and bottom ticks indicate 30° azimuth each (with the distance between the farthest left/right tick and the tactical region border being 10° to total 70° left and right of the aircraft). The left and right side ticks indicate 25% of the selected range scale (e.g. with 80nm, one tick is 20nm) except when 5nm or 10nm is selected, in which case they indicate 20% of the range scale.
The following are the common options available on the Attack Radar format regardless of the primary search mode of either RWS, TWS, or VS.
- Search Mode - This indicates the current search mode of either RWS, TWS, or VS. Selecting the option will cycle the search modes.
- Radar Operating Status and Frequency - The current radar status relative to the physical radar knob (top) and current radar frequency (bottom).
- Elevation Bar - The radar is capable of scanning in multiple elevations automatically below the manually designated elevation; this moves the radar elevation automatically in "bars". The first number indicates how many bars it is set to and the number after indicates the bar it is currently on. The first bar is always where the elevation has been manually set. The available settings are 1, 2, 4, and 6.
- SIL Mode - Selecting this option stops the radar from searching and invokes the "SIL" sublevel, placing the radar in Silent (SIL) mode.
- Maximum Range Scale and Range Arrows - The current maximum range scale in nautical miles displayed and (below) buttons to decrease/increase it. This is only what is displayed; the radar will always scan as far as it can. The available options are 5, 10, 20, 40, 80, and 160nm. The range scale is automatically adjusted to keep the L&S or DT2, whichever is farthest, on the screen within 40% and 90% of the previously manually selected range scale. The range scale is only automatically adjusted up, except in STT, which will adjust both up and down. Manual range scale adjustment is inhibited in STT.
- Minimum Range Scale - The lowest range the radar is currently displaying. This is normally 0, except when using the SCAN RAID or EXP functions.
- Radar Gain
- RSET Function - The RSET function:
- Removes the DT2 and resets the L&S to the highest ranked track. In RWS, the L&S is removed.
- Exits TWS EXP and SCAN RAID modes
- Exits TWS BIAS centering mode (enters MAN)
- NCTR - When selected, performs a non-cooperative target recognition (NCTR) scan when a target is put in Single Target Track. NCTR detects the way the fanblades of the aircraft warp the radar waves, and from this "print" can determine its aircraft type. NCTR requires an angle of about 30° nose-on-nose or nose-on-tail. The NCTR result is displayed on the Situational Awareness format.
- DATA Sublevel
- Not yet implemented.
- Scan Azimuth Setting - This is indicated in degrees total left and right (20° is 10° to the left and right). The options are 20°, 40°, 60°, 80°, and 140°.
- Not yet implemented.
- Pulse Repetition Frequency (PRF) - The PRF is the number of pulses the radar makes within a certain amount of time. Cycles between medium (MED), high (HI), and interleaved (INTL). MED has less range but can see targets at all aspects better. HI provides higher detection range. INTL alternates between MED and HI each scan. When the range scale is set to 5nm, only MED is available.
- Not yet implemented.
- A/A Waypoint - The A/A waypoint or "bullseye" is indicated here by this symbol, with the arrow pointing north. If the A/A waypoint is also the currently selected waypoint, the circle becomes a diamond.
- A/A Waypoint-Aircraft BRA - Bearing and range from the A/A waypoint to the aircraft.
- Aircraft-TDC BRA - Bearing and range from the aircraft to the TDC cursor.
- A/A Waypoint-TDC BRA - Bearing and range from the A/A waypoint to the TDC cursor.
- Aircraft True Heading
- A/A Weapon Indication - The currently selected air-to-air weapon and total quantity (A/A master mode only).
- Throttle Designator Controller (TDC) Cursor - The TDC cursor on this format has multiple functions. Above and below the cursor is displayed the maximum (above) and minimum (below) altitude, in thousands of feet, at which the radar can currently see (adding all elevation bars) at the location in space the TDC is placed. This is only shown when the cursor is within the tactical region.
- B-Sweep - Vertical bar indicating where the radar is currently scanning.
- Antenna Elevation - The current antenna elevation relative to the horizon, allowing the radar to scan higher or lower in altitude. The antenna can be moved 60° up or down; the tick marks along the scale each indicate 10°. This is manipulated via the radar elevation control wheel on the throttle. Manual control is disabled in ACM modes and STT. In STT, the indication is instead displayed relative to the boresight as opposed to the horizon.
- Aircraft Horizon Line and Vertical Velocity Vector - This velocity vector behaves like the caged velocity vector on the HUD, so there is no left/right drift.
- Aircraft Altitude
- Aircraft Airspeed and Mach
Not shown is the Surface (SURF) option, which is available in A/G and NAV master mode and will select the A/G radar modes.
Not shown is the L&S velocity (Vc), differential altitude, and ground track indications. When an L&S exists, its closure rate is displayed in knots with a visualizing caret on the right border of the tactical region. The difference in altitude between the L&S and the aircraft is displayed in thousands of feet next to the antenna elevation caret. The L&S ground track in degrees is shown in the upper left of the tactical region.
DATA Sublevel
- Latent Track While Scan - Toggles the Latent Track While Scan (LTWS) display mode for Range While Search (RWS).
- Multi-Sensor Integration - With MSI enabled, offboard trackfile information is displayed in modes where trackfiles are displayed. Otherwise, only onboard track information is displayed. MSI on the Attack format is dependent on the settings selected in the Sensor sublevel of the SA format.
- Color Option - Toggles all colored (red/yellow) elements of the RDR ATTK format.
- Not yet implemented.
- Aging Setting - Aging setting, in seconds, for raw hits. If the hit has not been seen again by the radar after this amount of time has passed, it will disappear. Bricks dim to indicate the progression of aging and un-dim when the hit is seen again.
- Declutter Options
- DCLTR1 removes the horizon line and velocity vector.
- DCLTR2 removes DCLTR1 symbology as well as the L&S closing rate, differential altitude, and ground track indications.
- BRA Toggle - Toggles the aircraft-TDC BRA indication in the bottom left of the format.
- Not yet implemented.
- Not yet implemented.
- Not yet implemented.
- RWR ATTK - If MSI is selected, this toggles display of RWR hits at the top of the Attack format. The priority four airborne RWR nails within 140° in front are displayed, indicated by yellow triangles identical to those on the SA format.
SIL Sublevel
- ACTIVE Function - This button commands the radar to complete a single scan and then stop again.
- Not yet implemented.
- SIL Mode Toggle - SIL is boxed when silent mode is activated. This will exit silent mode.
- Not yet implemented.
- Iron Cross - Cross indicating that the radar is not active. This cross will also display when there is weight on wheels or the radar is turned off via the knob, but the SIL sublevel is not invoked.
TDC Option Selection
The TDC cursor can be used outside the tactical region to select various options. The TDC cursor is hovered over the desired option and TDC depress is used the same way as an option select button would be on the DDI. For the azimuth, PRF, bar, and radar mode indications, hovering the TDC over them will display all available options instead of cycling through each.
Additionally, range can be adjusted up or down one increment by slewing the TDC outside the top or bottom of the tactical region and then back into the tactical region within 0.8 seconds.
Search Modes
Range While Search (RWS)
- Raw Hits - In RWS, raw radar "hits" are shown as green rectangular bricks. Raw hits display when the corresponding trackfile does not.
- Trackfiles - Trackfiles are shown as HAFU symbols. A trackfile is displayed in RWS when any one of these is true:
- The cursor is placed over its corresponding raw bricks
- It is designated as the L&S or DT2 trackfile
- There is an offboard element to the trackfile
- ERASE Function - The ERASE option removes all hits from memory, thus dropping onboard contribution to all trackfiles.
- SET Function - Selecting the SET function will save the current azimuth, bar, PRF, range scale, and aging setting to the currently selected A/A weapon.
The Range While Search (RWS) radar mode allows for the detection of contacts in the largest possible volume. RWS normally displays raw hits in the form of rectangular "bricks", but it also generates up to 10 trackfiles which can be displayed as Hostile, Ambiguous, Friendly, or Unknown (HAFU) symbols via the Latent Track While Scan option. AMRAAM guidance is available in RWS, although it does not provide the same scan functions as TWS.
The tactical region in RWS is presented as azimuth along the horizontal/X axis and range along the vertical/Y axis.
Latent Track While Scan (LTWS)
Latent Track While Scan (LTWS) is an RWS option that, under certain circumstances, displays detected hits as trackfiles in the form of HAFU symbols instead of raw bricks. In addition, with Multi Sensor Integration (MSI), it will display offboard trackfiles. It should be noted that LTWS is only a user interface option: "under the hood," RWS always creates trackfiles. Up to 10 trackfiles (8 regular and 2 for the L&S/DT2) are maintained, based on rank. After the 8th trackfile, no HAFUs will be available for any further bricks.
An onboard-only track is displayed whenever the TDC cursor is over the associated raw hit bricks (aka "target under cursor"/"TUC") or it is designated as the L&S or DT2. In these cases, the brick(s) will be replaced by a HAFU symbol representing the track. Note that since multiple raw radar hits may be correlated to be a single aircraft and therefor one trackfile, a HAFU may replace multiple bricks.
Offboard-only tracks and tracks that are both onboard and offboard are always displayed as HAFUs and never show their corresponding raw hits. Note that MSI must be enabled to display offboard trackfile information.
LTWS HAFU symbols, whenever under the cursor or designated as the L&S or DT2, feature the track's Mach number on the left side and its altitude in thousands of feet on the right. A line stems out to indicate the trackfile's horizontal velocity (this applies for all).
An IFF interrogation is automatically sent when a TUC is performed.
Track While Scan (TWS)
- Trackfiles - Trackfiles are displayed as HAFU symbols. The altitude in thousands of feet on the right and Mach number on the left is displayed when cursored over or designated as L&S or DT2. HAFUs are displayed most of them time in TWS, specifically whenever:
- It is one of the top 8 ranked trackfiles.
- It is an offboard-only trackfile.
- It is designated as the L&S or DT2. An L&S always exists in TWS.
- Raw Hits - Raw hits are displayed as green rectangular bricks. After 9 onboard trackfiles are processed, or up to 10 with a DT2, raw hits will begin displaying for anything detected after. The display of these raw hits can be toggled with the HITS option. Bricks can be designated with TDC depress to make them the L&S/DT2 and then will be turned into a trackfile. Bricks will automatically become trackfiles when a higher ranked trackfile is lost.
- Scan Centering - This indicates the current scan centering mode of either MAN, AUTO, or BIAS. Pressing this will toggle between MAN/AUTO.
- RAID - Commands SCAN RAID mode. Alternatively, the RAID switch on the throttle can be used. The option is boxed when active.
- HITS - Toggles the display of raw hits.
- Expand Mode - Commands Expand mode.
The Track While Scan (TWS) mode allows for trackfiles to be kept at a high update rate. To accomplish this, TWS artificially limits the scan volume (bars/azimuth) and provides for automatic scan centering. It is also optimal for providing post-launch datalink for the AIM-120 AMRAAM missile while remaining in search.
In TWS, contacts are automatically displayed as HAFU trackfile symbols if they are in the top 8 ranked or are the L&S or DT2. However, when there are more hits than the maximum amount of onboard trackfiles, TWS will display raw hits in the form of rectangular bricks. TDC depress over a brick will designate it as the L&S or DT2, as with a normal trackfile, and replace the next lowest ranked track with it. When TWS is entered without an L&S, the highest ranked track is automatically designated; an L&S always exists in TWS.
A Launch Acceptable Region indication is displayed for the L&S and DT2, and any trackfile under the cursor.
Scan Volume
| Max. Bar | Max. Azimuth |
|---|---|
| 2B | 80° |
| 4B | 40° |
| 6B | 20° |
The TWS search mode artificially limits the radar to a scan volume (i.e. bar/azimuth setting) deemed adequate for AMRAAM guidance and in general to maintain relatively up-to-date trackfiles. This limit is enforced whenever the bar setting or azimuth setting is changed; when one is set to a higher setting, if necessary the other one will be decreased automatically. For example, if an 60° azimuth is selected and the bar setting is 4B or 6B, it will be reduced to 2B. Alternatively, if a 4B bar is selected while the azimuth is 60°, then the azimuth will be reduced to 40°.
If TWS is entered from another mode and the scan volume has to be automatically decreased to comply with the limits, the bar setting will be kept (except if 1B, as explained below) and the azimuth will be decreased as necessary.
Furthermore, TWS does not ever allow for a 120° scan azimuth, nor a 1 bar setting. TWS will automatically change to 80°/2B if entered from RWS/VS with 120°/1B.
Scan Centering
In Track While Scan, multiple methods of scan centering are available to keep trackfiles in the scan volume, with respect to both elevation and azimuth. AUTO/MAN can be toggled with the option on the Attack Radar format, while BIAS is entered as described.
- MAN: Manual scan centering allows for the scan center to be set manually. The azimuth will be centered on the TDC cursor's present position. The antenna elevation can also be manually manipulated.
- AUTO: Automatic scan centering mode centers the azimuth scan on the Launch & Steering (L&S) trackfile. When the L&S is changed, or the current L&S moves, the azimuth center moves to keep it in the center. The antenna elevation is centered on the altitude of the L&S. If the L&S is lost/undesignated, MAN is automatically entered.
- BIAS: The TDC can be depressed on an empty area of the tactical region to enter bias scan centering mode. This allows for manual antenna elevation control and will center the azimuth on the point where the TDC was depressed. This allows for the TDC to be moved without the scan center following it.
EXP Mode
The TWS Expand mode (EXP) provides a zoomed-in view of the tactical region centered around the L&S trackfile. No change to the scan is made.
EXP is entered by selecting the EXP option as long as an L&S exists. If the L&S is changed while EXP is engaged, it will change to center on the new L&S. EXP is exited via selecting EXP again or via the RSET option. It is also exited if the L&S is dropped.
The EXP view is 10nm x 20°, centered on the L&S. Manual range scale adjustment is not available and the maximum/minimum range scale values on the top and bottom right of the format indicate the actual ranges shown while in EXP. The B-sweep remains "scaled" to the regular 140° view in EXP.
Trackfiles outside the EXP view are shown relative to the L&S along the border of the tactical region.
SCAN RAID Mode
SCAN RAID is a raid assessment mode. When an L&S exists, selecting the RAID option or the RAID button on the throttle will enter/exit SCAN RAID on the L&S trackfile. SCAN RAID is also exited if the RSET option or Undesignate button is pressed or the L&S is dropped.
In SCAN RAID, the radar commands a special 22° azimuth 3 bar scan centered on the L&S. Doing what is called "raid assessment," the radar will attempt to detect multiple target out of what it "thought" was a single target. This "Doppler grouping" effect can occur when targets are in extremely close proximity and have the same closure rate. SCAN RAID is purposed to combats this.
The SCAN RAID display is 22° x 10nm centered on the L&S. A Return to Search (RTS) option is displayed, as SCAN RAID entirely changes the radar operation and is not considered TWS. "SCAN RAID" is indicated in the center of the format. Additionally, the B-sweep is frozen on the azimuth, relative to the regular 140° scale, where the L&S is (not relative to the 22° SCAN RAID scale).
Raw hits are always displayed in SCAN RAID when the trackfile limit is exceeded. Trackfiles/hits outside the display are shown relative to the L&S along the border of the tactical region. The bar, azimuth, EXP, range scale, scan centering, and HITS options on the format are unavailable.
AIM-120 launches can be supported in SCAN RAID. As with any non-STT launch, an AIM-7 shot will result in automatic acquisition of the L&S into Single Target Track.
Velocity Search (VS)
Not yet implemented.
Air Combat Maneuvering (ACM) Modes
The radar's Air Combat Maneuvering (ACM) modes are search modes designed to place a target in Single Target Track at close range by acquiring it visually.
ACM mode is entered by pressing the Sensor Control Switch forward when the A/A master mode is engaged or by selecting the air-to-air gun via Weapon Select Switch aft; this places the Sensor Control Switch in "ACM condition." A boxed "ACM" indication and an option to return to search (RTS) is then displayed on the RDR ATTK page. The TDC is automatically assigned to the RDR ATTK page. For the HACQ, LHAQ, and WACQ modes, said mode is indicated on the HUD.
ACM mode can be exited via pressing the Undesignate button on the stick or via the RTS option on the RDR ATTK format; the radar returns to the last-entered search mode, except if the A/A gun is selected which will instead make the radar return to the Gun Acquisition ACM mode. If the radar is in STT, entering ACM will exit STT and exiting STT will exit STT and ACM mode; ACM mode remains engaged even when an STT is obtained.
Once in ACM mode (defaulting to BST/HACQ/LHAQ or GACQ), the following modes are available. All ACM modes place the first target detected in Single Target Track, but the ACM condition remains active.
- Boresight Acquisition (BST): Sensor Control Switch forward with HMD off.
- BST is a very small, circular scan on the aircraft nose which can be used whenever the nose can be brought onto a target. It scans in medium PRF, ±1.7° above and below the waterline, and 3.3° in azimuth, slaved to both pitch and roll. A small dashed circle on the HUD coincidental with the aircraft boresight indicates the Boresight Acquisition scan. It has a range of 10nm.
- Helmet Acquisition (HACQ): Sensor Control Switch forward with HMD on.
- Helmet Acquisition allows for the radar to be pointed wherever the head is looking, within its azimuth and elevation limits. When the HMD is looking at the HUD, it scans identically to Boresight Acquisition. When the HMD is pointed elsewhere, it maintains the scan shape but is slaved to the HMD center. When the radar scan limits are reached, the dashed circle will not move past the limits and will flash if the HMD moves farther than it can. HACQ has a range of 5nm.
- Long Helmet Acquisition (LHAQ): Sensor Control Switch forward for more than 0.8 seconds with HMD on.
- LHAQ functions identically to HACQ, except it has a range of 40nm.
- Wide Acquisition (WACQ): Sensor Control Switch left.
WACQ provides a wide, rectangular scan at 10nm range. It has two modes, toggled via the Cage/Uncage button on the throttle.- Caged: Caged WACQ commands a 60° azimuth scan, +6° and -9° relative to the waterline, with medium PRF. Caged Wide Acquisition is slaved to the aircraft in pitch but is horizon-stabilized in roll. A representation of the rectangular-shaped scan is placed in the bottom-right corner of the HUD, which provides a visualization of the roll stabilization.
- Uncaged: Not yet implemented.
- Vertical Acquisition (VACQ): Sensor Control Switch down and, when HMD is on, only from WACQ.
- VACQ is a very narrow and tall scan pattern, ideal for acquiring targets in a turn. Vertical Acquisition commands a scan of approximately 6° azimuth, -13° and +46° in elevation, and medium PRF from the aircraft waterline, slaved to both pitch and roll. A dashed rectangle on the HUD indicates the scan area. VACQ has a range of 5nm.
- Gun Acquisition (GACQ):
- GACQ is a special ACM mode entered whenever the A/A gun is selected and no other ACM mode or STT is commanded. Gun Acquisition is intended to acquire a target roughly within the HUD field of view while using the gun. GACQ commands a +6° and -14° scan from the aircraft waterline with medium PRF and 20° azimuth, slaved to pitch and roll. A dashed circle represents the scan shape on the HUD. Note that the radar is always in either ACM or STT when the gun is selected and so it cannot be commanded to return to search from GACQ.
Naturally, the Sensor Control Switch cannot be used for any other functions while in ACM condition.
Automatic Acquisition (AACQ)
Automatic Acquisition (AACQ) serves as a fast way of acquiring a track/hit into Single Target Track. It is entered via Sensor Control Switch right with the TDC already assigned to the RDR ATTK format, the A/A master mode engaged, and the radar not in an ACM mode. "AACQ" will be indicated on the upper-left border of the RDR ATTK tactical region and the HUD while it is active. The Undesignate button will exit AACQ, although this is usually only necessary when nothing at all is currently detected.
AACQ will execute a different function based on priority.
- If the cursor is over any trackfile or raw hit, AACQ acquires it into STT. This is called 'Fast Acquisition.'
- If an L&S exists and the cursor is not over a trackfile, AACQ commands STT on the L&S.
- If no L&S exists and the cursor is not over a trackfile, AACQ commands STT on the highest-ranked trackfile.
Single Target Track (STT)
Single Target Track (STT) mode is a traditional radar "lock" where the radar continuously scans a single target, resulting in a very high update rate; this makes it the primary method of providing guidance to air-to-air weapons.
STT maintains a trackfile for its target and automatically designates it as the L&S if it is not already. The radar is slaved to this trackfile; as such, manual antenna elevation control and scan azimuth setting is inhibited and the B-sweep follows the trackfile. Only the trackfile that is placed in STT as well as offboard trackfiles are visible; all onboard trackfiles are droppped. In STT, the RDR ATTK format is presented in azimuth along the horizontal axis and range along the vertical axis.
Placing a trackfile in Single Target Track is called 'acquisition.' Acquisition can be accomplished by:
- depressing the TDC while the cursor is over the Launch & Steering trackfile or while over any raw hit when in a mode where trackfiles are not displayed (e.g. RWS without LTWS selected or VS)
- using Automatic Acquisition
- using an Air Combat Maneuvering mode
It should be noted acquisition can only be initiated on an onboard trackfile.
STT is exited by pressing the Undesignate button. The radar is returned to the last-entered search mode, unless the A/A gun is selected, in which case it will return to the Gun Acquisition ACM mode.
- HAFU Symbol - Target's HAFU, with its Mach number on the left and altitude in thousands of feet on the right. Additionally displayed is the acceleration vector, perpendicular to the aspect stem, indicating observed acceleration in a different direction than previous. This is only displayed for STT.
- Allowable Steering Error (ASE) Circle
- Antenna Elevation / Differential Altitude - The caret that normally displays the current antenna elevation relative to the horizon instead displays it relative to the aircraft boresight in STT. The antenna elevation is always pointed toward the target in STT. A numbers indicates the difference in altitude, in thousands of feet, between the aircraft and the target.
- Target Closing Rate - Closing rate (Vc) with the target (this is displayed for the L&S even outside STT).
- Target Ground Track - The target's ground track in degrees is displayed here.
- Return to Search - Commands Return to Search (RTS). Displayed below is the mode that the radar will return to. This is typically the last-selected search mode. The Undesignate button on the stick also commands this.
- TWS Option - Commands the radar into Track While Scan.
Range scale is disabled in Single Target Track. The range will automatically change to keep the target centered to be vertically within 40%–90% of the tactical region.
MEM Function
The memory (MEM) function of the radar is used to re-acquire the trackfile in STT if it is lost unintentionally. If this occurs, the MEM function is initiated. The current position of the trackfile is extrapolated based on last-known parameters as it would be in RWS/TWS. If the radar locates the trackfile again, it will re-acquire it into STT. The MEM function ceases when the radar cannot re-locate the target.
When the MEM function is active, a "MEM" indication is displayed on the Attack Radar format and the L&S TD box becomes hashed.
AZ/EL Format
Not yet implemented in DCS.
L&S/DT2 HUD Indications
Whenever a Launch & Steering (L&S) target is designated, a target designator (TD) box will be superimposed over its position in space on the HUD/HMD in the form of a square for a friendly, unknown, or ambiguous designation or a diamond for a hostile designation (see HAFU). The L&S track's offboard datalink identification of hostile or friendly, if any, is indicated by the appropriate HAFU symbol (half circle or triangle) above the L&S TD box; PPLI does not apply. When the L&S TD box is not within the field of view of the HUD or HMD, it will flash and an arrow will point to it with a number indicating how many degrees off it is from the HUD or HMD center.
Whenever a Secondary Designated Target (DT2) is designated, a TD "X" is superimposed over it. When the DT2 TD X is outside the field of view of the HUD or HMD, it will flash.
The shapes are always stabilized to the physical HUD glass itself and the physical HMD, independent of the aircraft bank angle.
SA Format
The Situational Awareness (SA) format provides a top-down view of the area around the airplane. It displays trackfiles from all sources for the best possible situational awareness of airborne threats and allies. All trackfiles on the SA format are displayed as Hostile, Ambiguous, Friendly, or Unknown (HAFU) symbols.
The SA format additionally allows for offboard trackfile sources to be selectively filtered for all formats displaying tracks and provides the ability to manually classify the HAFU identification of trackfiles.
Also provided on the SA are most navigation functions and indications identical to those found on the HSI format; this excludes non-waypoint steering options and cues, the north up display option, and the aircraft heading line.
- TDC Cursor - This cursor is used for displaying information about certain trackfiles. It can also be used to select a track for IFF interrogation. The number to the left and right displays the current Mach number (left) and altitude in thousands of feet (right) for the track currently under the cursor.
- TDC Bullseye - Bearing/range in nautical miles from the A/A waypoint (bullseye) to the TDC cursor position or STEP box.
- Trackfile Information - Information about the track currently under the cursor or STEP box. From top to bottom:
- the aircraft type, which is be based off of an NCTR print or PPLI information
- for PPLI donors, the first and last letter and number of their callsign and current fuel state in thousands of pounds; for non-PPLI donors, their ground speed in knots and ground track (velocity) in degrees is instead displayed.
- bearing and range (BRA) from the aircraft to the trackfile.
- if an A/A waypoint is designated, this is the bearing and range from the A/A waypoint or "bullseye" (BE) to the trackfile.
- Current Waypoint - The current waypoint selected and its number is displayed in this form on the SA format. If an A/A waypoint is designated, it will always be displayed regardless of the currently selected waypoint. The A/A waypoint will have an arrow pointing out of it toward north.
- Declutter Options
- REJ1: Removes compass rose, ground track diamond, and SAM range rings.
- REJ2: Removes REJ1 items and the waypoint/TGT data block.
- MREJ1: Hides all SAM indications.
- MREJ2: Not yet implemented.
- Not yet implemented.
- STEP Function - The "STEP" function replaces the TDC cursor with a rectangular box, always centered around a trackfile. Around the trackfile selected is its Mach number to the left and altitude in thousands of feet. The option "steps" the STEP box through all non-friendly trackfiles based on rank. If the TDC cursor is over a trackfile, the STEP box will first step to that track; otherwise, it will step to the L&S trackfile or, if none exists, the highest ranked track. Moving the TDC will bring back the cursor, which will appear at the last location of the STEP box.
- EXP Mode - The Expand (EXP) option expands the SA format about a trackfile with a 5nm range scale. The ownship aircraft indicator is repositioned relative to it. The current aircraft heading remains the source of orientation for the SA format. If the cursor or STEP box is not over a trackfile, EXP will expand on the L&S track. If either of the former happen, it will expand on the cursored-over/STEP box trackfile. If the cursor or STEP box is not over a track and no L&S exists, the EXP option is removed. EXP is boxed as long as EXP mode is active; pressing it again leaves EXP mode.
- Countermeasures - Current chaff, flare, decoy 1, and decoy 2 count. The number represents the physical count of each while the bar is a visual representation of the percentage left, with 100% defined as the amount loaded into the aircraft before takeoff, unless said amount is none. This will show regardless of the dispenser switch position, unlike on the EW format which requires the ALE-47 to be ON and not BYPASS.
- Pilot Identification (PLID) - This option displays whenever the TDC cursor is over a trackfile or the STEP box exists. PLID allows for manual hostile, friendly, or unknown status designation of a trackfile which is not PPLI.
- SENSR Sublevel
Not shown are SAM indications. In the aircraft's database, the location of SAMs, their type, and approximate effective range can be entered (this is not based on any aircraft sensor or live source); in DCS, this is based on SAMs that are not marked hidden in the Mission Editor. The SAM will be indicated by their emitter identifier with a dashed green circle indicating their general range.
SENSR Sublevel
The sensor (SENSR) sublevel controls what sensors contribute to the displays throughout the aircraft. Selecting "SA" returns to the main format.
- Not yet implemented.
- Not yet implemented.
- F/F Contribution - Toggles trackfile information being displayed from fighter-fighter (F/F) donors.
- PPLI Contribution - Toggles trackfile information being displayed from Precise Participant Location and Identification (PPLI) donors.
- SURV Contribution - Toggles trackfile information being displayed from surveillance (SURV) donors.
- Unknown Trackfiles - Toggles display of unknown HAFU trackfiles.
- Friendly RWR Bearings - Toggles display of friendly air-to-air RWR bearings for the SA and RDR ATTK format.
- OFF: shows none.
- NO ID: shows friendly RWR bearings but without the emitter type in the triangle.
- RWR ID: shows friendly RWR bearings with both the triangle and emitter type. Note that only the priority four emitters are displayed, so friendly emitters will not always be displayed even with the option enabled.
- RWR Bearings - Toggles display of the four most priority air-to-air RWR bearings, shown in yellow as a triangle with the emitter identifier; an additional line is added to the top of the triangle for a lethal emitter and two lines for a critical. This effects the SA format itself and also the RDR ATTK with MSI enabled. This always displays hostiles and unknowns, but will also display friendly bearings based on the FRIEND setting. Unboxed will show no RWR bearings, "ALL" will will show all, "CRIT LETH" will show only critical and lethal bearings, and "CRIT" will only show critical bearings.
- Not yet implemented.
- Not yet implemented.
- FLIR Field of View - Displays where the FLIR is currently looking on the SA format in the form of a small green square, when the option is boxed. The option is crossed out when the FLIR is not set to ON.
- Not yet implemented.
Identification, Friend or Foe
Identification, Friend or Foe (IFF) is a technology equipped on most military aircraft, including the F/A-18C Hornet, allowing for one aircraft to 'interrogate' the other, and for the other to reply with a positive response; no response is termed a negative response. Attempting an interrogation with the plane's own IFF not operational is not considered a negative response. Transmitting (interrogating) and receiving is done via an IFF-capable transponder with what is called Mode 4 transponder operation. "Identification, Friend or Foe" is technically a misnomer, as IFF does not actually identify foes: a negative response does not mean inherently hostile, but simply not affirmatively friendly.
The F/A-18's IFF system, to both send interrogations and respond to them, is powered on and off by pressing the IFF button on the UFC and then pressing the ON/OFF button. An "ON" indication is displayed on the scratchpad when IFF is on.
In the F/A-18, IFF interrogations may be made on three formats: Situational Awareness, Azimuth/Elevation, and Attack Radar. The target must be in the field of view of the IFF antenna; the limits are approximately 70° left or right, 60° up, and 30° down. On any format, a manual IFF interrogation is performed by depressing the Sensor Control Switch on the stick while the TDC cursor is over the desired trackfile, while the radar is in Single Target Track, or while the SA STEP box is over the desired track. The trackfile's information, and thus its HAFU symbol will be updated according to the identification rules.
Datalink and MIDS
The F/A-18 has a "datalink" system for sharing and transmitting information with/from other aircraft on the network. This includes serving as a sensor for generating aircraft trackfiles. Datalink is transmitted over its Multifunction Information Distribution System (MIDS) radios.
The Hornet primarily uses Link-16, a modern network for transmitting data between aircraft. However, it can also connect to the less advanced Link-4 network to share some information with aircraft using Link-4. Link-16 is made up of multiple network participation groups which are sub-areas of the network dedicated to a specific function, all transmitted through the MIDS system. The F/A-18 accesses the following groups:
- Surveillance (SURV): SURV makes up trackfile information transmitted from airborne warning and control systems (AWACS).
- Fighter-to-Fighter (F/F): F/F is technically two groups, Fighter-to-Fighter 1 and Fighter-to-Fighter 2, and is the trackfile information transmitted between fighter aircraft.
- Precise Participant Location and Identification (PPLI): PPLI is position-related information shared among aircraft on the Link-16 network about a donor's own aircraft, e.g. position, callsign, and fuel state.
- Voice (VOC): Two groups, VOC A and VOC B, allowing for typical voice communication over the secure MIDS radio.
The MIDS terminal can be activated via the ON/OFF button on the UFC from the datalink (D/L) menu. Other MIDS options are not simulated.
Air-to-Air Weapons
This section will cover the employment of air-to-air weaponry in the Hornet.
Air-to-air weapons are selected via the Weapon Select Switch on the stick. They cannot be fired without the master arm switch in the ARM position. The commands of the switch are:
- Forward: AIM-7
- Aft: Gun
- Down: AIM-9
- Right: AIM-120
This HOTAS function allows for rapid selection of an A/A weapon and automatic configuration of the aircraft for an engagement, as entering A/A master mode brings up the STORES and RDR ATTK formats.
Air-to-air weapons are fired via the trigger on the stick. With missiles, a single will fire with the trigger depressed. With the gun, it will fire while the trigger is depressed.
Air-to-Air Gun
The F/A-18C is equipped with the M61A2 6-barrel machine gun, mounted in its nose. This section will cover air-to-air employment of the gun.
The gun, in A/A employment, is a very short-range weapon. The Hornet avionics is able to provide radar-assisted firing cues for maximum accuracy. In the absence of a radar lock, a static aiming mechanism is provided.
Whenever the A/A gun is selected, the radar automatically enters Air Combat Maneuvering mode and commands Gun Acquisition (GACQ), except if the radar is in Single Target Track. As such, selecting the A/A gun will interrupt a normal search mode. While the A/A gun is selected, regular search modes cannot be entered, but other ACM modes can (via the Sensor Control Switch). Commanding the radar to return to search in any other ACM mode will revert to Gun Acquisition.
Air-to-Air Gun STORES Format
When the A/A gun is selected, the STORES format will display the following.
- Wingspan Setting - Current wingspan setting in feet for the unguided gun funnel. XXX means it has not been changed and defaults to 40ft.
- Bullet Count - Current bullet count loaded in the gun.
- Round Type Selection - The gun is only loaded with one type, MK-50 or PGU-28, so this selection is simply informing the computer what type is loaded.
- Rate of Fire Selection - Low (LO) is 4,000 rounds per minute and high (HI) is 6,000.
- Wingspan UFC - This button brings up the wingspan selection option on the UFC. This allows for the wingspan of the unguided funnel to be set, in feet, between 10 and 150.
Unguided Mode
The unguided HUD display for the A/A gun displays whenever the radar is not in Single Target Track.
- Gun Funnel - Gun funnel, set to specified wingsan on the STORES format, and range indicators for firing. The top dot is calibrated to 1,000ft and the bottom is calibrated to 2,000ft. These are the points the gun rounds are calculated to land at those set distances when the gun is fired at that moment.
- Gun Boresight - Physical boresight of the gun.
- A/A Weapon Indication - "GUN" indicates the A/A gun is selected. It is crossed out when the master arm is set to safe or there is weight on wheels. Below is the current gun rounds loaded.
Not displayed is the firing evaluation display set (FEDS). These are dots on the HUD in SIM mode that represent the calculated position of real bullets fired.
Radar Guided Mode
The radar can assist in aiming the A/A gun when the target is in Single Target Track (STT). It provides the Gun Director, a "point and shoot" reticle for close range, and the Fluid Omni-Range/Rate Sight (FORESIGHT) for maximizing the effective range of the A/A gun (up to approximately 1.5 nautical miles).
- Gun Director
- Fluid Omni-Range/Rate Sight (FORESIGHT)
- Range and Closing Rate - Closing rate (Vc) in knots to the target (above) and range to the target (below). When the A/A gun is selected, the range is displayed in feet to the nearest hundred, instead of nautical miles, when below 1.0nm (starting at 6000ft).
Gun Director
The Gun Director is comprised of a circle indicating the range to the target and a reticle (dot) in the center.
- The reticle indicates where a bullet, when fired at that instant, would land at the current range to the target. Based off target parameters, it also computes the required lead angle for the bullets to land on target. In other words, using the Gun Director simply involves placing the reticle on the physical target and firing; this should result in the bullets landing on target if it does not change its current flight path.
- The larger circle forming the Gun Director provides a visualization of the range to the target. An inner circle unwinds counterclockwise as range decreases and winds clockwise as range increases. The 12, 9, 6, and 3 o'clock positions indicate 12,000, 9,000, 6,000, and 3,000ft range to the target respectively. The inner circle has an inward-pointed tick indicating the current range. The outer circle features an outward-pointed tick that indicates the gun's maximum range (Rmax).
A square occlusion zone exists around the Gun Director reticle. When the the target is within 3,000ft range, the Gun Director occludes (obscures) the L&S TD box to allow for an unobstructed view of the physical target.
FORESIGHT
The Fluid Omni-Range/Rate Sight, or "FORESIGHT," is one of two aiming methods of aiming the A/A gun in radar guided mode. The FORESIGHT is designed to provide assistance in aiming the gun at long ranges (up to about 1.5nm). The FORESIGHT assumes the target is on the same plane of motion as the aircraft - that is, heading approximately away or at it.
- 1G FORESIGHT Pipper - This is indicated by a "+". This is the lead angle required to land the bullets on a target on the same plane of motion and pulling 1.0G.
- Maneuver Potential Lines - Two lines indicating the target's potential to maneuver outside the aircraft's own plane of movement. The length of these lines, left and right, are the calculated distance the target would be able to maneuver outside the plane of movement if it were to roll 90 left or right and pull 9.0G, for the span of time it would take for a bullet fired at that moment to reach the distance to the target at that moment.
- 9G FORESIGHT Pipper - This is indicated by a "+" and always offset from the 1G pipper and indicates the lead angle required to land the bullets on a target on the same plane of motion pulling 9.0G. Accordingly, the imaginary lead angle indicator for a target on the same plane of motion pulling between 1.1G and 8.9G is somewhere between the 1G and 9G pippers.
BATR Cue
As long as the trigger is depressed, a "bullet at target range" (BATR) cue is displayed. This is a circle indicating where the last-fired bullet is calculated to end up at the current range to the target. In other words, if the BATR cue is over the physical target, the bullets will likely hit.
SHOOT Cue
A "SHOOT" cue is displayed above the Gun Director reticle when:
- The master arm is set to ARM
- Range is less than maximum range
- The predicted bullet miss distance is less than 20ft
Air-to-Air Missiles
The F/A-18C can carry multiple types of air-to-air missiles: the AIM-9 Sidewinder with infrared guidance, the AIM-7 Sparrow with semi-active radar guidance, and the AIM-120 AMRAAM with active radar guidance.
Launch Acceptable Region
All air-to-air missiles have four range variables relative to their effectiveness; these are known as the Launch Acceptable Region (LAR) cues.
- Raero: The maximum aerodynamic range is the maximum range the missile can be launched where it will have the aerodynamic ability to reach the target.
- Rmax: The maximum range is the farthest range the missile can be launched where it will have enough energy to reach the target.
- Rne: The no escape range is the range at which the missile will have enough energy to reach the target if it were to make a 180° turn.
- Rmin: The minimum range is the closest range at which the missile would likely be able to hit the target.
Whenever an air-to-air missile is selected, LARs are indicated on the HUD for the Launch & Steering (L&S) trackfile and on the RDR ATTK format for the L&S and the Secondary Designated Target (DT2).
SHOOT Cue
The "SHOOT cue" is an indication to the pilot that acceptable launch parameters have been met for the selected air-to-air missile. It is displayed above the L&S TD box and in the bottom center of the Attack Radar format.
For the AIM-7, although the cue is displayed outside of Single Target Track (STT), any AIM-7 launch outside of STT will result in automatic acquisition into STT.
The SHOOT cue is displayed when:
- The master arm is set to ARM
- The steering dot is within the Allowable Steering Error (ASE) circle
- Range equals Rmax or less
The SHOOT cue will flash when above parameters are met and the range is Rne or less.
HUD LAR Indications
- Maximum Aerodynamic Range (Raero) - When range is less than Raero, this is no longer displayed.
- Maximum Range (Rmax)
- No Escape Range (Rne)
- Allowable Steering Error (ASE) circle / Normalized In-Range Display (NIRD) - Placing the steering dot within this circle is what the plane considers to be an optimal launch (the ASE element). Around the circle is a thicker line with a small inward pointing line that winds counterclockwise as range decreases and clockwise as it increases; this visualizes the range from the target (the NIRD element). Only the NIRD element is displayed on the HMD. It is a "normalized" circle because the Rmax is always at the 6:00 o'clock position and Rmin at the 2:30 position; the rate of change and Rne change accordingly.
- Minimum Range (Rmin) - When below Rmin, an large X is displayed on the HUD.
- Steering Dot - The dot will flash when within 15° of the radar azimuth limit and when within 5° of the radar elevation limit. The steering dot is used with the ASE circle (see #4).
- Target Direction - The target's ground track is visually represented by this arrow. When it is pointed up, the target is moving directly away from the aircraft; when pointed down, the target is moving directly at it.
- Closure Rate - Target closure rate (Vc) in knots.
- Distance - Distance to the target in nautical miles.
RDR ATTK LAR Indications
On the Attack Radar format when there is no L&S designated and the cursor is over a trackfile, a vertical line coming through it serves as a LAR indication. When an L&S is designated, the LAR will show for the L&S and DT2 and no longer for any track under the cursor. Along the line are horizontal bars, indicating from top/farthest to bottom/closest Raero, Rmax, Rne, and Rmin (if the range is below Raero, Raero is not displayed). A fixed ASE circle is displayed for the L&S with a moving steering dot; see HUD LAR.
AIM-9 Sidewinder
The AIM-9 Sidewinder is a short-medium range, infrarotgelenkte Luft-Luft-Rakete used by the F/A-18. It comes in three variants, the L ("Lima"), the M ("Mike"), and the latest X ("X-Ray"). The AIM-9L and M are quite similar, with the M having some upgrades like reduced smoke trail and better resistance against countermeasures.
The L and M variants can lock a target up to 67° off boresight. The X variant features 90° off boresight launch capability (termed "high off boresight" or "HOBS") and improved maneuverability. The X also features different and more descriptive audio tones.
All AIM-9 variants can be loaded single onto the wingtip stations (9 and 1) and single or double on the outboard wing stations (8 and 2). Thus, the Hornet may carry a maximum of 6 AIM-9s.
AIM-9 STORES Format
The STORES format displays information about the AIM-9 when it is selected as the current A/A weapon.
- Selected Missile - A "SEL" over the individual AIM-9 indicates it is the one in sequence and will be the one to fire when the weapon is fired. Pressing down on the Weapon Select Switch will cycle through all AIM-9 stations. When selecting a station with dual AIM-9s, "SEL L" and "SEL R" will be displayed to indicate the left or right missile.
- Aircraft Wingform - A visual representation of all stores loaded on the aircraft.
- AIM-9 Indication - "9" indicates an AIM-9 and the letter after indicates the variant. The missile symbol below/above the text indicates what station the AIM-9 is loaded onto.
Standalone Employment
- A/A Weapon Indication - The "9" indicates the AIM-9 is selected. The proceeding letter indicates the type selected (L, M, X). This is crossed out when the master arm is set to SAFE.
- A/A Weapon Quantity - The amount of AIM-9s currently onboard. If multiple types are loaded, it is the total number for all types.
- AIM-9 Seeker Indication - This circle shows where the seeker is currently pointing. On the HMD, the circle is shown significantly larger except when uncaged onto a target.
The AIM-9 can be employed by itself when there is no Launch & Steering trackfile designated. When the HMD is looking at the HUD (or is off), the AIM-9 seeker is slaved to the aircraft boresight. When the HMD is looking elsewhere, it is slaved to the center of the HMD.
Audio tones are provided to give information on what the seeker sees. When the seeker sees a target and can track it, it will track and engage that target when fired.
The seeker can also be commanded to "lock" onto a target, which will make the seeker always follow the target instead of the HUD/HMD. This is termed "uncaging" the seeker and is toggled via the Cage/Uncage button on the throttle. Note uncaging is only for ease of use and not required for the seeker to be fired on and track a target. The seeker can only be uncaged when it currently sees a target.
Radar Slaved Employment
When the radar has a Launch & Steering (L&S) trackfile designated, the AIM-9 seeker will be slaved to and uncage onto the line of sight to the L&S track; however, if there is no longer an L&S, the seeker will re-cage. Although the AIM-9 is not radar-guided in its tracking, Launch Acceptable Region indications are shown as with all A/A missiles so as to provide the pilot additional information.
Audio Tones
- AIM-9L/M
- Low Growl: Seeker is searching.
- Loud Growl: Seeker sees an infrared contrasting target.
- Steady Tone: Seeker is uncaged.
- AIM-9X
- Static: Seeker is searching.
- Double Beep: Seeker has been moved past 27.5° off boresight while searching.
- Repeating Beep: Seeker sees infrared contrast, but not enough to reliably track (i.e. the seeker is too far from the source).
- Steady Tone: Seeker sees an infrared contrasting target.
- Steady High Pitch Tone: Seeker is uncaged.
- Steady Higher Pitch Tone: Seeker is uncaged and is more than 27.5° off boresight.
Seeker Cooling
For the AIM-9's infrared seeker to correctly function, it must be physically cooled in temperature. This is done by a coolant fluid in the missile, which lasts for 3 hours.
When the master arm is set to ARM, weight is off wheels, and the AIM-9 is selected, the coolant will automatically be released onto the seeker head. The coolant can be manually released by setting the IR coolant switch to the right of the right DDI to the normal (NORM) position, which will release it whenever there is not weight on wheels. The ORIDE position will manually release it even on the ground.
AIM-7 Sparrow
The AIM-7 Sparrow is a medium-long range semi active homing radar-guided air-to-air missile employed by the F/A-18C Hornet. 'Semi active' means that it requires the airplane's radar to lock on and reflect radar waves off the target using pulse-Doppler illumination (PDI), as it does not have its own independent radar, but rather a seekerhead that detects the PDI.
The AIM-7 has two variants, the L, the M, and the MH. The M is simply an upgraded version of the L with improvements like better electronic countermeasure resistance and low altitude performance. The MH has further improvements. The M and MH display identically in the aircraft software.
The AIM-7 may be loaded single on the body stations (6 and 4), the inboard wing stations (7 and 3), and the outboard wing stations (8 and 2). Thus, the Hornet can carry up to 6 AIM-7s.
AIM-7 STORES Format
A special display on the STORES format is shown when the AIM-7 is selected.
- AIM-7 Indication - The "7" indicates an AIM-7 and the letter after indicates the variant. The missile symbol below shows which station the missile is loaded on. "SEL" indicates that station is selected and will fire next. Stations can be cycled by pressing forward on the Weapon Select Switch.
- Target Size - Allows for the selection of the size of the target (small, medium, large) for the best detonation of the missile.
- Flight Mode - Allows for selection of the flight mode. NORM commands direct flight to target. LOFT will loft the missile to a higher altitude and then come down onto the target. HELO optimizes the missile to hit a very slow-moving target like a helicopter. NORM and LOFT may be toggled with the Cage/Uncage button on the throttle.
- AIM-7 Test - Activates a test on the AIM-7 and crosses out the AIM-7 station indications. When the cross is removed, the AIM-7 has been successfully tested and is usable.
FLOOD Employment
The AIM-7 requires the target to be painted by the radar with pulse Doppler illumination (PDI) in order to guide. The PDI is generally directed very accurately at the target via Single Target Track. However, as a backup, it can guide to a target not in STT via the FLOOD mode. This mode "floods" PDI in a 12° come in front of the aircraft and the Sparrow will attempt to engage whatever is illuminated. The radar does not search during FLOOD mode. Note that there is no indication as to whether or not the missile is tracking an illuminated target in FLOOD.
FLOOD mode is activated when:
- the STT is lost after launch
- the AIM-7 is launched without an L&S or the radar cannot put the non-STT L&S in STT automatically upon launch
- the FLOOD option on the RDR ATTK format is activated while in STT with the AIM-7 selected and launched
FLOOD mode can be exited by pressing the Undesignate button.
A "FLOOD" indication will be displayed on the RDR ATTK format and on the HUD for 5 seconds, and then the straight line (SL) countdown will display on the HUD.
- FLOOD Field of View - Circle indicating the view the radar will have when it enters FLOOD mode. Note this will also show on the HMD as an indication of FLOOD mode when looking away from the HUD, but the AIM-7 seeker is always pointed to boresight and a FLOOD launch cannot be made off boresight.
- A/A Weapon Indication - The "7" indicates the AIM-7 is selected and the letter after is the variant selected. This is crossed out when the master arm is SAFE.
- Weapon Quantity - The amount of AIM-7s aboard.
- AIM-7 Launch Mode - The current launch mode of the AIM-7 (NORM, LOFT, HELO). No text is displayed to indicate NORM mode.
Guided Employment
The normal guided employment of the AIM-7 uses the radar to reflect pulse Doppler illumination (PDI) off of a target, which requires it to be in Single Target Track (STT) mode. When operating in STT with the AIM-7 selected, the radar will initiate PDI mode which is indicated in place of the PRF setting. When fired, the missile will guide onto the illuminated target, assuming it is launched within the maximum range of the seeker.
When a Launch & Steering (L&S) trackfile exists but the radar is not in STT, the radar will attempt to acquire the L&S in STT when an AIM-7 is fired. Should this fail, FLOOD mode is initiated.
Three timers are are related to the AIM-7:
- time of flight (TOF): TOF is shown before the missile is launched and is the estimated time the missile will take to hit the target if it is launched then.
- time to go (TTG): the predicted time to impact after launch or the time to reaching its Raero, whichever is sooner.
- straight line (SL): the predicted time for the missile to reach its Rmax.
AIM-7 Guided HUD Indications
When a target is locked, a time of flight (TOF)/time to go (TTG) is shown on the HUD in seconds.
When an L&S exists with the AIM-7 selected but is not in STT, "GO STT" is displayed below the L&S TD box as a prompt to initiate STT before launch.
AIM-7 Guided RDR ATTK Format
When the AIM-7 is selected and a target is in an STT, the following unique information is shown on the RDR ATTK format.
- Fly-out Symbol - Visualization of the missile after launch, termed the "fly-out symbol." This is calculated by the aircraft mission computer and is not based on information from the missile itself and so may be inaccurate. The fly-out symbol is always positioned horizontally in line with the target; it only indicates distance, not its exact place in space. Below is its TTG or "LOST" if the STT is lost.
- Next Missile TOF Time of flight (TOF) for the next missile that can be launched.
- Maximum Aspect Cue - This is a value between 0 and 18 indicating the amount of degrees (in tenths) the target would have to turn to likely defeat the missile; for example, if the number is 18, the target would have to turn 180° to defeat it.
- Seeker Maximum Range - A small circle which displays in LOFT mode or when the missile seeker's range is less than the range to the target and the target is between Rmax and Rmin. If fired outside of the seeker range, the missile may fail to lock onto the illuminated target once in range.
AIM-120 AMRAAM
The AIM-120 Advanced Medium Range Air-to-Air Missile (AMRAAM) is an active radar homing air-to-air missile that the F/A-18C employs. 'Active radar homing' refers to the fact it has its own radar in the nose of the missile, meaning it can guide itself to a target without guidance from the airplane. However, the AIM-120 requires guidance post-launch from the airplane's own radar until a certain point in its travel to the target; the AMRAAM's own radar is limited in range to about 10nm and so cannot guide itself at long ranges
Inherently, the AMRAAM is a partially "fire and forget" missile - once it acquires the target with its own radar (going "active"), maintaining the target radar trackfile is no longer necessary. Multiple AIM-120s can also be guided onto separate trackfiles at the same time (in TWS/RWS).
The AIM-120 comes in two variants: the B and the C. The C has upgraded range and tracking capability, and also has slightly smaller aerodynamic surfaces. It can be loaded single or dual on the outboard wing stations (8 and 2) and the inboard wing stations (7 and 3) and single on the body stations (6 and 4). In total, up to 10 AIM-120s can be loaded on the F/A-18.
AIM-120 STORES Format
A special STORES format is displayed when the AIM-120 is selected.
- AIM-120 Indication - The "A" indicates an AIM-120 AMRAAM and the letter after indicates the variant (B or C). The missile icon shows what station it is loaded on. "SEL" displayed when that station is selected; with dual mounted AMRAAMs, "L SEL" or "R SEL" is displayed instead to distinguish between the left or right missile. Stations can be cycled manually via Weapon Select Switch right.
- RCS Selection - Radar cross section (RCS) of the target. Selection of small, medium, and large for optimal missile homing.
- Target Size Selection - Size selection of the target for optimal missile detonation.
- Not yet implemented.
VISUAL Employment
When the radar has no designated Launch & Steering (L&S) trackfile, the AIM-120 is in "VISUAL" mode. When an L&S does exist, VISUAL mode can be manually toggled via the Cage/Uncage button on the throttle.
In VISUAL mode, the AIM-120 relies entirely on its own radar. Upon launch, the missile will immediately begin searching and engage the first target it detects. Note that the AIM-120's radar has a maximum range of about 10nm.
- A/A Weapon Indication - "A" indicates that the AIM-120 is selected. The letter after indicates the type selected. If the master arm is set to safe, this is crossed out as the missile cannot be fired.
- Weapon Quantity - Total number of AIM-120s on board.
- VISUAL Mode Indication - Displays when in VISUAL mode.
- VISUAL Field of View - Field of view of the AIM-120 seeker for VISUAL mode launch. Note this will also show on the HMD, but the missile cannot be launched off-boresight in VISUAL mode; this is just to indicate the missile is in VISUAL mode and the actual seeker FOV is only indicated on the HUD.
After firing in VISUAL mode, the straight line (SL) countdown will display.
Guided Employment
When fired not in VISUAL mode the aircraft continues to update the AIM-120 with information on the target via a datalink. Essentially, the AIM-120 is being guided by the aircraft's own radar in this phase. Once fired on the L&S, the missile will continue to be guided against trackfile even if it is no longer the L&S, as long as the trackfile is not dropped.
At a certain optimal point, or if the trackfile is lost, the AMRAAM goes "active." At this stage, the missile acquires the target with its own onboard radar and guides to it; it no longer takes any information from the launching aircraft. Note that the missile's own radar has a maximum range of about 10nm and so if the L&S is lost, the missile may not be able to acquire the target when going active. Additionally, the farther from the target the missile goes active, the higher the chance it may accidentally acquire a different target.
Three countdowns are associated with the AIM-120:
- time to active (ACT): the time from launch to the time it will go active. It displays before and during launch until the missile goes active.
- time to go (TTG): the predicted time to impact after the missile has gone active.
- straight line (SL): the predicted time until the missile reaches Raero. This is displayed during a VISUAL launch or if the STT is lost after launch before the missile goes active.
AIM-120 Guided HUD Indications
When the aircraft has an L&S in with the AIM-120 selected, the ACT/TTG/SL countdowns are shown on the HUD in seconds. If the L&S is lost, a "LOST" indication will show for 5 seconds and then the SL countdown will show.
AIM-120 Guided RDR ATTK Format
- Fly-Out Symbol - Visualization of the missile after launch, termed the "fly-out symbol." This is calculated by the aircraft mission computer and is not based on information from the missile itself and so may be inaccurate. The fly-out symbol is always positioned horizontally in line with the target; it only indicates distance, not its exact place in space. Below the symbol is the ACT is seconds before activation, an "A" after activation, or "LOST" if the trackfile is lost.
- Next Missile ACT - ACT for the next missile not launched.
- Maximum Aspect Cue - This is a value between 0 and 18 indicating the amount of degrees (in tenths) the target would have to turn to likely defeat the missile; for example, if the number is 18, the target would have to turn 180° to defeat it.
Air-to-Ground Weapons
This section will cover the employment of air-to-ground weaponry in the Hornet.
Air-to-ground weapons are employed from the A/G master mode and selected via the A/G STORES format. They cannot be released without the master arm set to ARM and the master mode being A/G; however, selection and programming is still available from the NAV master mode, although HUD indications are not shown.
The A/G gun is fired via the trigger on the stick. All other air-to-ground munitions are fired/released via the air-to-ground weapon release button on the stick.
A/G STORES Format
The STORES format, when accessed in the NAV or A/G master modes, allows for the selection of air-to-ground munitions via the airplane's Stores Management System (SMS), the element of its computer systems regarding weapons release and programming. The STORES format can be accessed via the TAC menu; it is also brought up automatically on the left DDI when the A/G master mode is entered.
- Aircraft Wingform - This is a visual representation of the aircraft looking from the rear, displaying what stores are loaded. This wingform displays both air-to-ground and air-to-air munitions in all master modes. Stations are numbered 1–9, from left to right. A diamond indicates a dual rack launcher. A number above the weapon type indicates the quantity. An "X" shape indicates an air-to-air missile.
- Gun Rounds Remaining
- Master Arm Indication - Indicates whether the master arm is set to SAFE, SAFE with SIM mode, or to ARM.
- Simulation (SIM) Mode - When the master arm is set to SAFE, the SIM option is present and may be boxed. Weapon release is inhibited, but the avionics "simulate" as if the master arm was set to ARM in various indications.
- Not yet implemented.
- Release Tone - This option transmits a tone over the COMM1 or COMM 2 when the weapons release button depressed. When the option reads "TONE", it is disabled. "TONE 1" or "TONE 2" will enable it for the COMM1 or COMM2 radio. This option is only available when the master arm is set to ARM.
- A/G Gun Selection - This selects the A/G gun.
- A/G Weapon Selection - This is a list of all weapon types loaded on the aircraft, of which only one can be selected at a time. This will bring up options for said weapon and allow for it to be employed. The specific station selected will be boxed. Its A/G Ready status is indicated below. A given A/G weapon remains selected until manually un-selected or if an A/A weapon is selected by entering the A/A master mode.
A/G Ready Status
Any given air-to-ground munition requires its "A/G Ready status" to be "true" to be released; whenever A/G Ready is true, the store can be released. Different weapons have different requirements for A/G Ready to become true.
The following indications appear under the selected weapon on the STORES format:
- RDY: A/G Ready status is true.
- RDY-D: A/G Ready status is true but weapon is degraded.
- STBY: Weapon in standby, A/G Ready is false.
- BIT: Weapon undergoing built in test (BIT), A/G Ready is false.
- FAIL: Weapon BIT failed, A/G Ready is false.
- No indication: A/G Ready is false.
The following are universal requirements for A/G Ready status to be true:
- Weapon Selected - The weapon must be selected (boxed) on the STORES format.
- Master Arm set to ARM - The master arm must be set to ARM.
- Master Mode A/G - A/G Ready status requires the aircraft to be in A/G master mode. Note that weapons can still be selected and programmed in NAV.
| A/G Ready Conditions | |
|---|---|
| Weapon | Conditions |
| Conventional/Laser-Guided Bombs |
|
| AGM-65F Maverick |
|
| AGM-65E Maverick |
|
| AGM-88C HARM |
|
| AGM-84D Harpoon |
|
Conditions are in addition to basic conditions listed above. Weapons that only require the basic A/G Ready criteria are not listed.
A/G TGT
For usage with various air-to-ground munitions, a single place in 3D space can be designated; this is called the A/G Target (TGT). It can be seen on the HMD (not yet implemented) and HUD as a diamond, with a circle in the center if the TDC is assigned to the HUD.
On the HUD, "TGT" and a horizontal distance in nautical miles from the target is always displayed when a TGT is designated. A diamond on the heading tape indicates bearing to the TGT. If it is off the field of view of the HUD, an arrow points to the TGT with a number indicating the degrees off it is, except if it is farther than 90°.
The TGT can be designated by various sensors like the targeting pod or the A/G radar, or can be coincided with a waypoint via the HSI/SA formats. Said sensors' own sections will cover their ability to designate a TGT.
The TGT is undesignated via the Undesignate button on the stick when the TDC is assigned to the HUD or any format that can create a TGT point.
Note that while it can exist, the TGT HUD indications cannot be seen in the A/A master mode.
Air-to-Ground Gun
The F/A-18C's M61A2 gun can be used as an air-to-ground weapon. The A/G gun provides computer-assisted aiming for precise employment, and can also be selected simultaneously with most other A/G munitions but with limited aiming symbology.
Gun STORES Format
When the gun is selected (and not along with another A/G munition), these options will display on the STORES format.
- Mode Selection
- MAN Reticle Depression - Currently selected MAN reticle depression in milliradians (shown when MAN mode is selected).
- UFC - Brings up the UFC option to enter the MAN reticle depression in milliradians (shown when MAN mode is selected).
- Round Type Selection - The gun is only loaded with one type, MK-50 or PGU-28, so this selection is simply informing the computer what type is loaded.
- Rate of Fire Selection - Low (LO) is 4,000 rounds per minute and high (HI) is 6,000.
CCIP Mode
Continuously computed impact point (CCIP) mode calculates where the gun rounds will impact on the ground.
- CCIP Reticle - When the IN RNG cue is displayed, the center dot indicates where the gun rounds will impact the ground. An inward-pointing line unwinds around the reticle when the reticle is pointing at maximum 23,000ft away from a point on the ground. From 23,000ft to 0ft, the line will unwind nearly twice as each tick mark indicates 1,000ft (and there are 12 marks); when less than 12,000ft range, the circle itself will begin unwinding with the line. An outward-pointing thick tick mark will indicate the maximum range for the "IN RNG" cue.
- IN RNG Cue - "IN RNG" indicates the gun is in range for effective employment and the center dot in the reticle accurately represents where the bullets will impact when fired at that moment.
- Pull Up Cue - When this cue is above the velocity vector, an "X" will flash on the HUD. When the cue is above the velocity vector, this indicates weapon release is likely unsafe (not being able to pull away from the ground, shrapnel, or bullet ricochet).
- Mode Indication
- Gun and Rounds Indication - Indicates the gun is selected and the current rounds remaining.
MAN Mode
Manual (MAN) mode provides a constant reticle for aiming. By default, it is centered on the aircraft boresight, but may be depressed below in single milliradians ("mils").
- MAN Gun Reticle
- Pull-Up Cue - When this cue is above the velocity vector, an "X" will flash on the HUD. When the cue is above the velocity vector, this indicates weapon release is likely unsafe (not being able to pull away from the ground, shrapnel, or bullet ricochet).
- True Airspeed - The aircraft true airspeed in knots is displayed here for manual calculation.
- Mode and Reticle Indication - Indicates MAN mode and the reticle depression setting in mils.
- Gun and Rounds Indication - Indicates the gun is selected and rounds remaining.
Simultaneous Employment
When selected after another A/G munition is selected first, a "+" sign on the HUD is displayed to indicate the gun boresight and it can be fired, but no other gun-related symbology is shown. An exception applies to the AGM-65 Maverick, which will allow for full symbology of the last selected gun mode (MAN or CCIP) to be displayed with both the Maverick and gun selected. The gun cannot be selected simultaneously with the HARM, Harpoon, or JDAM/JSOW.
Rockets
The F/A-18 can carry air-to-ground rockets, which are small, unguided, momentarily-self propelled projectile explosive munitions launched from a pod of multiple. It can use the 5-inch Zuni Folding-Fin Aircraft Rocket (FFAR) Mk. 71 and the 2.75-inch Hydra 70 Mk. 151 rockets. Both can be single or dual mounted on stations 8, 7, 3, and 2. The Zuni is launched from the LAU-10 pod with 4 per and the Hydra 70 is launched from the LAU-68 with 7 per or the LAU-61 with 19 per. The Zuni FFAR has a 10lbs warhead and is specialized in penetration. The Hydra 70 has an 8lbs warhead with fragmentation.
The rockets can also be set by the ground crew (via the DCS Mission Editor) to single or ripple. In single mode, a single rocket is released from the pod per shot. In ripple, all rockets are released from the pod per shot, except the Zuni rockets will release half.
| SMS Designations | |
|---|---|
| Type | SMS Designation |
| Hydra 70 on LAU-61 in Single | |
| Hydra 70 on LAU-61 in Ripple | |
| Hydra 70 on LAU-68 in Single | |
| Hydra 70 on LAU-68 in Ripple | |
| Zuni FFAR on LAU-10 in Single | |
| Zuni FFAR on LAU-10 in Ripple | |
Rockets STORES Format
- Mode - Selection of either CCIP or MAN.
- Firing Mode - Selection between single (SGL) and salvo (SAL). SGL fires one rocket from the currently selected pod. SAL fires one rocket from every pod of that pod type.
- Rocket Motor The rockets simulated in DCS only use the Mk. 66 motor.
- Weapon Step - When in SGL mode, steps through the stations/pods (including individual pods on dual mounted pods).
- UFC - Brings up UFC option to enter the MAN reticle depression in mils (only shown in MAN mode).
- MAN Depression - MAN reticle depression setting in mils (only shown in MAN mode).
CCIP Mode
Continuously computed impact point (CCIP) mode calculates where the rockets will impact on the ground.
- CCIP Reticle - When the IN RNG cue is displayed, the center dot indicates where the rockets will impact the ground. An inward-pointing line unwinds around the reticle when the reticle is pointing at maximum 23,000ft away from a point on the ground. From 23,000ft to 0ft, the line will unwind nearly twice as each tick mark indicates 1,000ft (and there are 12 marks); when less than 12,000ft range, the circle itself will begin unwinding with the line. An outward-pointing thick tick mark will indicate the maximum range for the "IN RNG" cue.
- IN RNG Cue - This cue indicates that the rockets are in range for effective employment and the center dot in the reticle accurately represents where they will impact when fired at that moment; in other words, the dot is at less than maximum range.
- Mode Indication
- Rocket Indication and Quantity - Indicates a rocket is selected and the current total quantity of all rocket types on board.
MAN Mode
Manual (MAN) mode provides a constant reticle for aiming. By default, it is centered 2.5° below the aircraft boresight, but may be depressed below that in single milliradians ("mils").
- MAN Reticle
- Mode and Depression Indication - Indicates MAN mode and the depression setting in mils.
- Rocket and Quantity Indication - Indicates a rocket is selected and total rockets of all types on board remaining.
- True Airspeed - Current aircraft true airspeed, for manual calculation.
- Pull-Up Cue - When this cue is above the velocity vector, an "X" will flash on the HUD. When the cue is above the velocity vector, this indicates weapon release is likely unsafe (not being able to pull away from the ground, shrapnel, or bullet ricochet).
Konventionelle und lasergelenkte Bomben
The F/A-18 is capable of carrying the Mark 80 series of general purpose bombs as well as the Paveway series of laser-guided bombs (LGBs), which are modified Mark 80 bombs fitted with laser-tracking seekers and flight controls. Additionally, it can use the CBU-99 Cluster Bomb.
The Mk-82 and -83, the CBU-99, and the GBU-12 can be mounted single or dual on stations 8, 7, 3, and 2, and the GBU-10 and -16 can be mounted single on those. The Mk-82 and CBU-99 can be mounted single or dual on station 5 the Mk-83 and -84 can be mounted single on station 5.
Conventional bombs, being unguided, rely entirely on the initial trajectory at release and have no way to guide themselves onto the target; as such, their accuracy is dependent on this. Laser-guided bombs benefit from an accurate initial trajectory but still guide to the target themselves; their margin of error is rated to be 3.6ft (1.1m).
The Hornet carries the following Mark 80 series unguided bombs:
- Mk-82 (500lbs)
- Mk-82 Snake Eye (500lbs w/ drag petals)
- Mk-82 Retarded (500lbs w/ ballute)
- Mk-83 (1,000lbs)
- Mk-84 (2,000lbs)
- Mk-20 Rockeye II (cluster bomb)
- CBU-99 (cluster bomb)
The Mk-82, -83, and -84 standard variants are free-fall, unguided bomb units. The Mk-82 Snake Eye and Retarded are a high-drag versions for low-altitude employment, equipped with extendable drag flaps and a drag ballute respectively. The Mk-20 Rockeye and CBU-99 Cluster Bomb are cluster bombs, which release many small "bomblets" instead of acting as a single large bomb; both use the same anti-tank bomblets and simply use different dispensers inside (the CBU-199's is thermally protected).
The Hornet carries the following Paveway series guided bomb units (GBUs), which are laser-guided variants of the Mk-82, -83, and -84:
- GBU-12 Paveway II (500lbs)
- GBU-16 Paveway II (1,000lbs)
- GBU-10 Paveway II (2,000lbs)
- GBU-24 Paveway III (2,000lbs)
Laser-guided bombs use a laser-tracking seeker to lock onto a laser with a specific frequency. The laser may be fired from the airplane's own targeting pod, another aircraft, or a ground unit.
When selected (and in A/G master mode), the HUD displays the current mode of either CCIP, AUTO, FD, or MAN as an indication a conventional/laser-guided bomb is selected. No indication for the specific bomb type is provided on the HUD. This indication is crossed out when A/G Ready is false.
| SMS Designations | |
|---|---|
| Type | SMS Designation |
| Mk-82 | |
| Mk-82 Snake Eye | |
| Mk-82 Retarded | |
| Mk-83 | |
| Mk-84 | |
| Mk-20 Rockeye II | |
| CBU-99 Cluster Bomb | |
| GBU-12 Paveway II | |
| GBU-16 Paveway II | |
| GBU-10 Paveway II | |
Fuzing and Drag
There are various configurable fuze options for conventional and laser-guided bombs. A fuze is what instructs the bomb to actually explode. The mechanical fuze is the physical fuze on the bomb - Mark 80 series bombs employed by the Hornet only use nose fusing, and so a tail or nose and tail (N/T) fusing option will be a dud; LGBs do not use the mechanical fuzing option, so the proper setting is "off." The electronic fuze is the programmed fuzing of the bomb which activates as an effect of the mechanical fuze. Mark 80 series/LGBs can only use instantaneous (INST) or delay 1 (DLY1) electronic fuzing.
The CBU-99 Cluster Bomb and Mk-20 Rockeye II instead have variable timing (VT) and proximity (PRI) for mechanical fuzing. Variable timing releases the bomb at a specific height above the ground, while proximity fusing will release it when in close proximity to the ground. Neither use an electronic fuze.
Mk-82 Retarded and Mk-82 Snake Eye high-drag bombs, designed to be able to be launched from low altitude and travel slowly so the aircraft can get out of the fragmentation pattern that would prove dangerous in a normal bomb, have drag settings: RET (retarded) will deploy the ballute or drag petals upon release. Free fall (FF) disables this.
When either the fuzing setting is invalid or it is calculated that a release in the present flight condition would not allow enough time for the fuze to arm (i.e. the bomb won't explode on impact), a "DUD" cue is displayed on the HUD.
Bomb STORES Format
- Mode Selection
- Fuze and Drag Selection - When the variable timing fuze is selected, then a height (HT) option is prompted as well which will allow for different altitudes above the ground to be selected for cluster bomb release.
- Program Settings
- Program Selection - Bombs store 5 programs for mode, mechanical/electronic fuzing, drag, release height, quantity, multiples, and interval. These programs are universal for all bombs of the selected type.
- UFC Options
- Multiple is the amount of bombs to be released simultaneously.
- Quantity is the amount of bombs to release total (e.g. if a multiple of 2 and a quantity of 4 is selected, then 2 bombs will release simultaneously and then another 2 in accordance with the selected interval).
- Interval is the spacing on the ground in feet between bomb salvos when in CCIP/AUTO/FD mode or the interval between releases in milliseconds when in MAN mode. The weapons release button must be held until all bombs are released.
- Reticle is only shown in MAN mode and is the depression in milliradians the reticle is from the default position.
- Weapon Step - Cycles through each bomb of the selected type, including individual bombs dual-mounted on a single station.
Not shown is the laser-guided bomb code indication and option. When an LGB is selected, a CODE option is displayed to input the laser code for the individual selected bomb on the UFC.
CCIP Mode
Continuously computed impact point (CCIP) mode dynamically calculates the point where a bomb will impact when released. It is generally used with a dive bombing technique. The weapon release button will drop the bomb(s) at any point when pressed in CCIP mode.
- CCIP Impact Cross - When a bomb is released, it is calculated to impact at the point the cross is over at the moment of release. A line connects the cross to the velocity vector, which flashes each time an individual bomb is released. When the cross is outside the field of view of the HUD, a longer horizontal line is instead shown; the distance between this line and the bottom of the HUD's FOV is the distance between the bottom of the HUD's FOV and where the impact cross is in space.
- Pull-Up Cue - When this cue is above the velocity vector, an "X" will flash on the HUD. When the cue is above the velocity vector, this indicates weapon release is likely unsafe (not being able to pull away from the ground or shrapnel).
AUTO Mode
Automatic (AUTO) bombing mode calculates the optimal moment to release a bomb to land on a target. The A/G TGT is the AUTO mode's target. AUTO mode, in addition to when programmed, is entered from CCIP when there is an A/G TGT designated.
AUTO mode does not allow for release at any point; the weapon release button will release the bombs only when the time to release (REL) timer is 0 and the aircraft heading is within 20° of the azimuth steering line. Optimal accuracy requires the bombs to be released at the same moment the REL timer reaches 0. As such, the normal AUTO bombing technique is to begin holding the weapon release button down at some point before 0 REL; this will automatically release the bombs at 0 REL.
- Azimuth Steering Line (ASL) - This is a virtual line for optimal alignment with the target. The velocity vector, when centered with this line, means the aircraft is in the optimal release condition.
- Release Cue - This horizontal line falls down from the top of the ASL starting at 9 seconds to release. The release cue will meet the velocity vector when the release timer is 0; in other words, the release cue is a visualization of the final seconds of the release countdown.
- Release (REL) / Time to Impact (TTI) - These are two timer values, in seconds. REL is the time at the current parameters until release. TTI is the calculated time until the last bomb released impacts the ground.
Undesignated Symbology
When an A/G TGT is not designated, AUTO mode displays special symbology that can be used to designate an A/G TGT via the HUD. The TGT, instead of a diamond, is a segmented diamond. This AUTO designated TGT can be used for any other weapon as a normal TGT, but cannot be undesignated except with the TDC assigned to the HUD.
In undesignated AUTO mode with the TDC assigned to the HUD, a pipper displays on the HUD with a dashed line connecting it to the velocity vector - this is called the "ball and chain." The pull up cue is still displayed. The pipper is placed 7.5° below the horizon, except if the velocity vector is more than 7.5° below the horizon it will be on the velocity vector. When the weapon release button or TDC depress is pressed, an A/G TGT will be designated at the location of the pipper at that moment. The TGT can then be slewed with the TDC when TDC is assigned to the HUD. Holding TDC depress will stabilize the TGT diamond to the physical HUD glass rather than the ground itself.
If a normal designated TGT exists in AUTO, TDC depress will make it segmented and allow for slewing.
FD Mode
Not yet implemented.
MAN Mode
Manual (MAN) mode simply provides a fixed pipper. It is designed as a backup mode; a precise delivery in MAN requires manual calculation.
- Manual Reticle - By default, the reticle is placed 2.5° below the aircraft boresight; however, via the UFC option on the STORES format, it can be depressed further below in milliradians.
- Aircraft True Airspeed
- MAN Indication - This indicates MAN mode and the depression setting.
GPS-gelenkte Bomben
The F/A-18C is able to employ the Global Positioning System (GPS)-guided Joint Direct Attack Munition (JDAM) bombs and the Joint Standoff Weapon (JSOW) glide bombs. JDAMs are modified general purpose bombs, equipped with a GPS and inertial navigation system (INS) for guidance as well as flight controls. The JSOW has the same guidance and is a bomb with wings to provide lift and maneuvering flight controls. As such, it has a significantly longer range than JDAMs.
The JDAMs/JSOWs have (at optimal INS alignment) a margin of error of approximately 16ft (5m). Independent programming of each individual bomb allows for simultaneous multi-target attacks.
They consist of the GBU-38, -32, and -31 JDAMs, whose base are the Mk-82, -83, and -84 respectively, as well as the GBU-31(V), which is a JDAM variant of the BLU-109 2,000lbs penetrating bomb. The JSOW consists of the AGM-154A and AGM-154C: the A variant is a cluster bomb while the C has a penetration warhead.
All JDAM and JSOW variants except the GBU-31 and -31(V) can be mounted single or dual on stations 2, 3, 7, and 8. The GBU-31/-31(V) can be mounted single on the same stations.
| SMS Designations | |
|---|---|
| Type | SMS Designation |
| GBU-38 | |
| GBU-32 | |
| GBU-31 | |
| GBU-31(V) | |
| AGM-154A | |
| AGM-154C | |
JDAM/JSOW STORES Format
When a variant of the JDAM/JSOW is selected on the STORES format, various options are provided for the bomb. Additionally, all GPS-guided bomb variants loaded will begin Inertial Navigation System (INS) alignment. This takes approximately 3 minutes to reach best alignment; the longer it aligns prior to release, the more accurate the bomb will be. If the bomb is specifically deselected in the STORES format, power is taken away from that specific variant and the alignment is reset. However, if another A/G weapon is selected or A/A master mode is entered, without deselecting the GPS weapon itself, it will remain powered.
- Mode Selection - This toggles between Pre-Planned (PP) and Target of Opportunity (TOO) programming modes.
- Electronic Fuze - INST will explode instantaneously upon impact while variable timing (VTI) will detonate based on proximity. The EFUZ setting is displayed to the bottom right. The fuze is set for all weapons of the specific type selected.
- JDAM/JSOW ERASE - This option wipes all PP mission data and freezes it, meaning it will no longer accept data entry. Selecting the option allows for the erase to be accepted or cancelled. Selecting accept will box the ERASE JDAM/JSOW momentarily and then irreversibly erase the PP data and essentially disable the weapon as it cannot be given PP data.
- Not yet implemented.
- JDAM/JSOW DSPLY
- Weapon Step - Steps between weapons of the selected weapon type. This allows for each station to be programmed individually. When the quantity (QTY) function in the JDAM/JSOW DSPLY Format is used, only those selected stations will be cycled. This option is not available when only a single weapon is selected via QTY or only one is loaded.
- Time to Maximum Range (TMR) - This is a countdown timer in seconds (up to 99 seconds) to the time the aircraft will reach IRLAR. When the IRLAR is reached, it displays IN RNG. When within the IZLAR, it displays IN ZONE. See HSI indications.
- Alignment Countdown - A 10 minute countdown timer which stops when the selected weapon type reaches full alignment (generally this is at approximately 7:30).
- Alignment Status - 10 is the least accurate and 01 is the most accurate. The practical accuracy is also provided which correlates with the number: UNST (unstable), MARG (marginal), and GOOD.
JDAM/JSOW DSPLY Format
The JDAM and JSOW display (JDAM/JSOW DSPLY) formats are where most JDAM/JSOW options are presented for the selected weapon type. The JDAM DSPLY and JSOW DSPLY can be accessed from an option on the STORES format when the JDAM/JSOW is selected and is also available on any display from the TAC menu whenever the JDAM/JSOW is selected in the STORES format.
The JDAM/JSOW DSPLY format shares some options and indications of the STORES format when a JDAM/JSOW type is selected. It also provides many additional options.
- Station Data - From top to bottom:
- Selected station
- Selected PP or TOO mission for the station
- Station weapon type.
- On Time - A count-up timer indicating how long the weapon has been powered.
- Release Type and Quantity - This is the selected release type and the amount of bombs that have been selected with the QTY option.
- MSN Sublevel
- Release Type - This allows for the selection of the MAN, AUTO LF, or FD release types.
- Not yet implemented.
- Quantity - This allows for multiple stations to be selected for release, but will still all have their separate PP/TOO missions applied. The weapons release button is held down until all selected bombs are released. This allows for multi-target attacks with a single release of all bombs.
- Not yet implemented.
PP MSN Sublevel
Section WIP.
TOO MSN Sublevel
Target of Opportunity (TOO) mode bases the target off of the A/G TGT, allowing for another sensor to designate the JDAM/JSOW's target (e.g. the targeting pod or a waypoint). Only one TGT can exist at once, but separate profiles exist per station for TOO where an offset from the TGT scan be set, meaning a unique target per weapon can essentially exist in TOO. The TOO profiles also store separate employment options. These are edited from the TOO mission sublevel.
- TOO Missions - TOO mode allows for two missions to be defined per station, labeled TOO1 and TOO2. These have independent parameter settings unique to each station. The boxed profile is the one that will be executed by the station assigned on release; the boxing of TOO1 or TOO2 will be saved when stepping to another station. When no A/G TGT is designated, both TOO profiles are crossed out; a valid TGT designation is the only requirement for a TOO release.
- Not yet implemented.
- Not yet implemented.
- TOOUFC - Brings up UFC options for the terminal flight options for the selected TOO mission:
- HDG: True heading of the bomb before impact.
- ANG/HT: For JDAMs and the JSOW C-variant, the angle in degrees at which the bomb will impact. For the JSOW A-variant, this is the height (in feet or meters) of bomblet release.
- VEL: Velocity of the bomb in feet per minute before impact.
- Not yet implemented.
- Offset Release Point (ORP) - The ORP is the designated A/G TGT. This is the target point for the TOO mission except if offset parameters are defined.
- Offset (O/S) - Offset parameters, if any, which will be based on the ORP for the selected TOO mission.
- Terminal Parameters - Entered terminal parameters for the TOO mission.
- Return - Returns to the main JDAM/JSOW DSPLY format.
Release Types
The JDAMs/JSOWs have multiple release types which concern the method of releasing the munitions onto the target and are independent of the Pre-Planned/Target of Opportunity programming modes. A single depression of the weapons release button will release the currently stepped-to bomb; if the quantity option is used, all selected bombs will release as long as the button is held down.
Regardless of the release type, the following cues on the right side of the HUD are always displayed (when in A/G master mode):
- Time to maximum range (TMR) timer in minutes and seconds (MM:SS); this is the time to IRLAR (see HSI indications). When within maximum range, it will display IN RNG. When in the IZLAR, it will display IN ZONE. IN RNG/ZONE will flash when the aircraft is about to leave the IZ/IRLAR.
- Release mode.
- Weapon type followed by TOO/PP.
When a Pre-Planned mission is programmed with a target, the same indications are displayed as when an A/G TGT is (range, diamond superimposed on the physical target, bearing arrow, and diamond on heading tape).
Below the velocity vector, two horizontal lines form the "pull-up cue". When the velocity vector is under the pull-up cue, the bomb is likely not to have sufficient time to arm itself if released.
MAN
Manual (MAN) mode allows for the bomb(s) to be released at any time. No specific HUD indications are provided for MAN mode.
AUTO LF
Not yet implemented.
FD
Not yet implemented.
HSI JDAM/JSOW Indications
Section WIP.
AGM-65 Maverick
The Hornet is capable of firing the short-range AGM-65 Maverick air-to-ground missile. It uses two variants - the AGM-65E, which uses laser guidance, and the AGM-65F, which uses infrared guidance. Both have a range of approximately 12nm and have a 300lbs penetrating blast-fragmentation warhead.
The Maverick's seeker may lock onto a target that is farther away than the missile may physically reach. The calculated time until it can be launched is called the time to maximum range (TTMR). TTMR does not display more than 99 seconds. When the TTMR is up, the same indicating place will display "IN RNG". The TTMR/IN RNG indication requires the Maverick to be slaved to a designated TGT, as it cannot determine range alone.
The AGM-65 can be mounted single on stations 8, 7, 3, and 2.
| SMS Designations | |
|---|---|
| Type | SMS Designation |
| AGM-65E Maverick | |
| AGM-65F Maverick | |
AGM-65E
The AGM-65E uses a laser-tracking seeker to lock onto a laser of a specific frequency ("code"). It can be fired whenever it has successfully acquired a laser, either from its own airplane, another plane, or someone on the ground.
AGM-65E STORES Format
When selected on the STORES format, a "STEP" option is given to cycle the weapon stations the missiles are loaded onto and a "UFC" option, which brings up a UFC option to set the laser code - the first press will input it for all missiles, and further presses will cycle individual missiles to set separate codes if desired.
When first selected, the AGM-65E is given a 30-second test window and cannot be fired during this time. This timer can be viewed on the MAV format until it reaches 0.
MAV DSPLY Format
The Laser Maverick Display (MAV DSPLY) format is the primary means of operating the AGM-65E Maverick. It provides an indication of where the seeker is looking relative to the missile boresight. The MAV DSPLY format can be accessed by, when in the A/G master mode, selecting the AGM-65E in the STORES format again once it is already selected. Alternatively, whenever the AGM-65E is selected in the STORES format, it can be accessed on any display in the TAC menu. At the top of the MAV format is the currently loaded A/G munitions, just like the STORES page; MAV can be selected to go the STORES page.
When the missile is kept on boresight, it is "caged". When it is not, it is "uncaged". The seeker can be manually uncaged via the Cage/Uncage button on the throttle and then will automatically search from side to side for a laser. If it acquires a laser, it will lock it. It can also be uncaged and then manually slewed by depressing the TDC while slewing it with the TDC. While TDC depress is held, the seeker is ground-stabilized to wherever it is. When TDC depress is released, it will attempt to lock onto a laser underneath it. If it cannot find one, it will resume automatic search. When an A/G TGT is designated, when uncaged it will slave to that TGT and attempt to lock onto a laser on said TGT and cannot be slewed as long as the TGT is designated.
- Seeker Indication - An "X" indicating where the laser seeker is looking. This becomes a square if it is locked onto a laser. The dotted cross/circle indicates the boresight of the missile.
- -20° Indication - A horizontal line indicating 20° below gimbal. The Maverick seeker generally cannot lock beyond this and may not be able to maintain a lock if fired at this angle.
- Station and Status - Indicates the current station the missile is loaded on. Above is the A/G Ready status.
- STEP and UFC - Step and UFC option, as in the STORES format.
- Laser Codes - Station (left) and laser code for said station (right).
- Cage/Uncage and TTMR Indication - Indicates whether the missile is caged or uncaged. Above this is a TTMR/IN RNG indication when applicable.
- Fuzing Options - Instantaneous (INST) detonates the warhead immediately upon impact. Delay (DLY) 1 and 2 will detonate a set time after impact (with DLY2 longer than DLY1).
HUD Indications
On the HUD, an upside down triangle indicates where the laser seeker is looking. A crossed out "MAV" indication means the AGM-65E is selected but cannot be fired. "MAV LKD" indicates the missile is locked onto a laser (but may not be able to be fired, e.g. if the master arm is SAFE). If the Maverick is slaved to an A/G TGT, above this is a TTMR/IN RNG indication.
AGM-65F
The AGM-65F Maverick is fitted with an infrared seeker for acquiring a target with enough heat contrast to the background. It can be fired whenever locked onto a contrasting target.
AGM-65F STORES Format
The infrared Maverick, when selected on the STORES format, will provide a "STEP" option to cycle which specific Maverick will fire.
The AGM-65F requires its seeker to be cooled by releasing a fluant stored inside onto it for it to be able to see properly and cannot be operated until it is cooled. Upon first selection of it on the STORES format, cooling will be initiated. A timer counting down to operating status can be seen on the IMAV DSPLY format, which takes approximately 3 minutes.
IMAV DSPLY Format
The Infrared Maverick Display (IMAV DSPLY) format can be accessed by, when in the A/G master mode, selecting the AGM-65F in the STORES format again once it is already selected. Alternatively, whenever the AGM-65F is selected in the STORES format, it can be accessed on any display in the TAC menu. At the top of the IMAV format is the currently loaded A/G munitions, just like the STORES page; MAVF can be selected to go the STORES page.
The IMAV DSPLY format is the primary way of employing the infrared Maverick missile. It provides a video feed of the missile seeker once the seeker is cooled. The Maverick seeker is slewed by (with the TDC assigned to the IMAV DSPLY format) depressing the TDC while slewing it in any direction. When not slewed or locked but TDC depress is held down, the seeker will ground-stabilize to wherever the seeker is looking. TDC depress or the Cage/Uncage button on the throttle will "uncage" the seeker. When the seeker is caged, it will always point forward at its boresight. When uncaged, it will attempt to lock onto a contrasting target within the seeker center. If an A/G TGT is designated, the Maverick will be in slave mode, and when uncaged will be slaved to the A/G TGT and cannot be slewed as long as the A/G TGT exists. The Maverick cannot be uncaged when the master arm is set to SAFE.
- Seeker Center - There is a line pointing outward at the 12, 3, 6, and 9 o'clock positions when the Maverick is not locked but is spaced stabilized. The empty space in the center is the where the seeker will attempt to lock a target. The lines are not shown if the seeker is uncaged, not stabilized, and cannot find a target.
- Wide FOV Indication - Triangle in all 4 corners, indicating the seeker is in wide FOV mode.
- Cage/Uncage and TTMR - Indicates whether the seeker is caged or uncaged. Above is displayed, when applicable, TTMR/IN RNG.
- Station and Status - The station which the selected Maverick is on. Above is the A/G Ready status.
- Weapon Step - Weapon step function, as in the STORES format.
- Field of View Toggle - The seeker may be in "wide" FOV or "narrow" FOV. This can also be toggled via the FLIR FOV button on the throttle. FOV cannot be toggled when the Maverick is locked.
- Track Mode - In white track (WHT) mode, the lines will be green and the seeker will attempt to lock onto a hot target. In black track (BLK), the lines will be black and the seeker will attempt to lock onto a cold target.
- Ship Mode - This slightly enlarges the seeker center and optimizes it for locking onto and hitting a target on water.
- Fuzing options. Instantaneous (INST) detonates the warhead immediately upon impact. Delay (DLY) 1 and 2 will detonate a set time after impact (with DLY2 longer than DLY1).
- Seeker Position - The missile seeker position relative to its boresight. In this indication, the "X" is the seeker and the seeker center is the boresight. This is only shown when uncaged and the lines are visible.
Not shown is the slaved indication. This is a large "S" indication shown whenever the seeker is in A/G TGT slave mode.
HUD Indications
Whenever the AGM-65F is selected, the HUD will show "MAVF" and cross it out, except if it is in a condition to be fired. Above is a TTMR/IN RNG indication when applicable. An upside-down triangle indicates where the Maverick seeker is looking.
AGM-88C HARM
The AGM-88C High-Speed Anti-Radiation Missile (HARM) is an anti-radiation air-to-ground missile. Anti-radiation guidance homes in on radiowave emissions from a radar, allowing it to attack surface-to-air missile (SAM) sites. This mission type is often called suppression or destruction of enemy air defenses (SEAD/DEAD). Naturally, the HARM will not be able to guide accurately to impact if the radar source ceases emitting.
The AGM-88 can be mounted single on stations 8, 7, 2, and 3.
| SMS Designations | |
|---|---|
| Type | SMS Designation |
| AGM-88C HARM | |
HARM DSPLY Format
The HARM Display (HARM DSPLY) is the primary method of interfacing with the HARM. It can be accessed from the STORES format by selecting the HARM or in any master mode on the TAC menu whenever a HARM is loaded, even if not selected as the current weapon. The HARM is automatically selected as the current A/G weapon when the HARM DSPLY is selected from NAV or A/G master mode.
The HARM DSPLY format features the loaded A/G stores on the top, as with the STORES format; selecting "HARM" will deselect the missile and invoke the STORES format. A "STEP" option is also provided to step through each individual HARM loaded; the selected station is displayed on the format. On the left side, the desired HARM mode can be selected.
SP Mode
Self-Protect (SP) mode uses the radar warning receiver (RWR) to view and select emitters for the HARM to search for and then engage. This allows for 360° engagement; however, more kinetic energy is sacrificed to turn as the angle increases. Self-Protect is named as such because it is primarily designed for quick reaction to a threat.
SP HARM DSPLY Format
The HARM DSPLY format in Self-Protect mode provides a RESET option, which will select the highest-priority emitter.
SP RWR Indications
Self-Protect mode can be employed by any of the following RWR displays:
- Electronic Warfare (EW) format
- Standby RWR indicator
- HUD/HMD with RWR bearings displayed
On these three RWR displays, whenever the HARM and SP mode is selected, a square is placed around the selected emitter; the highest priority emitter is selected automatically. The HARM Sequence button on the throttle is used to cycle them. Note that a maximum of 6 emitters are displayed on the HUD, but the HARM will always cycle all emitters.
Once an emitter is selected, the missile can be released via the weapons release button. It will either have already acquired the selected emitter or, if it is outside the seeker field of view when mounted on the aircraft, it will maneuver to the emitter and acquire it post-launch.
TOO Mode
Target of Opportunity (TOO) uses the HARM seeker itself to view and engage emitters. Up to 15 emitters can be displayed.
In TOO mode, the HARM DSPLY format provides a boresight view of the HARM seeker. Emitters are displayed with their standard NATO codes, except no emitter category symbols are displayed like on the radar warning receiver, except the line under to denote a sea-based emitter. Friendly emitters have their code prefixed with an "F".
The selected emitter is denoted by a box on the HARM DSPLY and a square target designator (TD) box is displayed on the HUD. The HARM automatically selects the highest priority emitter. Emitters are cycled via the HARM Sequence button on the throttle. The master arm must be set to ARM.
The desired emitter to attack is "handed off" to the selected HARM missile via the Cage/Uncage button on the throttle (this toggles hand-off) with the TDC assigned to the format. "H-OFF" is indicated above the emitter on the HARM DSPLY and the HUD TD box and all other emitters are blanked from the display. Once handed off, the HARM may be fired via the weapons release button. As the hand-off is for a specific missile, it must be done again to fire sequential missiles at a single emitter.
TOO HARM DSPLY Format
- Format Field of View - "T" symbols on the four corners indicate the display limits of the format.
- Seeker Center - The "+" symbol indicates the center of the seeker.
- Emitters Outside FOV - An arrow on any of the four sides of the format indicates a seeker is detected in that direction but is presently outside the format display limits.
- Display Limit - Limits display to the 5 highest priority emitters.
- Emitter Categories Detected - Displays the emitter categories presently detected. A circle indicates an emitter of that category is in view. An up/left/right/down arrow indicates an emitter of that category is detected in said direction. Emitter category filters are also selectable. See the "class" filter option.
- Reset - Selects the highest priority emitter.
- Class Filter - Allows for only a specific class/category of emitters to be displayed.
| HARM Emitter Classes | |
|---|---|
| Class | Description |
| ALL | All classes |
| FRD | Friendly emitters |
| HOS | Hostile emitters |
| FN | Friendly naval (sea-based) emitters |
| HM | Hostile naval (sea-based) emitters |
| F1 | Old friendly radar systems |
| F2 | Modern friendly radar systems |
| H1 | Old hostile radar systems |
| H2 | Modern hostile radar systems |
| FAA | Friendly anti-aircraft artillery |
| HAA | Hostile anti-aircraft artillery |
| FS | Friendly search radar |
| HS | Hostile search radar |
| UKN | Unknown class of emitter |
| PRI | Emitter currently tracking the aircraft (priority) |
PB Mode
Not yet implemented.
AGM-84D Harpoon
The AGM-84D Harpoon is a stand-off range active radar homing anti-ship missile. The missile can be given bearing or range and bearing information, which it will then use to search for and attack a seaborne target.
The Harpoon relies entirely on an inertial navigation system (INS), radar altimeter, and radar for guidance and so requires no post-launch support from the aircraft. It is equipped with a 500lbs high-explosive penetrator warhead and is effective up to approximately 70 nautical miles.
The AGM-84D can be mounted on stations 2, 3, 7, and 8.
| SMS Designations | |
|---|---|
| Type | SMS Designation |
| AGM-84D Harpoon | |
AGM-84D STORES Format
The Harpoon missile is programmed from the STORES format. Upon being selected and powered by the SMS, the missile begins inertial alignment; a MM:SS timer counting down from 00:25 is displayed in the upper left. Once the timer reaches 0, it is removed and the Harpoon is aligned. Deselecting the Harpoon and selecting it will require it to be aligned again.
The following are the universal options present on the STORES format:
- Mode - Toggles between BOL and R/BL. An A/G TGT must exist to enter R/BL.
- Fly-out (FLT) Altitude - toggles between HIGH, MED, and LOW. This is the altitude the missile will fly at during the ingress/searching phase of flight. LOW is ~5,000ft, MED is ~15,000ft, and HIGH is ~35,000ft.
- Terminal (TERM) Altitude - toggles between SKIM and POP. This is the altitude the missile will fly at in the terminal phase of flight to ultimately impact the target. SKIM performs a very low-level approach all the way to impact. POP performs a high-G "pop-up" maneuver to impact the target from above.
- Program Selection - Cycles through 4 individual programs which include mode and all parameters. Each missile has its own independent set of 4 programs, allowing for multi-program successive launches.
- Current Program - Current program and the parameters set for it. The parameters other than MODE, FLT, TERM, and HPTP are different in BOL and R/BL.
- Station Step - Cycles through and selects each loaded Harpoon station.
- Harpoon Turnpoint (HPTP) - The HPTP is an optionally defined point to which the missile will fly before turning to the bearing specified (in either BOL or R/BL). Selecting this option makes the waypoint selected at that time the HPTP, which will be saved regardless of whether that waypoint remains selected. Deselecting the option removes the HPTP.
- IN ZONE/IN RNG/TTMR/Out of Zone Cue
- IN ZONE: displayed in BOL when no out of zone condition exists.
- IN RNG: displayed in RB/L mode when the aircraft is in range and no out of zone condition exists.
- TTMR: predicted time in seconds (to a maximum of 99) until the aircraft will reach maximum range in RB/L.
- Out of zone: one of various cues displayed in either BOL or RB/L if the aircraft meets one of these out of zone conditions:
- SRCH/DSTR: distance between BOL search point and destruct point is too small.
- DSTR RNG: BOL destruct range is greater than maximum range.
- INV TGT: R/BL TGT distance from aircraft is considered invalid (>172nm).
- ALT: aircraft altitude less than absolute minimum (generally 2,500ft above the ground).
- OFF AXIS: bearing to R/BL TGT, BOL search area, or HPTP is >90°.
- HPTP ANG: total angle at the HPTP is too large.
- A/C HPTP: aircraft is too close to the HPTP.
- TGT/HPTP: HPTP is too close to the R/BL TGT or BOL search area.
BOL Mode
Bearing-Only Launch (BOL) mode involves the missile being provided a bearing value relative to the aircraft or to an intermediate waypoint, which it will fly toward and attempt to detect a target with its radar within a defined search window. Alternatively, a Fixpoint (FXP) can be defined in BOL based on the bearing set at the time; the Harpoon's course will thus "pivot" around the FXP until launch, essentially defining a target point.
When launched in BOL mode, the Harpoon, at an altitude corresponding to the FLT option, travels either directly in the direction of the set bearing from the aircraft, directly to a Harpoon Turnpoint (HPTP) and then to the set bearing, or directly to the Fixpoint (FXP). At the defined search distance, the Harpoon will then initiate its search for a target. If it locates one, it will engage it based on the SKIM or POP terminal options. If it does not find a target before reaching the self-destruct point, it self-destructs.
BOL STORES Format
On the STORES format, two BOL-specific options are displayed:
- FXP: creates a Fixpoint (FXP) which is located halfway in distance between the search point and destruct point, based on the bearing value at that time. The course between the FXP and the aircraft then pivots around said FXP. If a HPTP exists (i.e. the option is boxed), the FXP option is removed and cannot be selected; conversely, selecting HPTP deselects FXP.
- UFC: brings up UFC options for programming BOL parameters.
- SRCH: the distance, in nautical miles, from launch to when the Harpoon will begin searching for a target. Valid value is between 0–105nm.
- DSTR: the distance, in nautical miles, the Harpoon will travel after launch before self-destructing if it does not find a target.
- BRG: the bearing, in degrees, the Harpoon will travel, if no Harpoon Turnpoint (HPTP) exists, at launch from the aircraft, or if a HPTP does exist, the bearing it will travel from the HPTP.
BOL HSI Indications
With the Harpoon missile selected and BOL mode active, the following indications are shown to visualize the Harpoon's path of travel.
- Harpoon Turnpoint (HPTP), if one exists; the dot in the center is removed if the currently selected waypoint is not the HPTP waypoint. If an HPTP ANG condition exists, an "L" shape is drawn indicating the minimum required angle to remove the HPTP ANG condition.
- Line, shorter than the Rmax line, indicating where the Harpoon will begin its search.
- Line, larger than the search line, indicating the maximum range, or Rmax, of the Harpoon based on current flight parameters. This is only shown when Rmax is equal to less than the destruction range.
- "X" shape indicating the point at which the Harpoon will self-destruct.
It should be noted there is no HSI indication for the Fixpoint (FXP). A courseline is drawn:
- if no HPTP or FXP exists, between the aircraft and the selected bearing
- if a FXP exists, between the aircraft and through the FXP
- if a HPTP exists, from the aircraft to the HPTP, and then another is drawn from the HPTP to the selected bearing.
If an OFF AXIS or HPTP ANG condition exists, the relevant courseline is dashed.
R/BL Mode
Range and Bearing Launch (R/BL) uses an A/G Target (TGT) designation to provide both range and bearing information to the Harpoon. This mode does not command the Harpoon to detonate on the TGT, but rather to begin searching for a suitable target near the TGT designation and then engage it. The altitude of the TGT designation is not relevant.
Upon launching the Harpoon in R/BL, it will travel, at an altitude corresponding to the FLT mode programmed, directly to, or first to a Harpoon Turnpoint (HPTP) and then directly to, the designated TGT point. The missile then begins searching a set programmed distance before the TGT. If it locates a target, it will engage it based on the SKIM or POP terminal modes.
R/BL STORES Format
One unique option is displayed on the STORES format for Range and Bearing Launch mode: "SEEK". This is the distance before the TGT point it will begin searching; a farther distance results in a larger search area:
- SML: 5.4 nautical miles
- MED: 10.8 nautical miles
- LRG: 16.2 nautical miles
R/BL HSI Indications
The HSI format provides a courseline from the aircraft, if no Harpoon Turnpoint (HPTP) exists, directly to the TGT. If a HPTP exists, it leads directly to the HPTP, and then another line leads from the HPTP to the TGT.
If the aircraft is beyond the maximum range, then the line will still point from the aircraft to the TGT or HPTP, but will end at the maximum range point rather than end at the aircraft symbol.
If a HPTP ANG condition exists, the courseline to the HPTP is dashed and an "L" shape on the HPTP indicates the minimum acceptable angle. If an OFF AXIS condition exists, the appropriate courseline is dashed.
AGM-84D HUD Indications
With the HPD selected and the A/G master mode engaged, the HUD provides the following indications from top to bottom:
- IN ZONE/IN RNG/TTMR/out of zone cue. This is identical to the indication shown on the STORES format.
- "HPD" and the selected mode, e.g. "HPD BOL".
AGM-62 ER/DL Walleye II
The AGM-62 ER/DL Walleye II (Extended Range/Datalink) is a television (TV)-guided command guidance/datalink-capable glide bomb. It has four fins for maneuvering, powered by a turbine at the back. The Walleye has a 2,000lbs warhead and has a ~20nm range.
The Walleye can be paired with the AWW-13 Data Link Pod to receive a live feed of the missile seeker after it is released and also to provide post-launch control if desired. Additionally, the pod allows for the bomb to be released without a valid lock on a TV-contrasting target.
The AGM-62 can be mounted on stations 8 and 2.
| SMS Designations | |
|---|---|
| Type | SMS Designations |
| AGM-62 ER/DL Walleye II | |
| AWW-13 Data Link Pod | |
AGM-62 STORES Format
A 'STEP' option is provided on the STORES format for the AGM-62 to cycle through available stations. No other options are provided.
WEDL DSPLY Format
- Selected Station and A/G Ready - The selected station is displayed here. When A/G Ready is true, 'RDY' is displayed above.
- Fuze - Toggles between instantaneous upon impact or delayed fuzing options.
- STEP - The STEP option is provided identical to the one on the STORES format.
- Cage Indication - Indicates whether the seeker is caged or uncaged, toggled via the Cage/Uncage button.
- Caging Retention and Boresight (CRAB) - Pressing and holding this option cages the seeker.
- Crosshairs - Aiming crosshairs are provided part of the raw video feed. The center of the crosshairs is where the seeker will attempt to lock a contrasting target.
- MAP - The Missile Axis Position square indicates the position of the seekerhead relative to the missile boresight. This allows for a visualization of where the seeker is looking relative to the aircraft boresight when the bomb is on the aircraft.
The Walleye Display (WEDL DSPLY) allows for standalone employment of the Walleye bomb. It is accessed by selecting the Walleye on the STORES format again after already selecting it. A/G master mode is required.
The Walleye Display format provides a feed from the missile seeker (when it is on the aircraft) for targeting. The Walleye is operated by "uncaging" the seeker with the Cage/Uncage button, i.e. allowing for it to be moved off boresight, and then slewing it by depressing the TDC while slewing. As long as the TDC is depressed, the seeker is space-stabilized. When the center of the seeker is brought onto a television-contrasting target and TDC depress is released, the seeker will stabilize onto that contrasting target and guide to that target if release. The Walleye, when not operated from the AWW-13 pod, requires a contrasting target to be acquired for A/G Ready to be true (i.e. for the bomb to be released).
DL13 Walleye Format
Section WIP.
Resources
Manuals & Documents
- NATOPS Flight Manual
- Startup Checklist
- I Read the Manual So You Don't Have To By MustardCosaNostra
- F/A-18C Hornet | Armament Matrix by Twisted-Biscuit
- SkillSawTheSecond's HOTAS Setup: Thrustmaster Warthog
- Official Feature List
- Chuck's Guides - DCS F/A-18C Hornet by Chuck_Owl
Wags' Tutorial Videos
YouTube tutorial videos by Wags, the senior producer for DCS:
- Introduction
- Cockpit Tour
- Preflight, Startup, Taxi, and Takeoff
- HUD, UFC and IFEI
- ADF and TACAN Navigation
- VFR Airfield Landing
- Waypoint Navigation
- Rockets and AG Gun
- CASE I Carrier Landing
- Air-to-Air Gun
- AIM-9 Sidewinders
- Unguided Bombs
- AIM-7 Sparrow Air-to-Air Missile
- Auto to CCIP Bombing
- Case III Carrier Recovery
- Flight Performance Advisory System
- Laser Maverick
Other Tutorials
- DCS F/A-18C Hornet Countermeasures Tutorial by RedKite
- DCS F/A-18C Manual Waypoints Quick Guide by RedKite
- Carrier Lights Tutorial
Abkürzunen mit Übersetzung
| Abkürzungen | ||
|---|---|---|
| Abkürzung | Bedeutung | Übersetzung |
| ACM | Air Combat Maneuvering | Luftkampf |
| AGM | Air-to-Ground Missile | Luft-Boden-Rakete |
| AIL | Aileron | Querruder |
| AMPCD | Advanced Multi-Purpose Color Display | Verbessertes Mehrzweck-Farbdisplay (unterer Bildschirm im Cockpit |
| AOA | Angle-of-Attack | Anstellwinkel |
| ATC | Automatic Throttle Control | Automatische Schubregelung |
| DDI | Digital Data Indicator | Digitale Datenanzeige (Bildschirm links/rechts im Cockpit) |
| DT2 | Designated Target 2 | Sekundär ausgewähltes Ziel (Radarkontakt) |
| FBW | Fly-by-Wire | Digitale Flugsteuerung |
| FCS | Flight Control System | Flugsteuerungssytem / Flugregler |
| FLIR | Forward-looking Infrared | Nach vorne schauendes Infrarotsichtgerät |
| HARM | ||
| HMD | helmet-mounted display | Helmvisier |
| HOTAS | hands on throttle and stick | Hände am Schubhebel und Steuerknüppel |
| HUD | Head's up display | |
| IAS | Indicated Air Speed | Angezeigte Fluggeschwindigkeit |
| IFF | Identify friend or foe | Freund-/Feinderkennung |
| LEF | Leading Edge Flaps | Vorflügel |
| NWS | nosewheel steering | Bugradlenkung |
| RAID | ||
| RUD | Rudders | Seitenruder |
| SCS | Sensor Control Switch | Sensor-Steuerschalter |
| STAB | Stabilators | kombiniertes Höhen- und Querruder |
| STT | Single Target Track | Einzelzielaufschaltung |
| TEF | Trailing Edge Flaps | (Lande-)Klappen |
| TWS | ||
| USMC | US Marine Corps | US Marine Spezialkräfte |


